🕷️ DIY Giant Rolling Spider: Build a Creepy Halloween Monster on a Budget
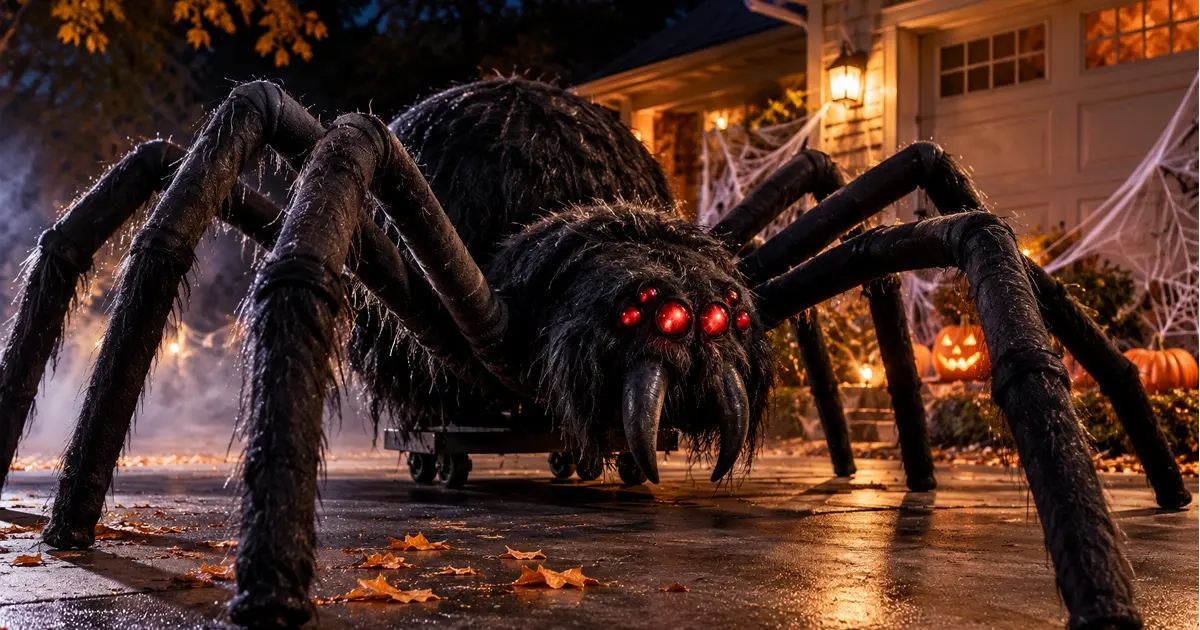
🕷️ Something Big Is Crawling Your Way
A DIY giant rolling spider does not need an expensive animatronic kit. It does not need a professional budget either. Homemade giant spiders have gone viral online more than once. One famous build even showed a homeowner sewing and painting an entire oversized spider by hand. Ordinary materials, shaped the right way, can create a genuinely convincing Halloween creature. A rolling base is the real secret behind that effect. It lets the spider move across a driveway instead of sitting frozen in one spot all night.
Size and silhouette do most of the frightening work here. From across the street, a DIY giant rolling spider only needs to read clearly as a spider. It does not need to survive close inspection up close. Eight long, bent legs create that instantly recognizable shape. A large dark body hides the rolling platform underneath completely. The whole creature appears to float just above the ground as it moves. Slow, deliberate motion sells the illusion that something is genuinely alive.
None of this requires expensive materials or advanced carpentry skills. A few carefully placed details make inexpensive supplies look far more convincing than their cost suggests. Sharp leg joints, glowing eyes, and a textured body all help sell the illusion. This guide builds a sturdier version of the classic homemade giant spider. It also builds a version that packs down and stores easily each year.
Find other Easy DIY Costume Ideas Here
🧰 Step 1: Gather Your Spider Building Materials
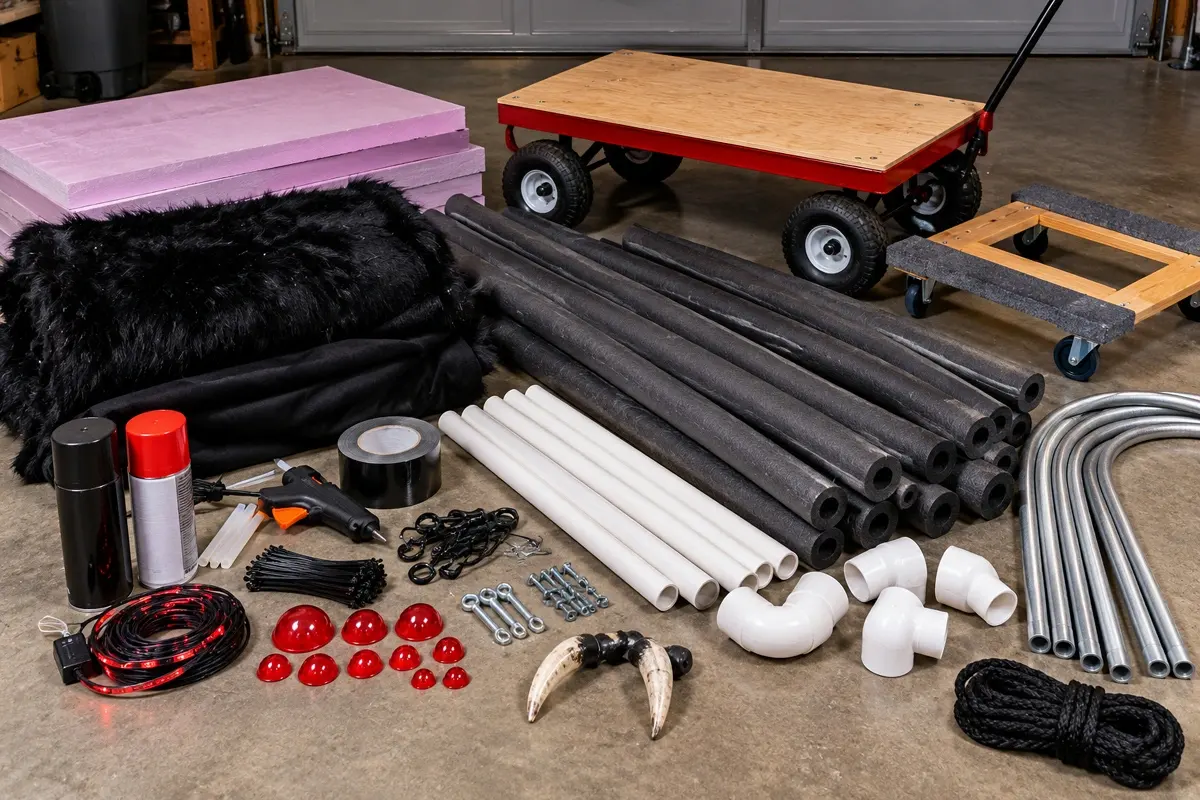
Start with foam pipe insulation tubes for the outer leg covering. They are lightweight and easy to shape by hand with scissors. For the actual leg skeleton, skip plain wire entirely. Thin electrical conduit or lightweight PVC pipe holds a bent shape far longer. Wire alone tends to sag within a single season outdoors. Black fabric, fleece, or inexpensive faux fur will cover the finished body. That fabric also hides the frame hiding underneath it.
An old wagon makes a great base for this project. A low rolling furniture dolly works just as well instead. Both already roll smoothly and support real weight without trouble. Lightweight foam board or sturdy cardboard builds the rounded body shape. Zip ties, duct tape, and a strong adhesive hold everything together securely. Black spray paint covers any exposed wood, wire, or pipe underneath.
For the finishing touches, grab red or reflective plastic eyes first. Battery powered LED rope light or EL wire works well for the legs. A length of sturdy rope handles pulling the finished spider across the ground. Most of these materials come from a hardware store or a craft store. Many households already have some of these supplies sitting in a garage. Gathering everything up front keeps the actual build of the DIY giant rolling spider moving quickly once work begins.
🛞 Step 2: Build the Rolling Spider Base
Choose a wagon or a low furniture dolly that rolls smoothly. Push it across pavement first, completely empty, to test the wheels. Check that nothing catches, sticks, or wobbles under light pressure. A shaky or uneven base will only cause problems later. Those problems get worse once the full spider sits on top.
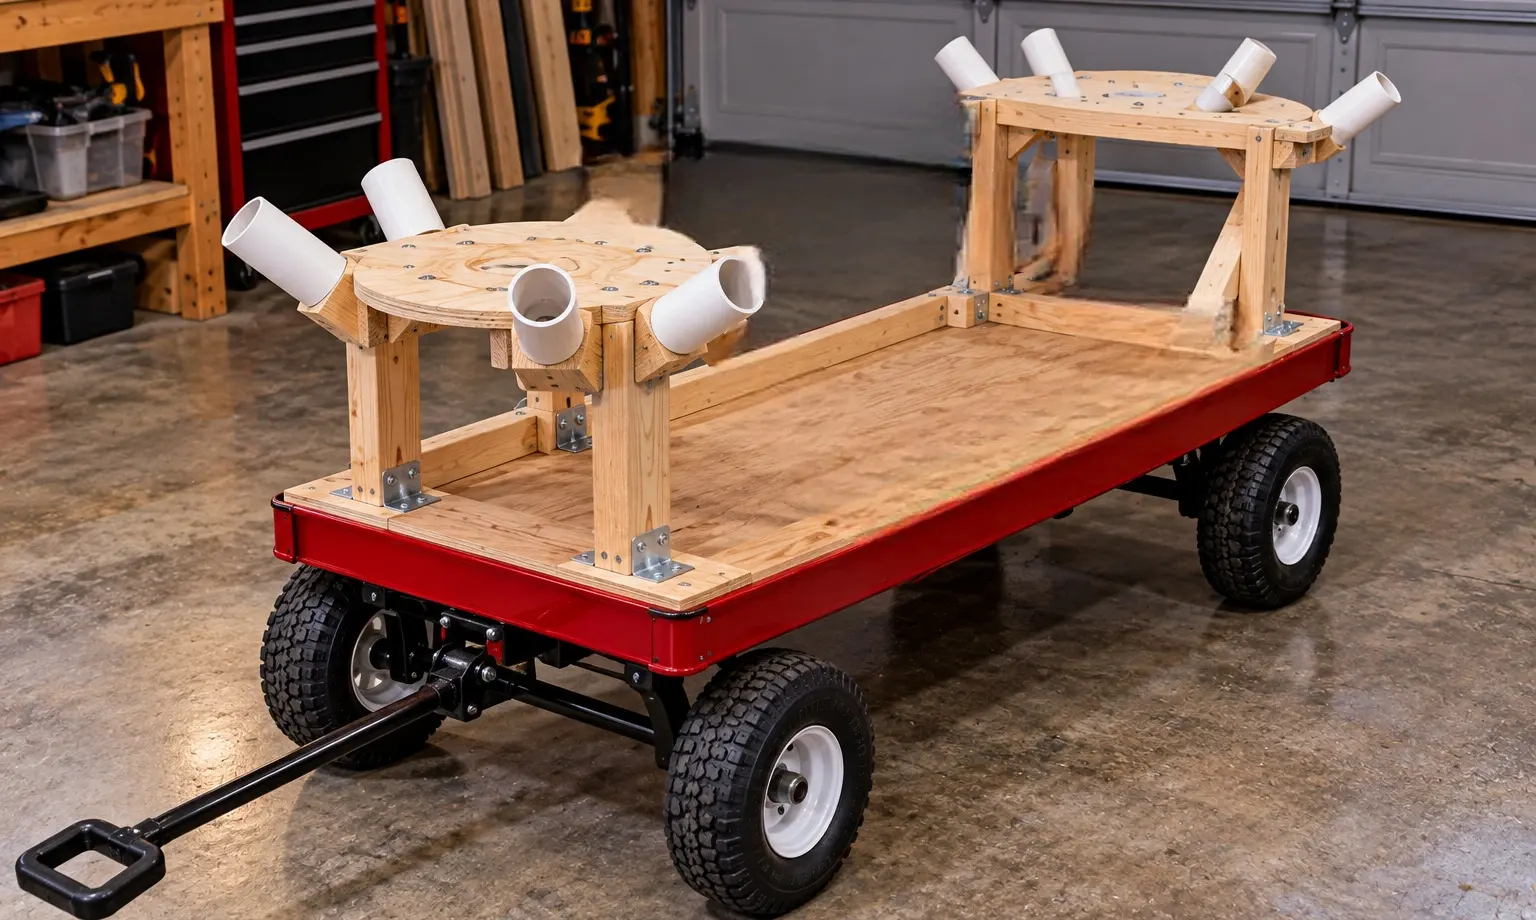
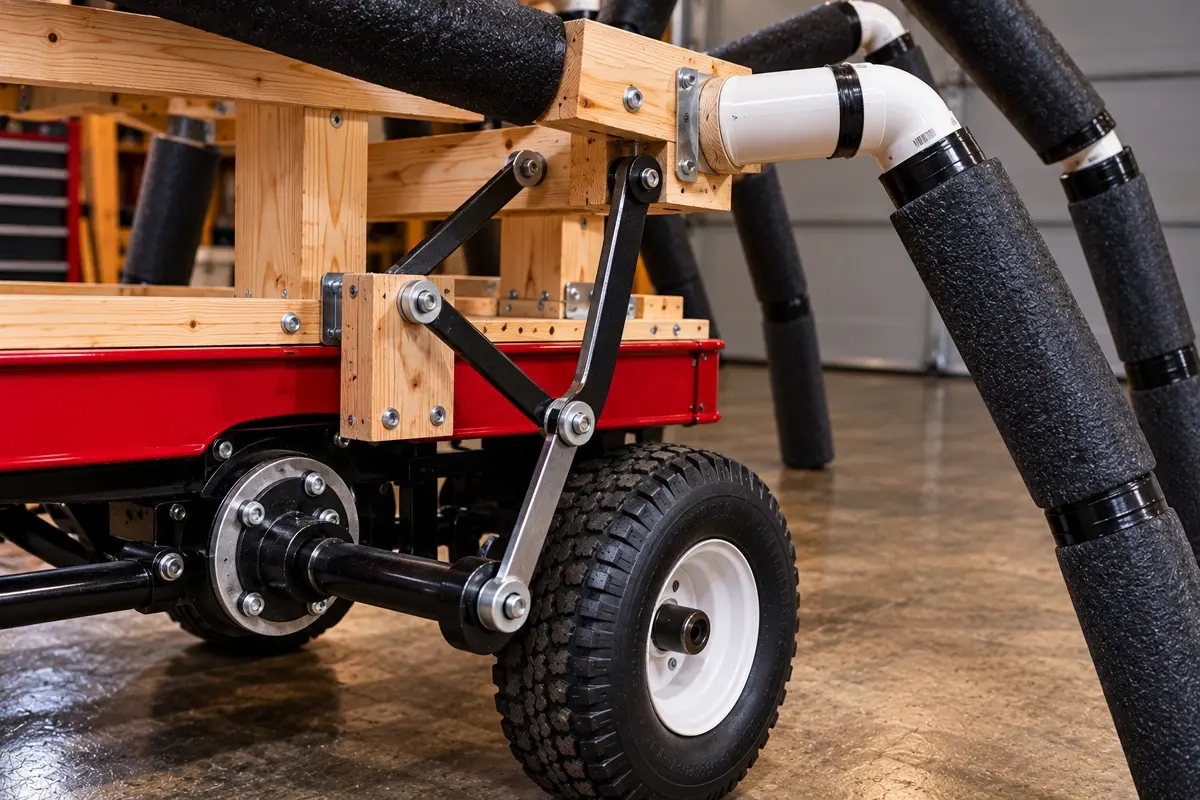
Build a simple lightweight frame above the rolling platform next. Wood strips or spare conduit both work well for this frame. That frame gives the body something secure to attach to later. Position the frame so the wheels stay completely hidden underneath. Leave enough ground clearance for smooth rolling over a driveway. Decide now exactly where the pulling rope will attach. That spot needs to stay both reachable and genuinely strong. A solid rolling base is the single most important part of a DIY giant rolling spider. Every other step depends on it staying stable.
🕸️ Step 3: Create the Giant Spider’s Body
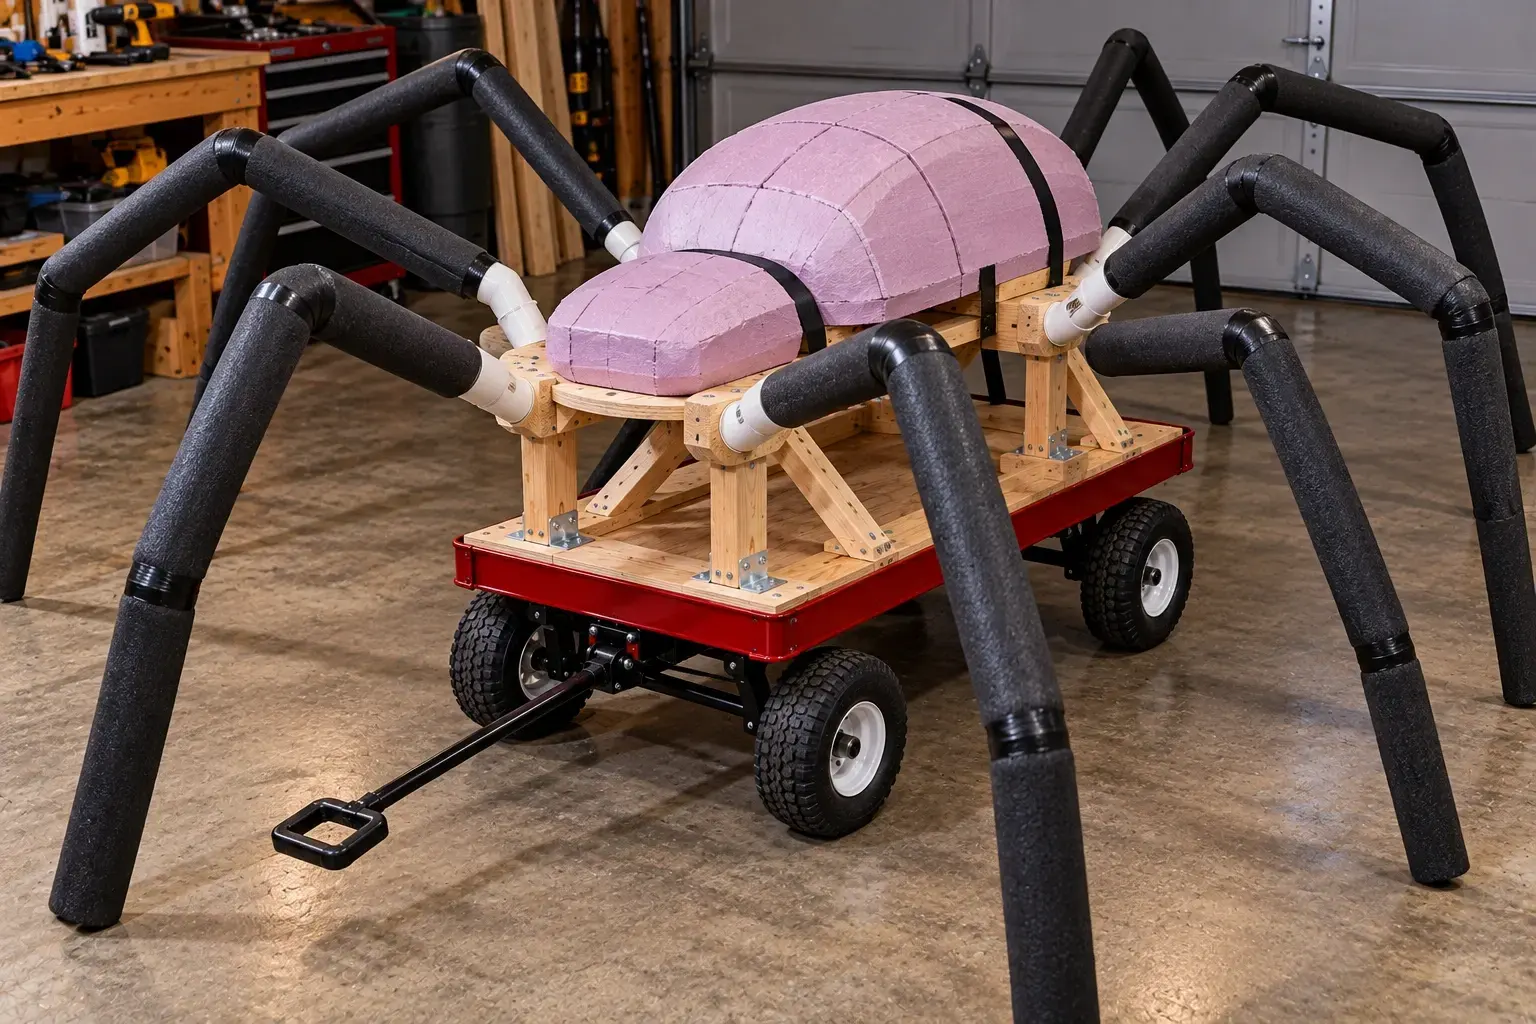
Form a large rounded abdomen from lightweight foam board or cardboard. Bend and shape the material until it feels roughly spider shaped. Build a smaller front section next for the head and thorax. That front section should sit slightly raised and forward of the body. Attach both pieces securely to the frame built earlier. Screws, strong adhesive, or zip ties through drilled holes all work well.
Cover the entire body with black fabric or faux fur next. Pull the material snug and secure the edges underneath where they hide. Add a few uneven bumps and folds rather than a perfectly round shape. Real spiders are lumpy and irregular, not smooth or symmetrical at all. That small imperfection is exactly what sells the finished illusion. Keep the body as light as possible throughout this whole step.
Every added pound makes rolling and pulling noticeably harder later on. A heavier body also raises the center of gravity. That makes a DIY giant rolling spider more likely to tip on uneven pavement. Weighting the base low, rather than the body up top, keeps everything far more stable once the legs are attached.
🦵 Step 4: Make Eight Long, Creepy Spider Legs
Cut thin metal conduit or lightweight PVC pipe to the desired leg lengths. Give each leg at least one sharp bend partway along its length. That bend mimics a real spider joint convincingly from a distance. Slide foam pipe insulation over each finished section of pipe. This softens the appearance and adds believable thickness to every leg. The combination holds its shape far longer than wire alone.
Creating those sharp bends takes a little planning. For PVC pipe, matching elbow fittings are the simplest option. Cut the pipe where the joint should go, then connect the sections using a forty-five-degree or ninety-degree PVC elbow. Secure the fittings with PVC cement according to the manufacturer’s directions. For metal conduit, use a conduit bender designed for the pipe’s size and type. This creates a smooth, permanent bend without additional fittings.
If you prefer bending PVC without fittings, a heat gun can soften the pipe enough to shape it. Work outdoors or in a well-ventilated area, follow the manufacturer’s heating instructions, and avoid overheating or scorching the plastic. Bend the softened pipe gradually and hold it in position until it cools. Never force cold PVC into a sharp bend. It can crack or snap under pressure. For most DIY builders, elbow fittings are easier, safer, and more predictable.
Build four legs for each side of the spider’s body. Attach them to a sturdy central support rather than fastening them directly to the lightweight body covering. A reinforced plywood frame or wooden cross with angled mounting sockets works well. Position the sockets so the legs spread outward naturally. Make the sockets deep enough to support the legs without excessive wobbling.
For easier storage, make the legs removable. Slide each leg into its mounting socket and secure it with a removable bolt or locking pin. This prevents the legs from slipping out while the spider rolls across the driveway. When Halloween ends, simply remove the pins and pull the legs free. Your DIY giant rolling spider can then be stored without taking up half the garage.
Arrange all eight legs at slightly different angles for a more natural appearance. Avoid making every pair perfectly symmetrical. Real spiders have an uneven, creeping silhouette, and that is exactly the look you want. Keep the leg tips high enough to clear the ground while the spider moves. Test the entire assembly by slowly rolling the base forward and turning it in both directions. Nothing should drag, catch, or interfere with the wheels.
Finally, cover any visible joints and mounting hardware with black fabric or strips of faux fur. The goal is to make those ordinary pieces of pipe look like the enormous legs of a living creature. Once the body and legs are covered, your giant spider should look frightening even before it starts moving.
👁️ Step 5: Add Eyes, Fangs, and Finishing Details
Position a cluster of eyes near the front of the head. Real spiders often have several eyes grouped tightly together. Red, white, or reflective plastic eyes catch available light well. They glow convincingly once the sun goes down outside. Build a pair of lightweight fangs from foam or cardboard. Curve them slightly downward from the front of the head.
Use black fabric strips or scrap faux fur for coverage. Hide any exposed frame, hub, or pipe connections completely underneath them. Spray paint black over anything still visible beneath the fabric. No hardware store colors should peek through on a finished DIY giant rolling spider in photos. A thin run of battery powered LED rope light helps enormously here. EL wire along two or three legs works just as well. That lighting adds a genuinely eerie glow once darkness falls. It also helps the finished spider stay visible from down the street. Running the lighting along the legs, rather than just the eyes, reinforces the crawling silhouette instead. It stops the glow from just lighting up the face alone.
🐾 Step 6: Make Your Giant Spider Crawl
Now comes the fun part. Your DIY giant rolling spider already looks frightening, but getting it to move makes the whole illusion even better. Start by attaching a sturdy pulling rope to the front of the wagon or furniture dolly. Fasten the rope directly to the rolling base rather than the spider’s lightweight body. Give the spider a few slow test runs across a flat driveway. Watch the legs carefully to make sure nothing drags, catches, or interferes with the wheels.
For a simple moving spider, the easiest approach is to let the flexible legs sway naturally as the platform rolls. The slight vibration of the wheels can create a little movement in the legs, especially if the outer sections have some flexibility. Avoid making every leg completely rigid. A small amount of controlled movement helps the spider look alive without adding complicated machinery.
Want the legs to actually rise and fall as the spider rolls? A simple mechanical linkage can make that happen. Attach a small off-center crank to a rotating wheel or axle that turns with the rolling platform. Connect a lightweight cord or linkage between the crank and a hinged front leg. As the wheel rotates, the off-center connection pulls and releases the linkage once per revolution. A flexible joint or light elastic return helps the leg settle back into position after each pull.
Start by connecting just one leg and testing the movement slowly. Once it works properly, a second linkage can operate another leg. Keep the movement small. A giant spider does not need wildly swinging legs to look convincing. A gentle lifting and lowering motion is enough to suggest that the creature is crawling. Make sure all moving parts are securely attached and keep cords away from the wheels, axle, and ground.
If building a crank mechanism sounds like too much work, skip it entirely. A concealed helper can operate one or two flexible legs using lightweight cords attached near their joints. Pulling and releasing the cords creates occasional leg movement while someone else slowly pulls the rolling platform. This method requires no gears, motors, or electrical equipment. It also gives you direct control over when the spider moves its legs.
Experiment with the spider’s speed once everything is working. A slow crawl often looks more convincing than a fast roll. Try moving forward a few feet, stopping briefly, and then creeping forward again. Those unexpected pauses make the spider seem as though it is watching something before deciding to move closer.
Keep the pulling rope out of visitors’ walking paths and never roll the spider directly into a crowd. Test the entire setup in daylight before using it after dark. Check that the base stays stable during turns and that the legs cannot strike anyone standing nearby. If the spider starts tipping, redistribute weight toward the bottom of the platform and reduce the speed.
With a little practice, your DIY giant rolling spider can creep across the driveway like an enormous eight-legged monster. Whether you use natural leg movement, a simple crank mechanism, or a hidden helper, the effect comes from making the spider move slowly and unpredictably. Sometimes the simplest Halloween tricks deliver the biggest scares.
🎃 Step 7: Stage and Capture the Scene
Position the finished spider near a garage, porch, or open driveway. Give it enough room to roll convincingly toward approaching visitors. Inexpensive artificial spiderweb material stretched nearby reinforces the whole theme. A few smaller store bought spiders placed close by help too. They make the giant spider look even larger by comparison.
Low angled lighting throws long, dramatic leg shadows across the ground. Those shadows often look scarier than the spider itself in photos. A fog machine adds extra atmosphere for a nighttime DIY giant rolling spider display. That addition is entirely optional, depending on time and budget. Always keep the rolling path clear of stairs and cords beforehand.
For photos, shoot from a low angle near ground level. This exaggerates the DIY giant rolling spider’s size dramatically against the sky. A daytime shot shows off construction details clearly for curious neighbors. A nighttime shot captures the glowing eyes and leg lighting beautifully. A short video of the spider rolling toward the camera works wonders. That kind of clip almost always gets the biggest reaction online.
🤔 Why Go DIY?
Building a spider instead of buying one keeps the project affordable. An ordinary weekend and a basic toolbox are usually enough. Foam, fabric, and lightweight pipe keep this large prop easy to move. They also keep it easy to store between Halloween seasons. A bulky manufactured decoration rarely offers that same convenience at all. Every piece of a DIY giant rolling spider can be changed too. The body size, leg span, eye color, and lighting are all adjustable. No two homemade spiders built this way ever look quite the same.
A removable leg hub means this version packs down small for storage. It will not take up an entire garage shelf year round. That reusability genuinely matters for a seasonal Halloween prop like this one. A DIY giant rolling spider built to last several Halloweens earns its construction time back. Most importantly, a slowly rolling, crawling spider genuinely startles people. A stationary decoration simply cannot match that effect, no matter how detailed.
🏁 Let Your Giant Spider Loose This Halloween
A handful of ordinary materials, shaped with some patience, becomes something special. It can turn into one of the biggest monsters on the block. The rolling platform truly sets this project apart from store bought options. It gives the spider real presence instead of leaving it frozen in place. Customize the legs, the lighting, and the body as much as possible. Make it feel like a creature nobody else on the street could build.
Once the wheels start turning and those eight legs begin to sway, something changes. Trick-or-treaters may suddenly remember somewhere else they needed to be tonight. Kilroy was here, and apparently, so was something with entirely too many legs.