🎄 Blow Mold Restoration Made Simple: Fix, Rebuild, and Repaint to Look New Again ✨
Restored Santa figure showing crisp lines and strong holiday colors.
Blow Mold Restoration often begins with a simple goal: take a faded, cracked, weather-beaten figure and return it to the bright display it once was. Many older molds were stored in attics, garages, or outdoor sheds, where heat and cold slowly weakened the plastic. A careful method brings them back to a strong and reliable finish without sacrificing the original charm that collectors value.
A proper Blow Mold Restoration considers the condition of the plastic, the history of the paint, and the stresses caused by decades of outdoor use. Each step builds toward a result that is sturdy, long-lasting, and visually accurate. Collectors who work methodically often find they can undo years of neglect with a steady hand and patient timing.
Before beginning any Blow Mold Restoration work, keep safety in mind. Use a heat gun with caution, avoid chemical fumes in small spaces, and check electrical parts before plugging anything in. Even a strong piece can weaken with age, so treat it gently during early steps. Once the foundation is stable, the remaining work becomes much easier.
Gather everything first so the Blow Mold Restoration process stays organized and efficient.
Tools Needed
Mild soap and warm water
Plastic-safe degreaser
Soft scrub pads and cotton towels
Rubbing alcohol
CA glue and two-part epoxy
Plastic weld compound
Fiberglass mesh or thin plastic backing
Medium and fine sandpaper
Painter’s tape
Plastic-safe primer
Acrylic outdoor paints
UV-safe clear coat
Adjustable heat gun
Electrical
Replacement sockets
New wiring
Grommets
LED bulbs
Wire nuts and strain reliefs
🔍 Inspect and Document Damage
Begin by placing the blow mold under bright lighting. Examine the surface for dents, cracks, seam separations, heat warping, paint failure, and areas thinned by sunlight. Proper documentation during Blow Mold Restoration helps confirm what must be repaired first and prevents overlooked damage later.
Photograph every flaw from multiple angles. Note where the plastic is weak or soft, because these sections often require backing support. This visual record also becomes useful when tracking progress from early repairs to the final restored surface.
🧼 Clean: Wash, Degrease, De-oxidize
Washing away years of grime before restoration begins.
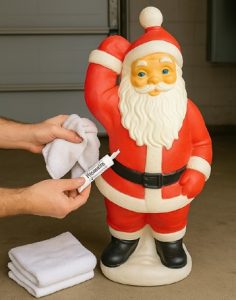
Wash the blow mold with warm, soapy water to remove dirt, dust, and loose paint. Rinse and dry it thoroughly. Many figures develop a chalky residue over time, so use a plastic-safe degreaser to remove oils left by storage and handling. This step is essential to long-lasting Blow Mold Restoration work.
After washing, de-oxidize the surface with diluted rubbing alcohol. This removes the thin sun-damaged layer that often prevents primer and paint from bonding. Once clean, the plastic will have a better grip for later sanding and finishing.
Use a heat gun on a low setting to correct dents or collapsed areas. Move the heat slowly and reshape with gloved hands, keeping pressure gentle. The goal is to restore the natural curve of the figure without overheating the plastic. Blow Mold Restoration often succeeds or fails based on how carefully the heat work is handled.
For gaps or soft spots, apply CA glue or two-part epoxy. These materials add strength and rebuild missing thickness. When seams split, plastic weld compound bonds the edges while restoring rigidity. Reinforcing the inside with a strip of mesh or thin plastic stabilizes these repairs and prevents future separation.
🩹 Patch Holes & Cracks: Mesh or Backing, Filler, Cure
Wider cracks and full holes need internal support. Place fiberglass mesh or cut plastic behind the damaged area, creating a backing that supports the filler. Press epoxy or filler through the opening to blend the outer surface. This technique ensures Blow Mold Restoration repairs remain solid under pressure.
Apply filler in thin layers rather than one heavy pass. Each layer should cure fully before sanding. This gradual approach keeps the repaired area strong and avoids shrinkage lines once paint is added.
🪵 Sand: Level Repairs, Scuff Whole Surface
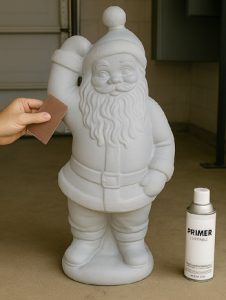
Surface smoothed and primed to ensure strong paint adhesion.
Sand repaired areas with medium grit to level them with the surrounding plastic. Once smooth, switch to fine grit to create a clean working surface. This is when the Blow Mold Restoration begins to take shape visually, as rough patches disappear and the figure regains consistent contours.
Lightly scuff the entire blow mold. This gives the primer something firm to cling to. Do not sand off molded features such as eyes, folds, buttons, or textures, since these contribute to the final appearance.
🎨 Prime: Plastic-Safe Primer, Light Coats
Use a plastic-safe primer designed for outdoor use. Apply several thin coats, allowing each one to dry before adding the next. Proper priming creates an even surface that accepts color smoothly throughout the Blow Mold Restoration process.
A uniform primer layer hides patched areas and prevents blotchy paint absorption. Thin applications keep edges sharp and protect molded details from becoming dull or muddy.
🎯 Color Match: Test Swatches in Daylight
Test color mixtures on scrap plastic or hidden areas. Daylight provides the most accurate reading of tone and brightness, so check each sample outside. Blow Mold Restoration relies heavily on faithful color matching, especially for vintage figures with distinctive palettes.
If the original paint is too faded to compare, study period catalog images or match tones from similar surviving blow molds. Adjust the mix until the color matches the intended look.
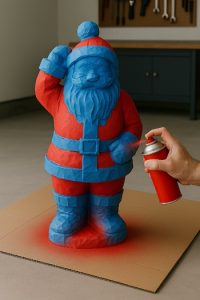
Blue tape protects details while fresh color is sprayed on evenly.
Place an LED bulb inside the figure before painting fully. The internal glow reveals how transparent or opaque your colors will become once illuminated. This is a key part of Blow Mold Restoration, since lighting changes the way paint appears at night. Testing the glow early saves time later and helps you judge whether certain sections need heavier coat buildup or a lighter touch to let the light shine through naturally.
Mask fine edges with painter’s tape and apply thin coats of acrylic paint. Build color gradually. Allow each layer to dry completely. Thin, steady applications preserve molded patterns and prevent unwanted drips. Taking your time with this step keeps the molded edges sharp and prevents color from bleeding into raised details.
Even coverage matters more than speed. Spray from a moderate distance so the paint settles as a soft layer rather than a heavy mist that can clump or run. Rotate the blow mold as you work to reach curves and recessed areas, keeping the spray angle consistent to avoid shadow lines. This careful approach gives the figure a crisp, even finish that photographs beautifully.
👁️ Detail Work: Brush Highlights, Eyes, Lettering
Small brushes bring back facial lines and classic highlights.
Once the base colors are dry, use small brushes for highlights, shading, eyes, lettering, and decorative touches. Detail work gives depth and restores personality to the blow mold. These fine strokes elevate a simple repaint into a true Blow Mold Restoration project, especially when working on faces where expression depends on clean lines and steady hands.
Move slowly and study the original sculpt as you paint. Raised areas often show you exactly where shadows and highlights belong, and following those natural contours keeps the finished look authentic. Thin paint works best for fine features because it settles gently without filling in the molded detail. Careful layering of color brings out the sculpted shapes around the eyes, beard, trim, and clothing.
For lettering or small accents, use a short, stiff brush or a detailing pen made for acrylic work. Light hand pressure prevents wobbling lines, and steady strokes help maintain the classic look found on older holiday figures. This part of Blow Mold Restoration is often the most satisfying, as the figure begins to look alive again with every small stroke added.
✨ Seal: UV-Safe Clear Coat, Matte or Gloss as Original
Finish with a UV-safe clear coat to protect the paint from sunlight. Choose a matte or gloss finish depending on the figure’s original appearance. This seal prevents fading and shields the colors from rain, dust, and handling.
Several thin coats produce a smooth, protective shell. Once sealed, the blow mold is ready for outdoor display and long use.
⏳ Cure Time: Full Harden Before Handling
Allow the piece to cure for at least a full day in a clean, dry space. Paint and clear coat may feel dry early, but deeper layers need time to harden. Rushing this stage risks fingerprints, scuffs, or peeling.
Full curing gives the blow mold the durability needed for handling, storage, and seasonal decorating. This final waiting stage ensures the Blow Mold Restoration holds up long term.
🔌 Electrical: New Socket, Wiring, Grommets, LED Bulb Heat Check
Replace worn or brittle wiring immediately. Install new grommets to protect cords from sharp plastic edges. Check the socket for corrosion or loose contacts. Electrical repairs are an essential part of a reliable Blow Mold Restoration, especially for older models.
Use LED bulbs to minimize heat. After assembly, test the temperature by leaving the bulb on for several minutes. It should remain comfortably warm, not hot.
💡 Reassemble and Light-Test for Hot Spots
Place the electrical parts inside and secure them properly. Light the blow mold in a dark room to identify bright spots, unwanted shadows, or blocked areas. Moving the bulb slightly often fixes these issues.
The goal is an even glow that complements the new paint. A proper light test completes an important phase of the Blow Mold Restoration process.
🌧️ Weatherproofing: Seams, Bases, Stakes
Seal exterior seams that will face rain or snow. Reinforce the base if the plastic feels thin or flexible. Add small supports when necessary to prevent tipping during windy weather. A careful weatherproofing step extends the lifespan of any Blow Mold Restoration project.
If the figure uses stakes, inspect the stake holes for wear. Reinforce them with epoxy if needed to prevent cracking under outdoor stress.
Store the blow mold in a cool, dark space away from attic heat or direct sunlight. Temperature swings cause plastic fatigue, so a stable environment is ideal. Padding protects raised features and prevents dents.
Avoid stacking heavy objects on top of the piece. Good storage preserves the work and keeps the Blow Mold Restoration looking new for the next season.
📸 Before/After Photos and Cost/Time Notes
Photograph the restored blow mold beside the original documentation. Side-by-side comparisons show the value of your work and help you refine methods for future Blow Mold Restoration projects.
Record the materials used, total hours invested, and approximate cost. These notes provide a helpful reference when planning additional restorations.
A vintage Santa blow mold fully restored from faded to vibrant.
❓ Quick FAQ & Troubleshooting
Why won’t the paint stick?
Insufficient cleaning or oxidation may still be present. Wash again, wipe with alcohol, and lightly scuff the surface before priming.
Why does the glow look uneven?
The bulb may be too close to one side. Adjust the position or reduce overly thick paint layers blocking the light.
Why are cracks reopening?
Repairs may need internal backing. Add mesh or a plastic patch behind the crack, then reapply filler.
What causes dull color after a few weeks?
The paint may lack UV protection. Apply a UV-safe clear coat to maintain brightness.
ML Lamp is the owner of Kilroy Was Here. After his 20 years of working in Las Vegas in the entertainment promotions field, Mr. Lamp retired in 2002 from his job to pursue his passion for collectibles. Now as a guest speaker and author he’s living the dream, and sharing his warmth with You.