DIY Santa Belly: The Secret to a Convincing Santa Claus Costume

A great Santa Claus costume needs more than a red suit, a white beard, and a hearty "Ho, Ho, Ho!" One of the most recognizable features of Santa Claus is his big, round belly. Without it, even an expensive Santa suit can look like something is missing. The good news is that you can make a realistic DIY Santa belly at home without spending a fortune on professional costume padding.
Whether you're dressing up for a Christmas party, entertaining children, appearing in a holiday parade, or playing Santa Claus professionally, the right belly padding can completely change the appearance of your costume. A properly shaped Santa belly adds fullness to the waist, creates a natural silhouette, and helps the familiar red suit hang the way it should.
But there's a difference between stuffing a pillow under your jacket and building a convincing Santa belly. Ordinary pillows often shift, sag, or create unnatural lumps. Professional costume makers use shaped foam, soft padding, and adjustable supports to create the illusion of a larger stomach while allowing the performer to walk, sit, and move comfortably.
In this DIY Santa belly tutorial, we'll explore two ways to create your own Christmas costume padding. The first is an inexpensive method using materials commonly available at fabric and craft stores. The second takes inspiration from theatrical costume construction, using shaped foam and a fitted support system for a more realistic appearance.
We'll also cover three different belly sizes, ways to keep the padding securely in place, and finishing techniques that help hide the construction beneath a traditional Santa Claus suit. Whether you're making your first homemade Santa costume or improving one you've worn for years, these techniques will help you create a belly worthy of the man from the North Pole.
The best part? You don't need to be a professional costume designer to make a convincing Santa belly. With the right materials, a little patience, and some basic measuring and cutting, you can create a reusable costume accessory that will be ready for Christmas celebrations year after year.
🎅 Free DIY Santa Belly Printable Patterns
Ready to build your own Santa belly? Download Kilroy's FREE
25-page printable pattern book, featuring cutting templates,
measurements, sewing instructions, and construction guides
for both the budget stuffed-fabric belly and the professional
sculpted-foam version.
📥 Download Your FREE Santa Belly Patterns (PDF)
25 printable pages • Standard adult size with adjustment instructions • Free download
DIY Santa Belly Materials and Tools: Budget and Professional Options
Before you begin making your DIY Santa belly, you'll need to choose the materials that best suit your budget, experience, and how often you plan to wear the costume. Fortunately, creating a convincing Santa Claus belly doesn't require expensive special effects equipment or professional sewing skills.
There are two practical approaches to building your homemade Santa belly. The first uses inexpensive craft materials and is ideal for beginners, Christmas parties, and occasional Santa appearances. The second uses theatrical costume-making techniques for a more realistic shape, improved durability, and greater control over the finished appearance.
Both methods create a wearable belly that fits beneath a traditional Santa Claus costume. The main differences are the padding materials, construction techniques, and amount of shaping involved.
Budget DIY Santa Belly: Materials Shopping List
If you're making a Santa belly for a Christmas party, family gathering, holiday parade, or occasional appearance, this inexpensive version is a good place to start. Most of the materials can be found at Walmart, fabric stores, craft shops, or online.
Estimated materials budget: $15–$35, depending on what you already have and the size of the belly. This estimate assumes basic sewing supplies are available and does not include the Santa suit.
- Polyester fiberfill or quilt batting: Approximately 1–2 pounds of fiberfill or an equivalent amount of batting. This creates the rounded belly shape while keeping the padding lightweight.
- Stretch fabric: Approximately 1–2 yards of cotton jersey, fleece, or another comfortable fabric. This forms the outer covering that holds the padding in place.
- Wide elastic: Approximately 2–3 yards of 1–2-inch elastic for adjustable shoulder straps and support around the body.
- Hook-and-loop fastener: Approximately 12–24 inches of sew-on fastening tape for an adjustable closure.
- Thread: All-purpose polyester sewing thread suitable for the selected fabric.
- Optional lightweight foam: A thin piece of flexible upholstery foam can help maintain the belly's shape.
- Optional fabric lining: Soft cotton or moisture-wicking fabric for additional comfort during extended wear.
Budget-building tip: If you have an old T-shirt, unused pillow stuffing, or leftover quilting materials, you may already own much of what you need. Clean, reusable materials can reduce the cost considerably.
Budget Santa Belly: Tools You'll Need
- Fabric scissors
- Measuring tape
- Fabric marker or tailor's chalk
- Sewing needle and thread or a basic sewing machine
- Straight pins or sewing clips
- Large paper for making a simple cutting pattern
- Ruler or straightedge
A sewing machine makes the project faster, but the budget Santa belly can also be assembled by hand using a strong backstitch. No specialized equipment is necessary.
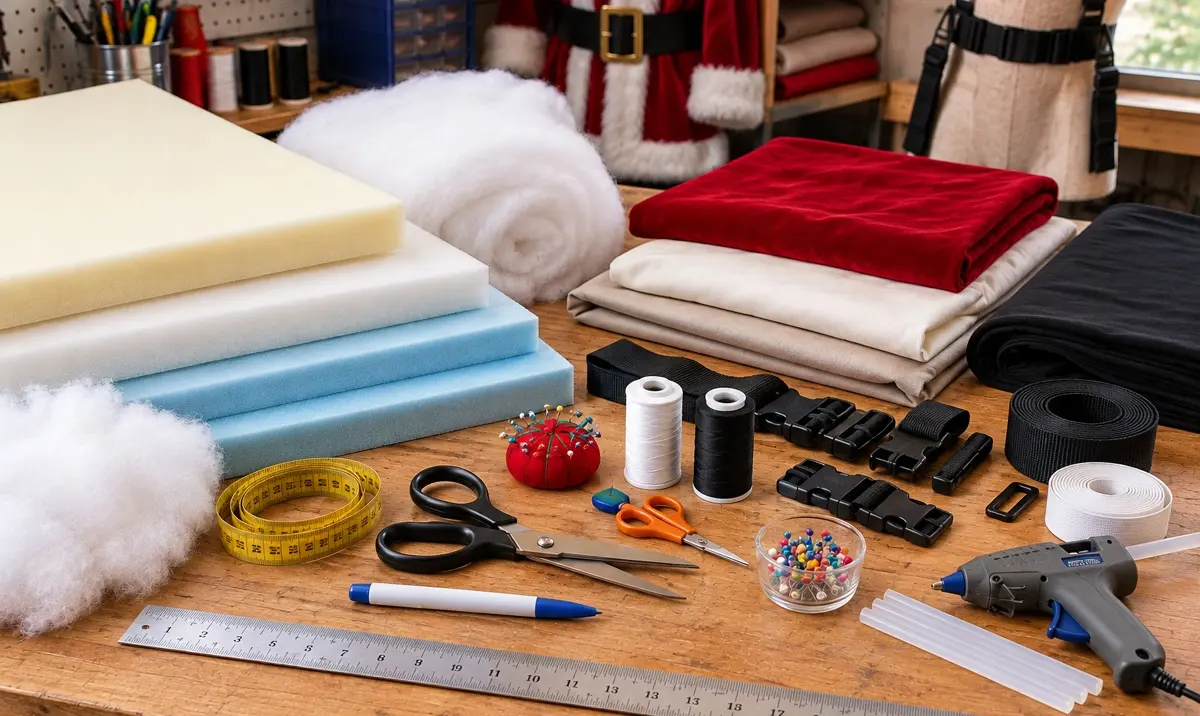
Professional DIY Santa Belly: Theatrical Costume Materials
For performers who portray Santa Claus regularly, a more carefully constructed belly can make a noticeable difference. Professional theatrical padding uses shaped foam, layered materials, and a fitted fabric foundation to create a fuller stomach with smoother transitions around the waist and chest.
This approach is particularly useful for Santa performers who spend several hours greeting visitors, posing for photographs, or appearing at holiday events.
Estimated materials budget: $40–$100, depending on foam thickness, fabric quality, and the amount of padding required. Specialty materials and new tools may increase the total.
- Flexible upholstery foam: Approximately 1–2 square yards in assorted thicknesses, commonly 1–3 inches. Open-cell polyurethane upholstery foam is useful for building the belly in layers.
- Polyester batting: Approximately 1–2 yards of quilt batting to soften the foam contours and conceal transitions between layers.
- Stretch fabric: Approximately 1–2 yards of four-way stretch fabric for the belly's outer covering.
- Sturdy vest fabric: Approximately 1–2 yards of cotton twill, canvas, or another durable fabric for the supporting garment.
- Breathable lining: Lightweight cotton or athletic mesh to improve comfort against the body.
- Wide elastic or webbing: Approximately 2–3 yards for adjustable shoulder straps and additional support.
- Hook-and-loop fasteners: Heavy-duty sew-on fasteners for opening and adjusting the belly vest.
- Foam adhesive: A flexible adhesive specifically approved for upholstery foam, used according to the manufacturer's directions.
- Heavy-duty polyester thread: For sewing the supporting vest and reinforced attachment points.
- Optional plastic buckles: Adjustable strap buckles for a removable or easily fitted belly.
Professional costume tip: Avoid choosing the firmest foam simply because it holds its shape. A Santa belly should have a rounded appearance while remaining flexible enough for normal movement. Medium-soft upholstery foam is generally a better starting point than rigid packing foam.
Professional Santa Belly: Recommended Tools
- Sharp fabric scissors
- Electric carving knife or long foam-cutting knife
- Measuring tape and flexible ruler
- Fabric marker or tailor's chalk
- Sewing machine with a suitable heavy-duty needle
- Large sheets of pattern paper
- Dressmaker's mannequin or adjustable dress form, if available
- Straight pins and sewing clips
- Foam-safe adhesive and appropriate application supplies
- Protective equipment recommended by the adhesive manufacturer
An electric carving knife can make it easier to cut thick upholstery foam into smooth curves. However, it is not essential. A sharp foam-cutting knife and careful trimming can produce good results.
Safety note: Cut foam on a stable work surface and keep hands clear of cutting blades. When using adhesives, follow the manufacturer's ventilation, protective equipment, and curing instructions. Never use a hot-wire cutter on polyurethane upholstery foam, and avoid placing uncured adhesive against the skin.
Budget vs. Professional Santa Belly: Which Materials Are Better?
Both construction methods can produce an attractive homemade Santa Claus belly. The right choice depends largely on how frequently you'll wear it and how much control you want over the finished shape.
| Feature | Budget Santa Belly | Professional Santa Belly |
|---|---|---|
| Estimated materials cost | $15–$35 | $40–$100 |
| Main padding | Polyester fiberfill or batting | Shaped upholstery foam and batting |
| Difficulty | Beginner | Intermediate |
| Construction | Stuffed fabric belly with straps | Layered foam attached to a fitted vest |
| Shape control | Moderate | Greater control over contours |
| Adjustability | Elastic straps and closures | Fitted vest with adjustable supports |
| Best use | Parties and occasional appearances | Frequent performances and photography |
| Expected durability | Depends on stitching and materials | Potentially longer-lasting with proper construction |
Choosing the Right Materials for Your Santa Claus Costume
Before purchasing supplies, consider the Santa suit you'll be wearing. A loose-fitting traditional Santa jacket can conceal simple padding very effectively, while a more fitted costume may require carefully shaped foam to prevent visible lumps and uneven contours.
The size of the performer also matters. A smaller person may need less padding to achieve the classic Santa silhouette, while a taller or broader performer may need a larger belly to keep the costume proportions balanced.
For either version, the goal is to create a lightweight, comfortable, and realistic Santa belly that stays in place throughout the event. Avoid excessive weight, tight straps, or padding that restricts breathing, sitting, or normal movement.
One final suggestion: Before cutting expensive fabric or foam, try on your Santa jacket and take a few basic measurements around your chest, waist, and hips. These measurements will help determine how much padding you need and prevent unnecessary waste.
With your materials gathered and your tools ready, it's time to begin building the belly itself. We'll start with the budget-friendly construction method, using simple fabric and padding to create the familiar round Santa Claus silhouette.
15 Vintage Christmas Collectibles: Shocking Prices Revealed
How to Make a DIY Santa Belly: Step-by-Step Budget Construction
Now that you have gathered your materials, it's time to build your DIY Santa belly. This beginner-friendly method uses inexpensive upholstery foam, polyester batting, and fabric to create a rounded stomach that fits comfortably beneath a traditional Santa Claus suit.
The secret to a convincing homemade Santa belly is its shape. A real stomach doesn't look like a basketball strapped to someone's waist. It curves gradually outward from the upper abdomen, reaches its fullest point around the middle and lower stomach, and then tapers toward the hips.
For this project, we'll build a lightweight padded belly that can be worn over a T-shirt and secured with adjustable straps. You won't need a professional costume workshop, and most beginners should be able to complete the project in approximately three to five hours, depending on sewing experience.
Step 1: Measure Your Waist and Decide How Big Santa's Belly Should Be
Before cutting any foam or fabric, put on the shirt you intend to wear beneath your Santa costume. Use a flexible measuring tape to record the following measurements:
- Natural waist circumference: Measure around your waist without pulling the tape tight.
- Chest circumference: Measure around the fullest part of your chest.
- Front belly width: Measure across the front of your torso where you want the padding to sit.
- Belly height: Measure from just below your chest to the point where you want the rounded stomach to end.
- Desired belly projection: Decide how far the finished padding should extend outward from your natural stomach.
For a typical adult Santa costume, a good starting point is a belly approximately 16–20 inches wide, 14–18 inches tall, and 4–7 inches deep at its fullest point. These are suggested starting dimensions, not universal measurements. Your body size and the fit of your Santa jacket will determine the best proportions.
DIY tip: Put on your Santa jacket and hold a folded pillow against your stomach. This gives you a quick visual reference for the amount of fullness you want before committing to a particular size.
Step 2: Make a Paper Pattern for Your Santa Belly
Lay a large sheet of kraft paper, wrapping paper, or several taped-together sheets of printer paper on a flat work surface.
Draw a wide oval representing the front outline of your Santa belly. For our example, we'll use an oval approximately 18 inches wide and 16 inches tall.
- Draw a vertical centerline measuring 16 inches.
- Mark the midpoint of that line.
- Draw a horizontal line measuring 18 inches through the midpoint, extending 9 inches to each side.
- Connect the four endpoints with smooth, rounded curves to create an oval.
- Cut out the paper pattern and hold it against your stomach to check the proportions.
The paper oval will serve as the cutting guide for the fabric covering and the largest layer of foam.
Important: This pattern creates a front-mounted belly pad, not a complete bodysuit. The back of your torso remains relatively flat, making the finished costume lighter and easier to wear.
Step 3: Cut the Foam to Create the Belly Shape
Place your paper pattern over a sheet of flexible upholstery foam. For this budget version, a piece of foam approximately 1–2 inches thick works well as the foundation.
Trace the oval onto the foam using a marker, then carefully cut around the outline with a sharp pair of scissors or a foam-cutting knife.
Next, cut two additional foam ovals:
- Base layer: 18 inches wide by 16 inches tall.
- Middle layer: 14 inches wide by 12 inches tall.
- Top layer: 10 inches wide by 8 inches tall.
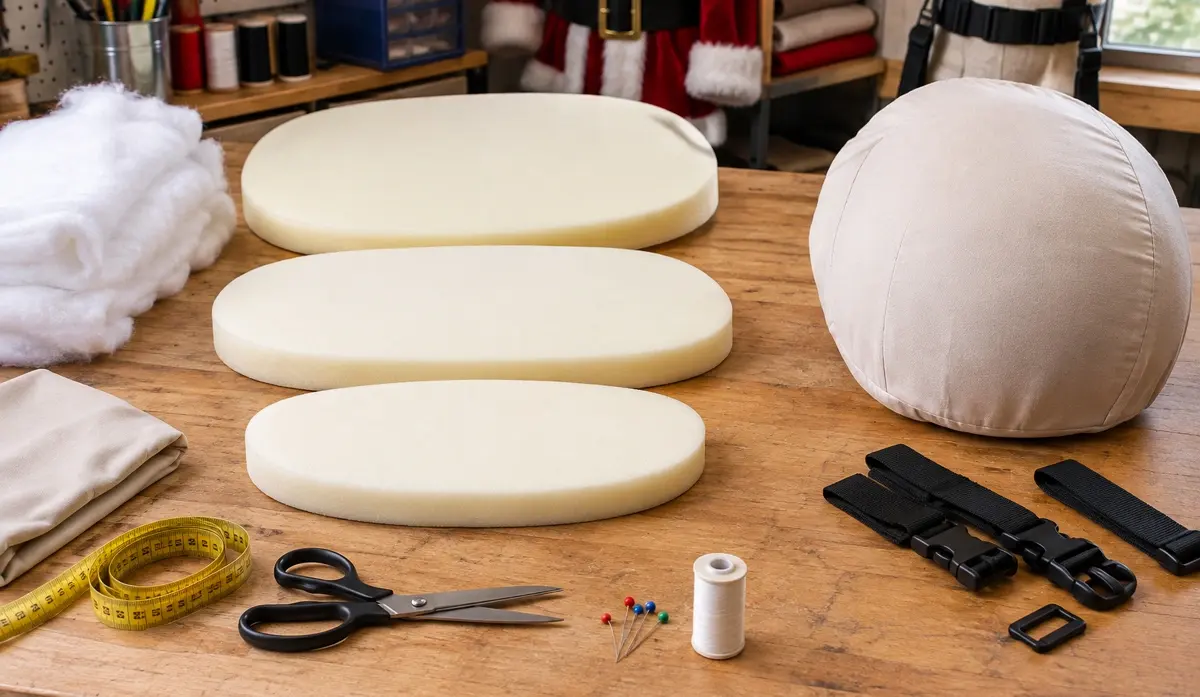
These three layers create a stepped mound that will become the foundation of your Santa belly. If each layer is 1 inch thick, the center will initially measure approximately 3 inches deep before additional padding is added.
Center the smaller pieces on top of the larger ones, with the smallest oval on top. Temporarily secure the layers with a few loose loops of thread or hold them together while checking the shape.
Costume-making trick: Position the smallest foam oval slightly below the center of the larger layers. This places more fullness toward the lower stomach, helping create the familiar rounded Santa silhouette.
Step 4: Add Polyester Batting for a Smooth, Rounded Belly
At this stage, your foam layers may resemble a stack of oversized pancakes. That's normal. The next step is what turns those flat layers into a convincing Santa belly.
Lay a generous sheet of polyester quilt batting over the foam stack. Gently pull the batting around the edges to soften the transitions between the different foam layers.
- Cover the entire foam mound with one continuous layer of batting.
- Add additional batting around the edges where the foam layers create noticeable steps.
- Place a little extra padding over the center if you want a fuller stomach.
- Continue adding thin layers until the surface looks smooth and rounded.
- Use a few loose hand stitches through the batting layers, without compressing the foam, to help keep everything in position.
If you are using loose polyester fiberfill instead of quilt batting, spread the stuffing evenly over the foam and hold it in place with a temporary fabric covering.
Avoid packing the stuffing too tightly. The padding should remain soft and flexible so the belly looks natural and feels comfortable beneath the Santa suit.
Step 5: Make a Fabric Cover for Your Santa Belly
With the foam and batting shaped into a rounded stomach, the next step is to make a fabric cover that holds everything together.
- Lay your padded belly on a piece of stretch fabric.
- Trace around the padding, allowing enough extra fabric to cover its rounded front and thickness.
- Cut a second piece of fabric for the flat backing.
- Place the fabric pieces together with their finished sides facing inward.
- Sew around the edges, leaving an opening large enough to insert the padding.
- Turn the cover right side out and insert the foam and batting.
- Adjust the padding until it sits smoothly inside the cover.
- Close the opening with hand stitching or a suitable hook-and-loop fastener.
The cover should fit snugly enough to hold the padding in place without flattening the rounded stomach. Smooth out any wrinkles or bunching before closing it.
Step 6: Prepare the Belly for Shoulder Straps
Your finished belly needs a secure way to stay against your stomach while you move. For this budget version, adjustable shoulder straps provide a practical solution.
Cut a sturdy fabric backing panel slightly smaller than the belly itself. Sew this panel to the back of the fabric cover, keeping the stitches away from the thickest foam.
Reinforce the upper and lower attachment areas with small patches of sturdy fabric. These will provide strong connection points for the shoulder harness described later in this tutorial.
Do not attach straps directly to thin stretch fabric without reinforcement. The weight of the padding can eventually pull the stitches loose.
Step 7: Check the Shape and Fit of Your Homemade Santa Belly
Hold the covered belly against your stomach and check its appearance in a full-length mirror.
- Make sure the belly is centered beneath your chest.
- Check that the rounded portion extends outward naturally.
- Look for lumps, wrinkles, or visible foam edges.
- Adjust the batting if any part of the belly appears uneven.
- Put on your Santa jacket to see how the padding looks beneath the costume.
- Check that the belly does not press uncomfortably against your thighs when sitting.
If the stomach appears too flat, add a little batting beneath the cover. If it looks excessively round or projects too far forward, remove some padding or trim the foam gradually.
Once you're satisfied with the shape, your basic DIY Santa belly is ready for the adjustable harness described later in this article.
How to Make a Professional Santa Belly Using Theatrical Costume Techniques
If you want your DIY Santa belly to look convincing in photographs, on stage, or during close-up Christmas appearances, it's worth taking a few lessons from professional theatrical costume construction. A well-made Santa belly should appear to be part of the performer's natural body shape, with smooth curves, realistic proportions, and enough flexibility to move comfortably.
Unlike the basic stuffed belly, a professional Santa Claus belly costume uses carefully shaped upholstery foam attached to a fitted fabric vest. This construction gives you greater control over the stomach's size, shape, and position while helping the padding remain secure during extended performances.
The following method is inspired by traditional theatrical padding techniques. It does not require expensive silicone prosthetics or specialized movie studio equipment. With flexible upholstery foam, a sharp cutting tool, and some patience, you can create a realistic padded stomach suitable for repeated use.
Step 1: Design the Shape of Your Professional Santa Belly
Before cutting the foam, decide how you want the finished belly to look. A convincing Santa belly should have a broad, rounded appearance that blends into the chest, waist, and sides of the torso.
The most common mistake is making the stomach too round and too narrow. This creates the appearance of a large ball attached to the front of the body rather than natural body weight.
For a traditional Santa Claus silhouette, aim for these characteristics:
- Upper stomach: A gentle outward curve beginning below the chest.
- Center of the belly: The fullest area, extending outward in a smooth, rounded shape.
- Lower stomach: A gradual downward curve that tapers toward the hips.
- Side contours: Soft transitions that blend the belly into your waistline.
- Overall proportions: A broad stomach that looks balanced with the performer's chest, shoulders, and height.
Start by putting on your Santa jacket and estimating how much additional stomach projection you need. For many adult performers, approximately 4–8 inches of added projection at the fullest point can create a substantial Santa belly, although the ideal amount depends on the performer's natural build and costume size.
Professional costume tip: Study photographs of real body shapes rather than copying a perfectly round cartoon Santa. Natural stomachs are rarely symmetrical spheres, and subtle variations in contour can make theatrical padding appear more believable.
Step 2: Create a Fitted Fabric Vest to Support the Foam
Professional costume padding works best when attached to a supporting garment. For this project, we'll use a sleeveless vest that fits comfortably over the performer's undershirt.
A fitted vest distributes the weight of the padding across the shoulders and torso, reducing the need for tight elastic straps around the waist.
Recommended materials:
- Approximately 1–2 yards of sturdy cotton twill or lightweight canvas
- Breathable cotton or athletic mesh lining
- Heavy-duty polyester thread
- Sew-on hook-and-loop fasteners
- Optional adjustable shoulder or side straps
To construct the vest:
- Measure your chest, waist, shoulder width, and torso length while wearing your intended undershirt.
- Use a basic sleeveless vest sewing pattern that fits your measurements, or trace a comfortably fitting vest onto pattern paper.
- Cut the front and back panels from your chosen fabric, allowing the seam allowances specified by the pattern.
- Sew the shoulder and side seams, leaving a front opening for easy dressing.
- Finish the neckline and armholes so the edges do not rub against the skin.
- Add hook-and-loop fasteners or another secure closure along the front opening.
- Try on the vest and check that you can sit, bend, and breathe comfortably.
The vest should fit closely enough to prevent excessive movement without feeling restrictive. It should also extend below the area where the belly padding will end, giving the foam a stable foundation.
Important: The supporting vest must be able to carry the weight of the padding without pulling the neckline downward. Reinforce the shoulder seams if necessary, especially when constructing a larger belly.
Step 3: Build the Belly Using Layers of Upholstery Foam
Instead of cutting one enormous block of foam, professional costume makers often build body padding from several thinner layers. This makes it easier to control the shape and reduce unnecessary weight.
For our example, we'll use flexible open-cell polyurethane upholstery foam in thicknesses ranging from approximately 1–3 inches.
Begin with a broad oval base measuring approximately 20 inches wide and 18 inches tall. This is only a starting size and should be adjusted to fit your torso.
Cut the following foam pieces:
- Base layer: Approximately 20 inches wide by 18 inches tall, using 1-inch foam.
- Second layer: Approximately 17 inches wide by 15 inches tall, using 2-inch foam.
- Third layer: Approximately 13 inches wide by 11 inches tall, using 2-inch foam.
- Center layer: Approximately 9 inches wide by 7 inches tall, using 1-inch foam.
When stacked, these pieces create a maximum central thickness of approximately 6 inches before sculpting. The actual projection will depend on how much foam is trimmed away and how the padding sits against the body.
Arrange the layers with the largest piece against the vest and the smallest piece facing outward. Position the smaller layers slightly below the center of the base to create a fuller lower stomach.
Temporarily hold the layers together and check the overall shape before applying any adhesive.
Foam-saving tip: Don't glue everything immediately. Adjust the position of the layers until the stomach looks balanced from both the front and side. Small changes at this stage can prevent a great deal of unnecessary cutting later.
Step 4: Glue the Foam Layers Together
Once you're satisfied with the arrangement, the foam layers can be joined into a single sculptable piece.
Use a flexible adhesive specifically approved for the type of upholstery foam you've selected. Some adhesives can damage polyurethane foam or leave the finished padding stiff and uncomfortable.
- Place the largest foam oval on a clean, protected work surface.
- Apply the foam-compatible adhesive according to the manufacturer's instructions.
- Position the second layer over the base, keeping the lower stomach slightly fuller.
- Continue attaching the remaining layers in the same manner.
- Allow the adhesive to cure completely for the time specified by the manufacturer.
- Inspect the assembly to make sure the layers are securely joined before shaping.
Use adhesive sparingly. Excess glue can create hard areas inside the padding and reduce flexibility.
Safety note: Some upholstery adhesives contain flammable solvents and produce harmful vapors. Follow all product instructions for ventilation, protective equipment, application, and curing. Do not use solvent-based adhesives near flames, heaters, or other ignition sources.
Step 5: Sculpt the Foam into a Natural Belly Shape
This is where the professional version begins to look different from ordinary homemade costume padding.
At this stage, your foam assembly will probably have visible steps where the different layers meet. The goal is to remove those sharp transitions and turn the stacked foam into one continuous, rounded shape.
An electric carving knife can be useful for trimming thick upholstery foam, although a sharp foam-cutting knife can also work.
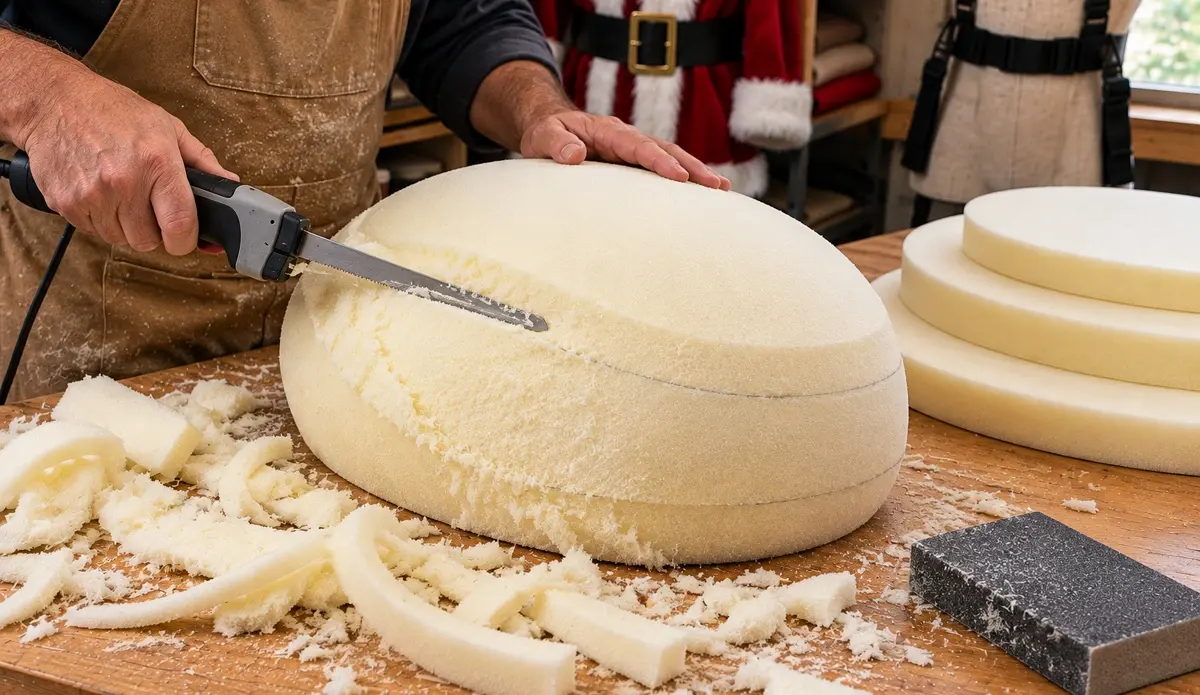
Begin shaping the foam:
- Place the foam assembly on a stable work surface with the rounded side facing upward.
- Identify the highest point of the belly, usually near the center or slightly below it.
- Begin trimming the raised edges between the foam layers.
- Use shallow cuts to create a gradual slope from the center toward the outside edges.
- Round the upper portion so it blends naturally toward the chest.
- Shape the lower portion into a broad curve that gradually tapers toward the waist.
- Trim the sides so the belly does not end in an abrupt vertical edge.
Work slowly and remove small amounts of foam at a time. It is much easier to cut away additional material than to replace foam that has already been removed.
Keep checking the shape from the side. A realistic belly should have a smooth outward curve rather than a flat front or a sharply pointed center.
Hollywood-style costume trick: Make the outer edges of the foam thinner than the center. These tapered edges help the padding disappear beneath the costume fabric, reducing the appearance of a separate object strapped to the stomach.
Step 6: Feather the Foam Edges for a Seamless Appearance
One of the most important techniques in professional theatrical padding is called feathering. This means gradually reducing the thickness of the foam near its edges so the padding blends smoothly into your body.
Without feathering, the foam may create visible ridges beneath the Santa jacket, particularly around the chest and sides.
To feather the edges:
- Lay the shaped foam belly on a flat surface.
- Mark a border approximately 2–3 inches inward from the outside edge.
- Begin carefully shaving the foam between this line and the outer perimeter.
- Reduce the thickness gradually as you approach the edge.
- Leave the outermost edge as thin and flexible as practical without tearing it.
- Repeat around the upper, lower, and side edges of the belly.
The finished foam should have a thick, rounded center and progressively thinner edges.
Pay special attention to the upper edge beneath the chest. This is one of the areas where poorly constructed belly padding is most likely to show through clothing.
Professional tip: You don't need to make every edge paper-thin. The goal is a gradual transition that remains durable enough for repeated wear.
Step 7: Add Batting to Smooth the Foam Surface
Even carefully sculpted foam may have small cutting marks, uneven areas, or subtle ridges. A layer of polyester quilt batting helps soften these imperfections.
Cut a sheet of batting large enough to cover the entire front of the foam belly and wrap slightly around its edges.
- Lay the batting over the sculpted foam.
- Smooth it gently from the center toward the edges.
- Add small pieces of batting wherever the foam surface needs additional blending.
- Avoid creating thick patches that could produce visible lumps.
- Secure the batting with a lightweight stretch-fabric cover or carefully placed stitching through the covering materials.
For a smoother finish, use two thin layers of batting rather than one thick layer. This allows you to control the contour more precisely.
Don't compress the batting too tightly. It should soften the surface without flattening the belly's rounded shape.
Step 8: Attach the Sculpted Belly to the Supporting Vest
With the foam shaped and covered in batting, the next step is to attach it to the fitted vest.
The most practical approach is to place the foam inside a fabric pocket or covering that can be sewn securely to the vest. This also makes future repairs easier.
- Put on the vest and mark the desired position of the belly.
- Remove the vest and lay it flat on your work surface.
- Construct a stretch-fabric cover large enough to hold the foam and batting without compressing them.
- Place the padded foam inside the cover and close the opening with stitching or a suitable fastener.
- Position the covered belly against the vest using your earlier markings.
- Sew the fabric cover securely to reinforced areas of the vest, keeping the foam itself free from unnecessary compression.
- Try on the assembly and adjust the attachment points if the belly hangs unevenly.
For a removable design, sew a series of strong hook-and-loop attachment panels between the belly covering and the vest. Use broad attachment areas rather than relying on a few small fasteners.
Construction tip: Avoid sewing directly through thick sections of upholstery foam. Attaching the foam's fabric covering to the vest generally provides a more flexible and serviceable construction.
Step 9: Blend the Belly into the Chest and Waist
A professional-looking Santa belly should not appear to begin suddenly beneath the chest or end abruptly above the belt.
To create a more natural silhouette, you may need a little additional padding around the upper abdomen and sides.
Use thin pieces of flexible foam or polyester batting to soften the transition between the main belly and the surrounding torso.
Check these areas carefully:
- Upper abdomen: Add a thin layer of batting if the belly creates a visible ridge beneath the chest.
- Side waist: Use tapered foam pieces to create a broader, more natural stomach shape.
- Lower abdomen: Smooth the bottom edge so the padding does not form a sharp shelf above the hips.
- Chest transition: Make sure the belly does not push unnaturally against the lower chest or interfere with breathing.
Some theatrical costume designs use additional padding around the sides of the waist to create the impression of greater overall body weight. For a Santa costume, this can help balance a large stomach and prevent the performer from looking unusually narrow when viewed from the front.
However, avoid adding unnecessary bulk. The padding should remain lightweight and comfortable enough for the intended performance.
Step 10: Test the Professional Santa Belly Under Your Costume
Once the belly is attached to the vest, put on the complete assembly and your Santa Claus suit.
Stand in front of a full-length mirror and examine the costume from the front, side, and three-quarter angles.
Look for the following:
- A smooth, rounded stomach without visible foam ridges
- A natural transition between the chest and belly
- Balanced proportions between the stomach and shoulders
- No obvious edges showing through the red jacket
- A comfortable fit beneath the Santa belt
- Enough flexibility to walk, sit, and bend naturally
Take several photographs while wearing the complete costume. If possible, have someone photograph you while sitting, standing, and walking.
Pay particular attention to the way the belly behaves when sitting down. A very thick or rigid foam assembly may press against the thighs or push upward toward the chest. If this happens, reduce the thickness of the lower padding or adjust the position of the vest.
Performance tip: Wear the completed Santa belly for at least 30 minutes before using it at an event. This gives you time to identify uncomfortable pressure points, slipping straps, or areas that need additional adjustment.
How to Make Your Santa Belly Look More Realistic on Camera
Photographs and video can reveal costume imperfections that are difficult to notice in person. If you plan to use your realistic Santa belly for professional Christmas photography, holiday videos, or theatrical performances, a few finishing details can improve the overall appearance.
- Avoid perfectly round shapes: A slightly wider lower stomach often looks more natural than a symmetrical ball.
- Keep the foam flexible: Soft upholstery foam allows some movement when the performer walks or sits.
- Use smooth fabric coverings: Wrinkles and bunching can become visible beneath thinner costume materials.
- Check the side profile: The stomach should curve outward gradually rather than projecting sharply from the waist.
- Choose the right Santa jacket: A properly fitted jacket helps conceal the construction while allowing the belly to maintain its shape.
- Position the belt carefully: The belt should follow the costume's natural waistline without cutting deeply into the padding.
For a traditional Santa Claus appearance, the goal is a broad, soft-looking stomach that complements the familiar red suit and white beard.
Is a Professional Foam Santa Belly Worth the Extra Work?
A carefully sculpted foam belly requires more time and patience than the inexpensive stuffed version, but it offers several advantages for serious Santa performers.
The fitted vest helps distribute the weight, the shaped foam provides better control over the stomach's proportions, and the feathered edges create smoother transitions beneath clothing.
With proper construction and storage, a theatrical foam belly can be reused for multiple Christmas seasons. Individual components can also be repaired or replaced if the padding begins to lose its shape.
For occasional holiday parties, the basic DIY Santa belly may be all you need. However, for professional Santa appearances, Christmas photography, theatrical productions, or frequent performances, the additional effort can produce a more convincing and dependable costume accessory.
Coming up next: Not every Santa Claus needs the same size belly. In the next section, we'll explore how to make three different Santa belly sizes, from a modest rounded stomach to an extra-large traditional Santa silhouette, using the same basic construction principles.
DIY Santa Belly Sizes: Small, Traditional, and Extra-Large Santa Claus Padding
Not every Santa Claus needs the same size belly. A convincing DIY Santa belly should match the performer's height, natural build, and the style of Santa Claus they want to portray. Some costumes look best with a modest rounded stomach, while others call for the enormous belly associated with classic Christmas illustrations.
One of the advantages of making your own Santa Claus belly padding is that you can control the size instead of settling for a one-size-fits-all costume accessory. Using the foam, batting, and fabric techniques covered earlier, you can create three different belly sizes without changing the basic construction method.
We'll look at a small Santa belly, a traditional full-sized Santa belly, and an extra-large version for performers who want a more exaggerated Christmas appearance.
Small Santa Belly: Subtle Padding for a Natural Appearance
A small Santa belly is ideal for performers who already have some natural stomach fullness or simply want to add a little extra roundness beneath their Santa suit. It also works well for slimmer costumes, lightweight holiday outfits, and situations where comfort and mobility are especially important.
Rather than creating a dramatic outward projection, this version gently rounds the front of the abdomen.
Suggested Small Santa Belly Measurements
- Overall width: 14–16 inches
- Overall height: 12–14 inches
- Maximum added depth: 2–3 inches
- Foam layers: Two or three thin layers
- Recommended materials: Flexible upholstery foam and polyester batting
- Best construction: Lightweight fabric pocket or adjustable belly vest
These measurements are starting points for an adult costume and should be adjusted to fit the performer. The depth refers to the thickness of the padding, not the total distance from the performer's back to the front of the stomach.
How to Build the Small Santa Belly
- Cut a flexible foam oval approximately 15 inches wide and 13 inches tall.
- Cut a second oval approximately 11 inches wide and 9 inches tall.
- Center the smaller piece over the larger piece, positioning it slightly below the midpoint.
- Secure the layers using a suitable foam adhesive or a fitted fabric covering.
- Trim the edges to create a smooth transition between the layers.
- Add a thin layer of polyester batting to soften the surface.
- Place the finished padding inside a fabric cover and attach it to your supporting vest or strap system.
For this smaller version, avoid excessive stuffing. A little additional fullness can make a surprising difference once the Santa jacket and belt are in place.
Costume tip: If your Santa suit already fits closely around the waist, try the small belly before attempting a larger version. You may achieve the desired appearance without needing to alter the jacket.
Traditional Santa Belly: The Classic Round Christmas Silhouette
When most people picture Santa Claus, they imagine a cheerful figure with a generous round stomach beneath a bright red suit. This is the traditional appearance associated with Christmas cards, holiday decorations, department store Santas, and countless Christmas movies.
For many performers, the traditional belly offers the best balance between appearance and comfort. It provides noticeable fullness without requiring the extreme amount of padding used in oversized theatrical costumes.
Suggested Traditional Santa Belly Measurements
- Overall width: 18–22 inches
- Overall height: 16–20 inches
- Maximum added depth: 4–6 inches
- Foam layers: Three or four shaped layers
- Recommended materials: Medium-soft upholstery foam, batting, and stretch fabric
- Best construction: Sculpted foam attached to a fitted supporting vest
These dimensions provide a starting point for a classic rounded Santa belly. A shorter performer may need a smaller design, while a taller or broader performer may need additional width to keep the proportions balanced.
How to Build the Traditional Santa Belly
- Cut a large foam base approximately 20 inches wide and 18 inches tall.
- Cut a second foam oval approximately 17 inches wide and 15 inches tall.
- Cut a third oval approximately 13 inches wide and 11 inches tall.
- Add a smaller center piece if additional projection is needed.
- Stack the foam layers, placing the greatest fullness slightly below the center of the stomach.
- Secure the layers and carefully trim the raised edges.
- Feather the outer perimeter so the padding gradually blends into your torso.
- Cover the foam with polyester batting to smooth the contours.
- Enclose the padding in stretch fabric and attach it securely to the supporting vest.
When shaping the foam, concentrate on creating a broad, rounded stomach rather than a narrow protruding bump. The sides should gradually curve back toward the waist, and the upper edge should blend naturally beneath the chest.
Professional Santa tip: Try on the belly with your complete Santa suit before making the final cuts. The thickness of the jacket, the position of the belt, and the performer's natural body shape can all affect the finished appearance.
Extra-Large Santa Belly: Building a Big, Jolly Christmas Costume
For a theatrical production, Christmas parade, comedy performance, or an especially traditional Santa Claus appearance, an extra-large DIY Santa belly can create a memorable silhouette.
This version uses more padding and requires careful attention to weight distribution, flexibility, and comfort. Simply adding more stuffing to a small belly pattern usually produces an unnatural shape. A convincing oversized belly needs additional width and height as well as depth.
Suggested Extra-Large Santa Belly Measurements
- Overall width: 24–28 inches
- Overall height: 20–24 inches
- Maximum added depth: 7–10 inches
- Foam layers: Four or more carefully shaped layers
- Recommended materials: Lightweight flexible upholstery foam, polyester batting, and reinforced fabric
- Best construction: Reinforced theatrical vest with broad shoulder support
These are suggested dimensions for an exaggerated adult costume. They are not suitable for every body size. The largest designs may require substantial adjustments to the Santa jacket and supporting garment.
How to Build the Extra-Large Santa Belly
- Begin with a broad foam base approximately 26 inches wide and 22 inches tall.
- Cut a second layer approximately 22 inches wide and 19 inches tall.
- Cut a third layer approximately 18 inches wide and 15 inches tall.
- Add smaller foam layers until you approach the desired projection.
- Temporarily assemble the layers and test the shape against the body before gluing.
- Trim the foam gradually, creating a broad dome with smooth transitions along the upper and side edges.
- Remove unnecessary foam from areas that do not contribute to the visible shape.
- Use thin layers of polyester batting to smooth the surface.
- Place the padding inside a reinforced fabric covering.
- Attach the covered belly to a sturdy vest that distributes the weight across the shoulders and torso.
For an extra-large Santa belly, consider extending some of the padding around the sides of the waist. This helps the stomach appear wider and more natural when viewed from the front.
However, the belly should never be so large or heavy that it restricts breathing, prevents normal walking, or makes sitting difficult.
Important safety tip: Test an oversized Santa belly in stages. Begin with less padding, check your mobility, and add more only if the costume remains comfortable. Take extra care around stairs, doorways, and crowded performance areas because a large padded stomach can obstruct your view of the ground.
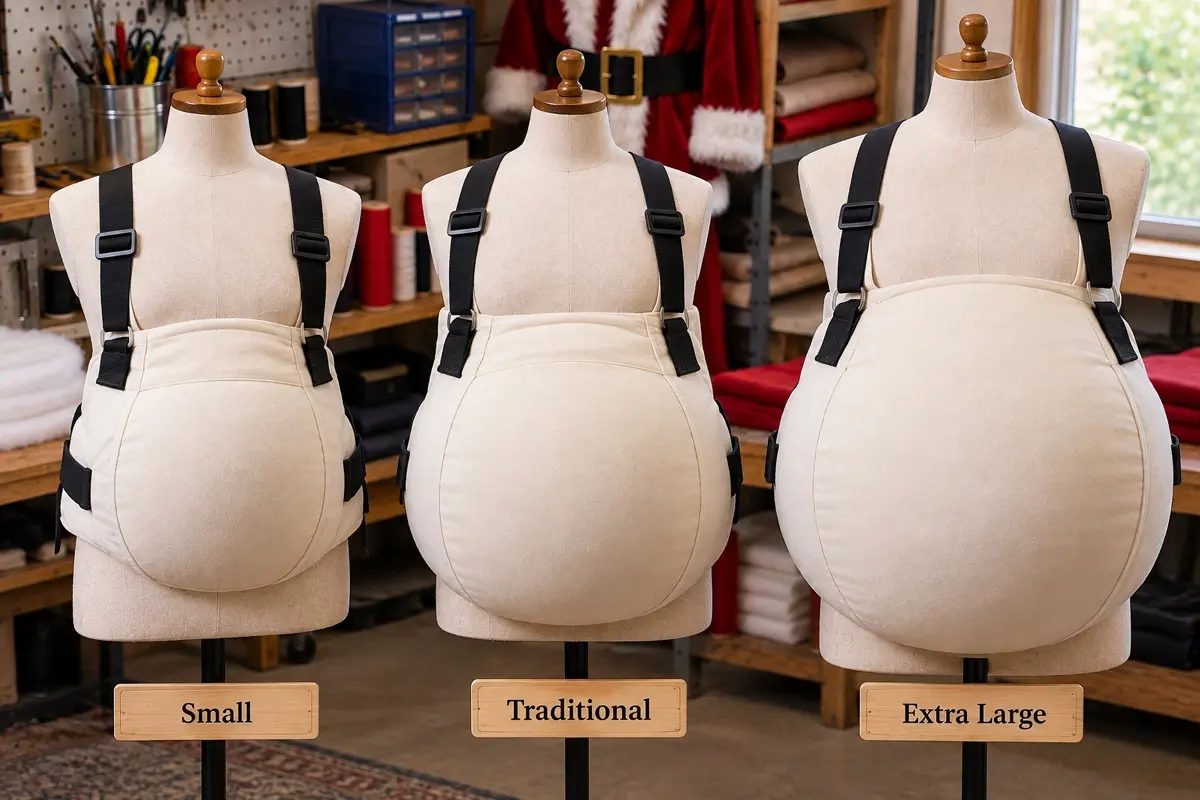
Santa Belly Size Comparison Chart
The following chart provides a quick comparison of the three homemade Santa belly sizes. Use these measurements as flexible guidelines rather than fixed rules.
| Feature | Small Belly | Traditional Belly | Extra-Large Belly |
|---|---|---|---|
| Width | 14–16 inches | 18–22 inches | 24–28 inches |
| Height | 12–14 inches | 16–20 inches | 20–24 inches |
| Added depth | 2–3 inches | 4–6 inches | 7–10 inches |
| Padding construction | Two or three layers | Three or four layers | Four or more layers |
| Difficulty | Beginner | Beginner to intermediate | Intermediate to advanced |
| Best use | Subtle costume padding | Classic Santa appearances | Theater, parades, and exaggerated costumes |
| Support system | Fabric pocket or straps | Fitted vest | Reinforced vest |
How to Choose the Right Santa Belly Size for Your Body
Choosing the correct belly size involves more than measuring your waist. The goal is to create a balanced costume that looks convincing from every angle.
Consider the following factors before cutting your foam:
- Your height: Taller performers may need a wider and longer belly to maintain natural proportions.
- Your natural build: Someone who already has a rounded stomach may need only a small amount of additional padding.
- Your Santa jacket: A fitted jacket may not accommodate an extra-large belly without alterations.
- Your performance: A Santa who spends hours sitting with children may need a softer, more flexible belly than someone appearing briefly on stage.
- Your desired appearance: A realistic Santa costume generally benefits from smooth, moderate padding, while a theatrical character may call for exaggerated proportions.
One useful technique is to temporarily assemble the foam layers without permanently attaching them. Hold the padding against your body, put on your Santa jacket, and take photographs from several angles.
This allows you to experiment with different sizes before committing to the final construction.
Can You Make One Santa Belly with Adjustable Sizes?
Yes. One of the most useful features of a homemade Santa belly is the ability to create a modular padding system with removable foam inserts.
Instead of permanently gluing every foam layer together, you can make a fabric pocket that holds a basic belly shape and accommodates additional removable padding.
For example:
- Small Santa: Use the base foam layer and a thin layer of batting.
- Traditional Santa: Add one or two shaped foam inserts behind the outer belly layer.
- Extra-Large Santa: Add additional foam inserts to increase the projection and fullness.
For the most convincing result, use inserts that gradually increase both the width and depth of the belly. Simply stacking thick pieces in the center can create an unnatural pointed appearance.
A modular design also makes the costume easier to store, repair, and adjust for different performers. Each insert should be held securely inside its own pocket or fastening system so the padding cannot shift during movement.
DIY costume tip: Label your removable inserts by size and keep them together when storing the Santa costume. This makes it easier to recreate the same appearance each Christmas season.
Which DIY Santa Belly Size Looks the Most Realistic?
For most adult Santa Claus costumes, the traditional medium-sized belly is a practical starting point. It creates the familiar rounded appearance while allowing enough room for comfortable movement beneath a properly fitted Santa suit.
However, realism depends more on proportion and shaping than on the actual size of the padding. A carefully sculpted small belly can look more convincing than an oversized one with visible lumps or abrupt edges.
Whatever size you choose, concentrate on smooth contours, gradual transitions, and secure attachment to the supporting garment.
Once you've selected the right belly size, the next challenge is making sure it stays exactly where it belongs. In the following section, we'll look at how to construct a comfortable Santa belly harness and support system that prevents slipping, sagging, and unwanted movement throughout your Christmas appearance.
How to Make a Santa Belly Harness That Stays Secure and Comfortable
You've spent time shaping, padding, and fitting your DIY Santa belly, but even the most realistic costume padding won't look convincing if it slides down, shifts sideways, or bounces every time Santa takes a step. A properly designed Santa belly harness is what keeps everything securely in place while allowing you to walk, sit, bend, and move naturally.
Professional theatrical costumes often use internal support systems to distribute the weight of body padding across the shoulders and torso. You can use the same basic principles to create a comfortable harness for your homemade Santa Claus belly without purchasing expensive specialty equipment.
In this section, we'll build an adjustable shoulder harness for the budget Santa belly and explain how to reinforce the fitted vest used in the professional version. Both methods can be adapted to accommodate different belly sizes.
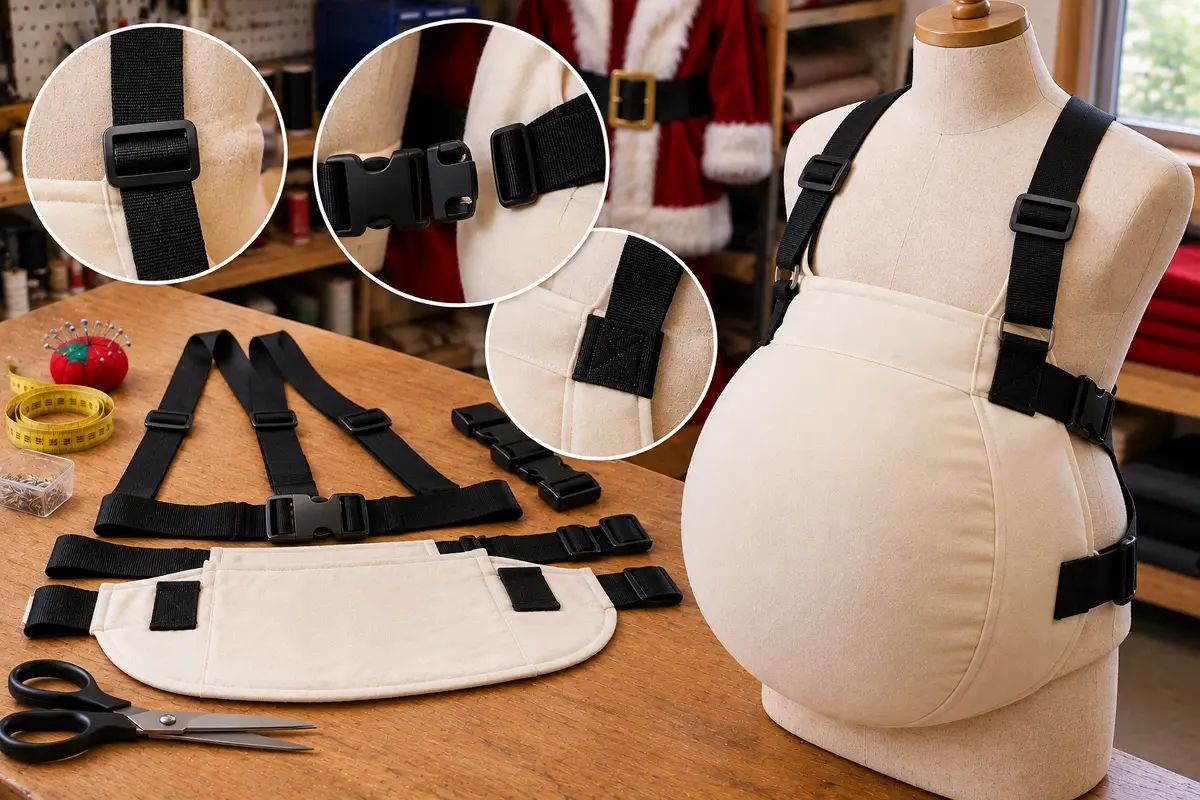
Why Your DIY Santa Belly Needs a Proper Support System
One of the biggest mistakes when making a homemade Santa belly is relying entirely on a tight elastic band around the waist. Although this may hold lightweight padding temporarily, it can become uncomfortable during longer Christmas appearances.
A large padded belly also creates leverage that pulls the costume forward and downward. Without adequate support, the belly may gradually sag below its intended position.
A good Santa belly harness should accomplish five things:
- Distribute the weight: Support the belly through the shoulders and torso instead of concentrating pressure around the stomach.
- Prevent slipping: Keep the padding at the correct height throughout the performance.
- Reduce sideways movement: Stop the belly from shifting when walking, turning, or bending.
- Allow adjustment: Make it easy to change the fit for different clothing layers or performers.
- Maintain comfort: Avoid excessive pressure on the shoulders, chest, waist, or abdomen.
The ideal support system should feel similar to wearing a comfortable vest or lightweight backpack. You should be aware that it's there, but it shouldn't interfere with normal movement.
Materials Needed to Make a Santa Belly Harness
Most of these materials were included in our original shopping lists. If you have already purchased supplies for the basic or professional Santa belly, you probably have everything you need.
- Wide elastic or polyester webbing: Approximately 2–3 yards of material measuring 1–2 inches wide.
- Adjustable strap sliders: Two or four plastic or metal adjusters sized to match the webbing.
- Side-release buckles: Optional buckles for quick attachment and removal.
- Hook-and-loop fasteners: Approximately 12–24 inches of sew-on fastening tape.
- Reinforcement fabric: Small pieces of canvas, cotton twill, or another sturdy woven fabric.
- Soft shoulder padding: Optional fleece or thin foam for additional comfort.
- Polyester thread: Strong all-purpose or heavy-duty sewing thread.
Tools: Measuring tape, fabric scissors, sewing machine or hand-sewing needle, fabric marker, and sewing clips.
For the shoulder straps, polyester webbing is often a better choice than very stretchy elastic because it provides more consistent support. Elastic can still be useful for a lightweight waist stabilizer.
Step 1: Determine Where the Santa Belly Should Sit
Before cutting the harness straps, put on your undershirt and position the finished Santa belly against your stomach.
The upper portion of the padding should begin below the chest, with the fullest part of the belly positioned where it creates the most convincing Santa Claus silhouette.
- Stand naturally in front of a full-length mirror.
- Hold the padded belly against your abdomen.
- Adjust its height until the shape looks balanced with your chest and hips.
- Check that the lower edge doesn't interfere with your thighs when sitting.
- Mark the desired position on your undershirt using small pieces of removable tape.
Try sitting in a chair while holding the belly in place. If the padding presses firmly against your chest or legs, adjust its position or reduce the lower padding thickness.
Costume tip: Don't position the belly based solely on where your Santa belt normally sits. The belt can be adjusted later to complement the finished shape.
Step 2: Measure and Cut the Shoulder Straps
For the basic Santa belly, we'll create two adjustable shoulder straps that support the padding from above.
These straps will run from the upper attachment points of the belly, over the shoulders, and down to the lower attachment points, forming a harness similar to a pair of suspenders.
- Measure from the upper left attachment point of the belly, over your left shoulder, and down your back to the intended rear anchor point.
- Repeat the measurement on the right side.
- Add approximately 6–8 inches to each measurement to allow for adjustment and attachment.
- Cut the webbing to the required lengths.
- Thread the webbing through adjustable strap sliders according to the hardware manufacturer's instructions.
- Temporarily secure the straps with sewing clips while checking the fit.
For a front-mounted belly pad, you'll also need a stable connection between the rear shoulder straps and the lower portion of the belly. This can be made using a broad fabric back panel and side straps.
The back panel helps prevent the shoulder straps from pulling forward and keeps the harness balanced.
Step 3: Make a Fabric Back Panel for Better Support
A simple fabric back panel can make the harness more comfortable and prevent the shoulder straps from spreading apart.
Use a piece of sturdy cotton twill or canvas approximately 8–12 inches wide and 10–14 inches tall. Adjust these dimensions to fit the performer's back.
- Cut the back panel from your chosen fabric.
- Fold the edges inward approximately 1/2 inch and sew them to prevent fraying.
- Position the panel against the upper and middle back.
- Attach the two shoulder straps near the upper corners.
- Reinforce the attachment points with additional stitching.
- Attach two side straps near the lower corners of the panel.
The side straps will wrap around the waist and connect to the belly covering, helping keep the entire assembly centered.
For additional comfort, line the back panel with soft cotton or breathable mesh.
Professional construction tip: A broad back panel spreads pressure over a larger area and can be more comfortable than narrow straps alone, particularly when supporting a traditional or extra-large Santa belly.
Step 4: Reinforce the Belly's Strap Attachment Points
Never rely on a few stitches through thin stretch fabric to support a heavy foam belly. Repeated movement can eventually tear the fabric or pull the straps loose.
Instead, create reinforced attachment points using small patches of sturdy woven fabric.
- Cut four reinforcement patches approximately 3 inches square.
- Position two patches near the upper corners of the belly's fabric backing.
- Position the remaining patches near the lower side attachment points.
- Sew each patch securely to the backing fabric, keeping the stitching away from the thick foam.
- Attach the harness straps to the reinforced patches.
- Use several rows of stitching to strengthen each connection.
If your belly covering is made entirely from stretchy jersey fabric, consider adding a separate nonstretch backing panel before attaching the reinforcement patches.
This prevents the straps from pulling the fabric out of shape.
Important: The attachment points should support the weight of the padding without compressing or distorting the rounded stomach.
Step 5: Add an Adjustable Waist Stabilizer
The shoulder straps carry much of the belly's weight, but a soft waist stabilizer helps prevent the padding from moving sideways.
For this part of the harness, use wide elastic or soft webbing with an adjustable closure.
- Measure around your waist while wearing the belly and shoulder harness.
- Cut a length of elastic or webbing that allows comfortable adjustment.
- Attach one end to the lower left side of the belly backing.
- Route the strap around your back and connect it to the opposite side.
- Add hook-and-loop fasteners or an adjustable buckle.
- Adjust the stabilizer until the belly stays centered without squeezing your waist.
The waist strap should stabilize the padding, not carry its entire weight.
Check the fit by taking a deep breath and bending forward. If the strap digs into your abdomen or restricts movement, loosen it.
Comfort tip: A wider strap generally distributes pressure more comfortably than a narrow one. Avoid using thin cords or narrow elastic bands that can dig into the body.
Step 6: Adjust the Harness for a Comfortable Fit
With the shoulder straps, back panel, and waist stabilizer attached, put on the complete Santa belly harness.
Make adjustments in the following order:
- Position the belly at the correct height.
- Adjust the shoulder straps until they support the padding evenly.
- Check that the back panel rests comfortably against your back.
- Fasten the waist stabilizer loosely.
- Tighten the stabilizer only enough to prevent excessive sideways movement.
- Move your arms, shoulders, and torso to check for restrictions.
Both shoulder straps should carry approximately equal tension. If one side feels noticeably tighter, adjust the strap lengths until the belly sits level.
For a larger belly, consider adding thin shoulder pads made from fleece or soft foam to reduce pressure during extended wear.
Step 7: Reinforce the Professional Santa Belly Vest
If you built the professional foam belly described earlier, you may already have a fitted fabric vest. In that case, you don't necessarily need a separate shoulder harness.
The vest itself can serve as the support system, provided it is properly reinforced.
To improve the support of your theatrical Santa belly vest:
- Inspect the shoulder seams and reinforce them with additional stitching if necessary.
- Add sturdy fabric panels behind the belly attachment points.
- Check that the front closure remains secure when the foam padding is attached.
- Install adjustable side straps if the vest allows excessive movement.
- Add a soft lining to areas that contact the shoulders and upper back.
- Try on the vest with the complete foam belly and adjust the fit.
For an extra-large Santa belly, a broad supporting vest is usually preferable to a narrow strap-only harness because it distributes the load across more of the torso.
Theatrical costume tip: If you plan to use removable foam inserts, make sure the vest and its attachment points can support the largest configuration without stretching or sagging.
Step 8: Make the Santa Belly Easy to Put On and Remove
A good Santa costume should be easy to put on without assistance. This becomes especially important when performers need to change costumes quickly or remove the padding during breaks.
Consider adding one or more of the following features:
- Front-opening vest: Allows the performer to put on the belly without pulling it over the head.
- Side-release buckles: Make straps easier to fasten and adjust.
- Hook-and-loop closures: Provide simple adjustments without complicated hardware.
- Removable shoulder padding: Allows the harness to be cleaned or repaired.
- Detachable belly pocket: Makes it easier to change padding sizes or store the costume.
Make sure at least one closure can be reached and released easily by the wearer. A Santa belly should never require cutting straps or struggling with hidden fasteners to remove it.
Step 9: Test the Harness While Walking, Sitting, and Bending
Before wearing your homemade Santa belly at a Christmas event, give the completed harness a thorough movement test.
Put on the belly, followed by your Santa jacket and belt. Then perform the following movements:
- Walk across the room: The belly should remain centered without bouncing excessively.
- Sit in a chair: The padding should not push painfully against your chest or thighs.
- Stand up: The harness should return to its normal position without adjustment.
- Bend slightly forward: The straps should not dig into your shoulders or abdomen.
- Raise your arms: The harness should not interfere with normal shoulder movement.
- Turn from side to side: The belly should follow your body without twisting or slipping.
If possible, wear the complete costume for approximately 30 minutes while performing ordinary activities.
This test can reveal problems that aren't obvious during a quick fitting.
Safety reminder: Remove or loosen the harness immediately if you experience restricted breathing, dizziness, overheating, numbness, or painful pressure. Never sacrifice comfort or safety for the appearance of the costume.
Common Santa Belly Harness Problems and How to Fix Them
Even a carefully constructed harness may need a few adjustments before it fits perfectly. Fortunately, most problems are easy to correct.
| Problem | Likely Cause | Recommended Fix |
|---|---|---|
| Belly slides downward | Shoulder straps are too loose | Shorten the straps and check the attachment points |
| Belly shifts sideways | Waist stabilizer is too loose | Adjust the side straps and center the back panel |
| Shoulders become sore | Weight concentrated on narrow straps | Add wider straps or soft shoulder padding |
| Vest pulls forward | Insufficient back support | Reinforce the back panel and rebalance the harness |
| Belly bounces while walking | Loose attachment points or excessive movement | Secure the belly backing and adjust the stabilizer |
| Harness feels too tight | Straps or vest are overadjusted | Loosen the fit and check the padding position |
| Straps slip off shoulders | Incorrect strap placement | Reposition or cross the straps across the back |
| Fabric begins tearing | Attachment points lack reinforcement | Add sturdy backing patches and repair the stitching |
Should You Use a Harness or a Vest for Your Santa Belly?
Both support systems can work well, but each has advantages depending on the size and construction of your homemade Santa Claus belly.
Choose an adjustable shoulder harness if:
- You're making a lightweight budget Santa belly.
- You want a simple construction with fewer fabric pieces.
- You need a support system that can be adjusted easily.
- You plan to use the belly for occasional Christmas appearances.
Choose a fitted supporting vest if:
- You're building a professional theatrical foam belly.
- You want to distribute the weight across a larger area.
- You're making a traditional or extra-large Santa belly.
- You expect to wear the costume for extended periods.
- You want a secure foundation for removable padding inserts.
For frequent Santa performers, a well-fitted vest with adjustable side supports is often the most practical solution. It provides a stable foundation while keeping the padding properly positioned beneath the costume.
The Secret to a Comfortable Santa Belly That Stays in Place
A convincing Santa Claus costume depends on more than the shape of the belly. The padding must move naturally with the performer, remain centered beneath the jacket, and stay comfortable throughout the appearance.
Whether you choose a simple shoulder harness or a reinforced theatrical vest, concentrate on balanced weight distribution, adjustable straps, strong attachment points, and unrestricted movement.
A properly supported DIY Santa belly should stay in place without constant readjustment, allowing Santa to concentrate on greeting visitors, posing for photographs, and spreading a little Christmas cheer.
With the belly securely fitted, we're ready to address another important part of professional costume construction: making the padding look and move more naturally. In the next section, we'll explore techniques for adding realistic movement to your Santa belly using flexible foam, layered padding, and carefully selected fabrics.
How to Make a DIY Santa Belly Move Naturally with Flexible Padding
A convincing DIY Santa belly needs more than the right shape. It also needs to move naturally when Santa walks, sits, bends, laughs, or reaches into his bag of presents. A perfectly rounded stomach may look wonderful on a mannequin, but if it remains completely rigid while the performer moves, the illusion can quickly disappear.
Professional theatrical costume makers address this problem by combining flexible foam, soft batting, stretch fabrics, and carefully positioned padding. These materials allow a costume to maintain its basic shape while responding to ordinary body movements.
Fortunately, you can use many of these same techniques when building your homemade Santa Claus belly. Whether you're making the inexpensive version or the more advanced theatrical costume, a few construction adjustments can help create a softer, more believable appearance.
Why Realistic Movement Matters in a Santa Claus Costume
Think about how Santa Claus moves. He walks with a relaxed stride, bends slightly to greet children, settles into a chair, and occasionally gives that familiar belly-shaking laugh.
If the padding is too stiff, these movements can look unnatural. A rigid foam belly may remain perfectly round while the rest of the body moves, making it obvious that something is being worn beneath the jacket.
On the other hand, padding that is too loose can create its own problems. The belly may bounce excessively, shift from side to side, or lose its shape when Santa sits down.
The goal is to find a balance between structure and flexibility.
A properly constructed realistic Santa belly should:
- Maintain its rounded shape while standing.
- Compress slightly when the performer sits.
- Move gently with the torso while walking.
- Allow natural bending and twisting.
- Return to its original shape after movement.
- Remain securely positioned beneath the Santa suit.
These qualities depend largely on the materials you choose and how you arrange them inside the costume.
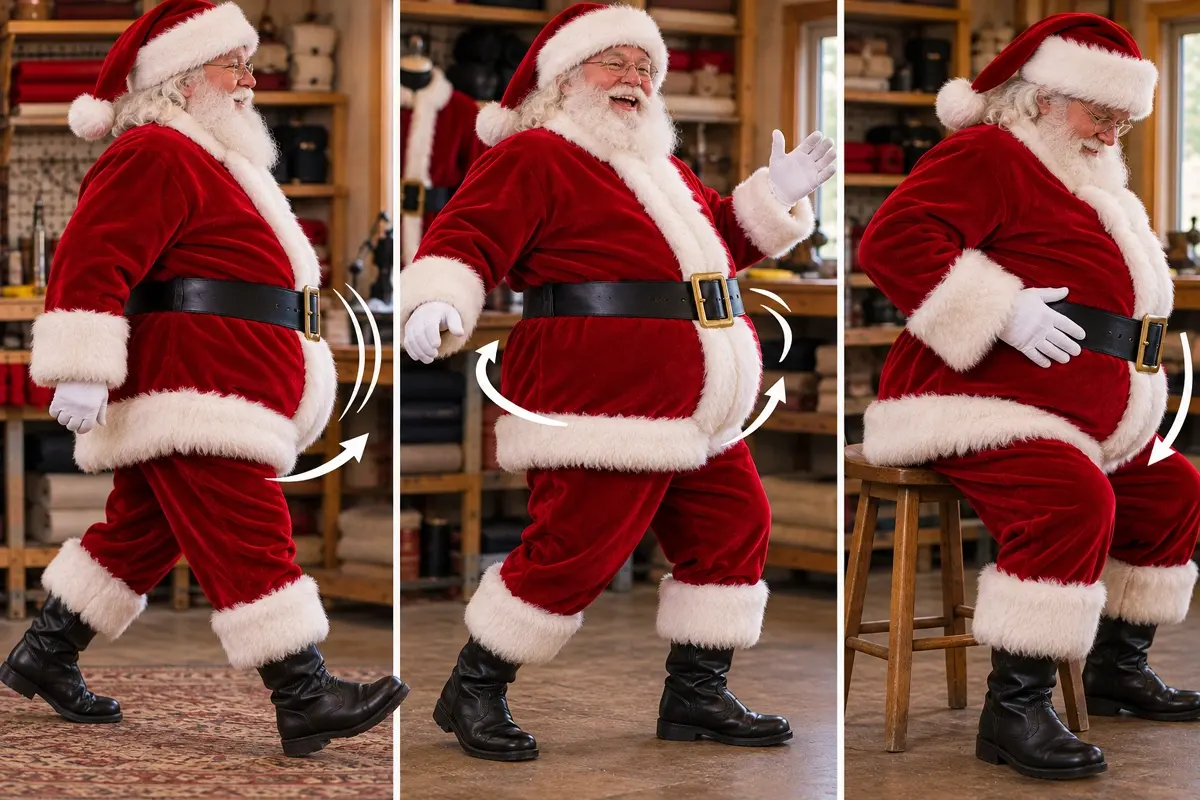
Step 1: Choose Flexible Foam Instead of Rigid Padding
The first step toward realistic movement is selecting the right type of foam.
Flexible open-cell polyurethane upholstery foam is a practical choice for theatrical body padding because it can compress and recover its shape. It is also relatively lightweight and available in several thicknesses and firmness levels.
For a Santa belly, look for foam that feels soft to medium-soft when compressed by hand.
Avoid using rigid insulation foam, hard packaging foam, or other materials that resist bending. These products may hold a rounded shape, but they generally do not respond naturally to body movement.
Simple foam test: Before cutting your padding, press your palm firmly into a sample of the foam. It should compress without excessive force and return reasonably close to its original shape when released.
Next, bend the foam gently. It should flex without cracking or developing a permanent crease.
Foam that passes both tests is a reasonable candidate for a flexible Santa belly.
Step 2: Build the Belly with Thin Foam Layers
One thick block of foam can be difficult to shape and may feel stiff against the body. Using several thinner layers often provides greater control over the finished costume.
For example, instead of making a belly from one solid 6-inch-thick piece, you could combine several thinner foam pieces to create the desired projection.
Consider the following arrangement:
- Base layer: A broad piece of 1-inch flexible foam that follows the natural contour of the abdomen.
- Middle layer: A smaller piece of 2-inch soft upholstery foam that provides most of the stomach's fullness.
- Outer layer: A rounded piece of 1-inch foam that helps create the final contour.
- Finishing layer: Polyester quilt batting that softens the surface and conceals transitions between foam pieces.
This example produces approximately 4 inches of central foam thickness before sculpting or compression. Additional layers can be used for a larger belly.
However, simply stacking thin foam does not automatically make a costume flexible. The foam's firmness, the amount of adhesive, and the construction of the outer covering all affect movement.
Professional costume tip: Avoid coating entire foam surfaces with thick layers of adhesive. Use a foam-compatible flexible adhesive only where necessary and according to the manufacturer's instructions. Excess adhesive can create stiff areas that interfere with natural movement.
Step 3: Create a Soft Outer Layer with Polyester Batting
Polyester quilt batting is useful for more than smoothing the appearance of your Santa belly. It also creates a soft outer surface that can compress slightly beneath the costume.
When used over flexible foam, batting helps reduce the hard-edged appearance that sometimes develops when a performer bends or sits.
To add a soft outer layer:
- Place the sculpted foam belly on a flat work surface.
- Cut a sheet of polyester batting large enough to cover the entire rounded surface.
- Lay the batting over the foam without stretching it tightly.
- Add small pieces of batting around the upper and side transitions if needed.
- Cover the assembly with a second thin layer of batting for a smoother finish.
- Secure the batting inside the fabric covering so it cannot bunch or slide during movement.
For a traditional Santa belly, two thin layers of batting are often easier to shape than one thick layer.
Keep the batting relatively loose. If it is compressed tightly inside the fabric cover, much of its softness will be lost.
DIY tip: Avoid using excessive loose fiberfill in a large professional belly. Although it creates softness, unsecured stuffing can migrate inside the covering and produce uneven lumps over time.
Step 4: Use Stretch Fabric to Allow Natural Compression
The fabric surrounding your foam padding has a considerable effect on how the finished belly moves.
A tightly fitted, nonstretch fabric covering can prevent soft foam from compressing properly. It may also pull across the stomach and create visible wrinkles beneath the Santa jacket.
For the outer belly covering, consider using a soft four-way stretch fabric, cotton jersey with adequate stretch, or another flexible costume material.
To create a comfortable covering:
- Measure the finished foam and batting assembly across its widest and tallest points.
- Cut the fabric pieces with enough room to accommodate the rounded shape.
- Use a stretch-compatible stitch, such as a narrow zigzag stitch, when sewing stretchy fabric.
- Test the covering over the foam before permanently closing it.
- Check that the belly can compress gently without the fabric pulling tightly across the surface.
- Adjust the covering if wrinkles, excessive tension, or loose folds appear.
The fabric should hold the padding securely while allowing it to respond to ordinary movements.
Important: Stretch fabric works best as the belly's covering. The main supporting vest or harness should still use sufficiently sturdy materials to prevent the entire belly from sagging.
Step 5: Make the Lower Belly Flexible for Sitting
One of the most common problems with oversized Santa belly padding occurs when the performer sits down.
A thick, rigid lower section can press against the thighs and push the entire belly upward toward the chest. This may cause discomfort and make the costume look unnatural.
To improve flexibility, the lower portion of the belly should be slightly softer and more tapered than the center.
Try the following adjustments:
- Put on the unfinished belly and sit in a sturdy chair.
- Identify where the lower padding contacts your thighs.
- Mark any areas that create uncomfortable pressure.
- Remove the belly and gradually reduce the foam thickness in those areas.
- Replace some of the removed thickness with soft batting if additional surface fullness is needed.
- Try on the belly again and repeat until sitting feels comfortable.
Don't remove so much foam that the lower stomach collapses or develops a sharp crease.
The goal is a gradual transition from the thicker center to a softer lower edge.
Santa performer tip: If you expect to spend several hours sitting for Christmas photographs, test the belly in the actual chair you plan to use whenever possible. A low chair and a high-backed Santa throne can affect the padding differently.
Step 6: Allow the Sides of the Belly to Move with the Torso
A natural stomach changes shape slightly when a person twists, turns, or bends sideways. Your homemade Santa belly should allow similar movement without shifting out of position.
One useful approach is to keep the center of the padding relatively full while using thinner, more flexible foam around the sides.
This allows the side sections to follow the movement of the torso more easily.
To improve side flexibility:
- Lay the foam belly on your work surface with the rounded side facing upward.
- Identify the outer 3–4 inches along each side.
- Check that these areas are thinner than the center of the belly.
- Gradually trim any thick or abrupt foam transitions.
- Add a thin layer of batting to soften the edges.
- Try on the belly and gently rotate your torso from side to side.
If the padding pulls against the harness or restricts twisting, check the attachment points before removing more foam.
Sometimes the problem is caused by a tight fabric cover or support strap rather than the foam itself.
Step 7: Create Gentle Belly Movement Without Excessive Bouncing
Santa's famous belly-shaking laugh is part of the traditional Christmas image. However, a costume belly that swings or bounces wildly can look more like a loose pillow than natural body padding.
For a convincing effect, the outer padding should be soft enough to respond slightly to movement while the main structure remains securely supported.
A practical construction combines:
- A stable foam base attached to the vest.
- Soft foam layers that compress gently.
- A lightweight batting layer that rounds the surface.
- A flexible fabric covering.
- A properly adjusted harness that prevents the entire assembly from swinging.
When Santa laughs or moves his torso, the soft outer surface may shift and compress slightly while the supporting structure keeps the belly in position.
Important distinction: A foam belly will not move exactly like natural body tissue. These techniques improve the appearance of movement, but they should not be expected to reproduce the behavior of a professional silicone prosthetic.
For most Christmas costumes, however, carefully shaped flexible foam provides a practical balance of appearance, comfort, and cost.
Step 8: Consider Removable Padding for Different Movements
If you followed our earlier instructions for making an adjustable Santa belly, you may already have a fabric pocket designed to hold removable foam inserts.
This modular construction offers another advantage: you can change the amount of padding depending on the type of Christmas appearance.
For example:
- Standing appearances: Use the full padding arrangement for a larger, rounder silhouette.
- Seated Santa appearances: Remove or replace a lower insert if it creates uncomfortable pressure when sitting.
- Parades and walking performances: Use a lighter arrangement that provides greater freedom of movement.
- Photography: Adjust the inserts to achieve the desired shape from the camera's main viewing angle.
Make sure all removable inserts fit securely inside their pockets. Loose foam pieces can shift during movement and create visible lumps beneath the costume.
Professional costume tip: Keep a photograph of each successful padding arrangement. This makes it easier to recreate the same Santa appearance for future performances.
Step 9: Test Your Santa Belly with Realistic Movements
Once you've adjusted the foam, batting, and fabric covering, it's time to test the complete DIY Santa belly costume.
Put on the belly, secure the harness or vest, and wear your Santa jacket and belt.
Perform the following movement tests:
| Movement | What to Look For | Possible Adjustment |
|---|---|---|
| Standing naturally | Smooth, rounded stomach | Redistribute batting or reshape foam |
| Walking | Gentle movement without excessive bouncing | Adjust harness and side supports |
| Sitting | Comfortable compression of lower padding | Thin or soften lower foam |
| Bending forward | No painful pressure against chest or thighs | Reduce foam thickness or reposition belly |
| Turning sideways | Padding follows torso movement | Improve side flexibility or loosen restrictive straps |
| Laughing | Subtle movement of the outer padding | Check foam softness and fabric tension |
| Standing after sitting | Belly returns to its original position | Check foam recovery and harness fit |
Have someone watch you from the front and side while you move. They may notice unnatural shifting or visible costume edges that are difficult to see yourself.
For an additional check, record a short video of yourself walking, sitting, and standing. Watching the footage can help identify problems before your first Christmas appearance.
Common Problems That Make a Santa Belly Look Unnatural
Even carefully constructed padding may require a few adjustments. The following problems are particularly common when trying to create realistic movement.
The Belly Looks Like a Hard Ball
Likely cause: Foam that is too firm, excessive central thickness, or a covering that compresses the padding into a rigid shape.
Solution: Use softer foam, broaden the shape, and create more gradual transitions around the edges.
The Belly Bounces Too Much While Walking
Likely cause: Loose harness straps, an unstable foam attachment, or too much unsecured stuffing.
Solution: Improve the supporting vest or harness, secure the padding, and remove excessive loose fiberfill.
The Belly Develops Wrinkles When Sitting
Likely cause: Excess fabric, uneven batting, or a covering that doesn't follow the foam's shape.
Solution: Adjust the fabric covering and smooth the batting. Some temporary fabric folds are normal during sitting, particularly beneath a loose Santa jacket.
The Belly Pushes Upward When Sitting
Likely cause: Excessively thick lower foam or padding positioned too low on the torso.
Solution: Reduce the lower foam thickness, improve its taper, or reposition the belly slightly higher if comfortable.
The Belly Doesn't Return to Its Original Shape
Likely cause: Low-quality foam, compressed batting, or padding that has lost its resilience.
Solution: Replace damaged foam or flattened batting. Avoid storing the belly under heavy objects that can permanently compress the materials.
Should You Use Silicone for a More Realistic Santa Belly?
Professional film and television productions sometimes use silicone prosthetics to create realistic body transformations. Silicone can provide soft, skin-like movement, but it also introduces additional cost, weight, and construction challenges.
For a Santa Claus costume worn beneath a red jacket, silicone is usually unnecessary. Much of the belly remains concealed by the costume, making flexible upholstery foam and batting a more practical choice.
Silicone padding can also become heavy, particularly when used in large volumes. A poorly supported silicone belly may be uncomfortable during long performances.
Unless you're creating a specialized close-up prosthetic effect, a carefully shaped foam belly will generally provide the appearance needed for traditional Santa performances.
The Final Test: Does Your DIY Santa Belly Move Like Part of the Costume?
The best homemade Santa belly is one that allows the performer to forget about the padding while wearing it. The stomach should remain rounded when standing, compress comfortably when sitting, and move gently with the torso during ordinary activities.
Achieving this effect doesn't require complicated machinery or expensive special effects materials. Flexible foam, layered batting, a properly fitted covering, and a secure supporting vest can make a considerable difference.
Take your time during the fitting process. Small changes in foam thickness, padding placement, and fabric tension can improve both the appearance and comfort of the finished costume.
Now that your Santa belly has the right shape and movement, it's time to make sure the rest of the costume works with it. In the next section, we'll explore how to fit a Santa belly under a Santa Claus suit, conceal the padding edges, position the belt correctly, and avoid the common costume mistakes that can spoil an otherwise convincing appearance.
How to Fit a DIY Santa Belly Under a Santa Claus Suit for a Realistic Look
You've built your DIY Santa belly, shaped the padding, adjusted the harness, and tested its movement. Now comes one of the most important parts of the entire project: making sure the finished belly looks convincing beneath your Santa Claus suit.
Even beautifully sculpted theatrical padding can look unnatural if the Santa jacket is too tight, the belt sits in the wrong position, or the edges of the foam show through the fabric. Fortunately, professional costume makers use several simple techniques to conceal padding and create a smooth, believable body shape.
Whether you're wearing an inexpensive Christmas costume or a professional velvet Santa suit, proper fitting can make the difference between an obvious homemade belly and a convincing Santa Claus appearance.
Step 1: Choose a Santa Suit That Accommodates the Belly Padding
Before making any final adjustments to your homemade Santa belly, examine the fit of your Santa Claus jacket.
A traditional Santa suit generally has a loose, generous cut that works well with padded costumes. However, not every Santa jacket is designed to accommodate a large artificial stomach.
If the jacket is too small, it may stretch tightly across the padding, revealing foam edges, fabric wrinkles, and unnatural contours.
If the jacket is excessively large, the extra fabric may hang loosely and conceal the rounded belly you worked so hard to create.
For the best appearance, look for a Santa jacket that:
- Provides adequate stomach room: The jacket should close comfortably over the belly without stretching tightly across the padding.
- Allows natural shoulder movement: The costume should not pull across the chest when reaching or bending.
- Has enough length: The lower edge should remain in place when walking, sitting, and standing.
- Uses suitable fabric: Velvet, velour, and other moderately substantial fabrics can help conceal minor padding imperfections.
- Accommodates the belt: The jacket should allow the belt to sit naturally without forcing the belly into an awkward shape.
Professional Santa tip: Always try on your Santa suit while wearing the completed belly. Measurements taken without the padding may not accurately represent the finished costume.
Step 2: Position the Santa Belly at the Correct Height
One of the most common mistakes when wearing a Santa belly costume is positioning the padding too high or too low.
If the belly sits too high, it may appear to begin directly beneath the chest, creating an unnatural rounded bulge.
If it sits too low, the padding may hang over the hips, interfere with walking, or push upward when the performer sits.
To find the correct position:
- Put on your undershirt and Santa belly harness or supporting vest.
- Stand naturally in front of a full-length mirror.
- Adjust the belly so the upper curve begins below the chest.
- Position the fullest portion of the padding around the middle or lower abdomen.
- Check that the lower edge tapers smoothly toward the hips.
- Put on your Santa jacket and examine the overall silhouette.
For most traditional Santa costumes, the stomach should appear broad and rounded without looking as though a separate ball has been strapped to the front of the body.
Costume fitting tip: Take a photograph from the side. This angle often reveals positioning problems that are difficult to notice from the front.
Step 3: Hide the Upper Edge of the Santa Belly Padding
The upper edge of the padding is one of the easiest places to spot a homemade Santa belly.
If the foam ends abruptly beneath the chest, it can create a visible horizontal ridge through the Santa jacket. This becomes particularly noticeable when the performer turns sideways or raises their arms.
To conceal the upper edge:
- Remove the belly and lay it on a flat work surface.
- Examine the transition between the thick central padding and the upper edge.
- Trim any abrupt foam ridges using a sharp foam-cutting tool.
- Gradually taper the foam toward the upper perimeter.
- Add a thin layer of polyester batting over the transition.
- Smooth the batting beneath the stretch-fabric covering.
- Try on the belly again and check the result beneath the Santa jacket.
The goal is to create a gradual transition between your chest and the padded stomach.
Hollywood costume trick: A thin layer of batting extending slightly beyond the main foam can help soften a visible transition. Keep the batting smooth and securely enclosed so it does not bunch beneath the jacket.
Step 4: Blend the Side Edges into the Natural Waist
A realistic Santa Claus belly should look convincing from the front, side, and three-quarter angles.
One problem with inexpensive costume padding is that it often adds fullness only to the front of the stomach. When viewed from the side, the padding may appear to end suddenly at the waist.
Professional theatrical costumes frequently use tapered side padding to create a smoother transition.
To improve the side contours:
- Put on the belly without the Santa jacket.
- Stand sideways in front of a mirror.
- Identify any visible ridges where the padding meets your natural waist.
- Remove the belly and mark those areas.
- Use thin flexible foam or batting to soften the transition.
- Taper the added material gradually toward the back of the torso.
- Secure the padding beneath the fabric covering.
Be careful not to add unnecessary bulk around the entire waist. The purpose is to create a smooth silhouette, not simply make the costume larger.
Professional tip: For a traditional Santa belly, slightly wider side contours often look more natural than a narrow stomach that projects sharply forward.
Step 5: Eliminate Lumps and Uneven Padding
Visible lumps can spoil the appearance of an otherwise convincing homemade Santa belly.
These imperfections often develop when loose polyester fiberfill shifts inside the covering or when foam layers are not properly blended.
To correct uneven padding:
- Remove the Santa jacket and inspect the belly covering.
- Feel the surface gently to locate unusually firm or raised areas.
- Open the removable cover or access opening if your design includes one.
- Redistribute any loose fiberfill that has collected in one area.
- Trim abrupt foam transitions if necessary.
- Add thin batting where the surface needs additional smoothing.
- Replace the covering and check the finished shape.
A smooth outer layer is especially important when wearing a lightweight Santa suit.
Thicker velvet or velour may conceal minor imperfections, but it is still worth correcting obvious lumps before wearing the costume.
Step 6: Position the Santa Belt Without Flattening the Belly
The wide black belt is one of the most recognizable features of a traditional Santa Claus costume. It also plays an important role in how the finished belly appears.
A belt that is pulled too tightly can flatten the padding, create a deep indentation, or push the foam into an unnatural shape.
A belt that is too loose may slide downward or hang awkwardly across the stomach.
To position the belt correctly:
- Put on the complete Santa suit with the belly padding underneath.
- Fasten the jacket and smooth the fabric over the stomach.
- Wrap the Santa belt around the outside of the jacket.
- Position the belt where it creates the most natural division between the upper and lower portions of the costume.
- Adjust the belt until it rests securely without crushing the padding.
- Check the appearance from the front and side.
- Walk and sit to make sure the belt remains comfortable.
Depending on the Santa suit and belly size, the belt may look best near the natural waist or slightly below the fullest portion of the stomach.
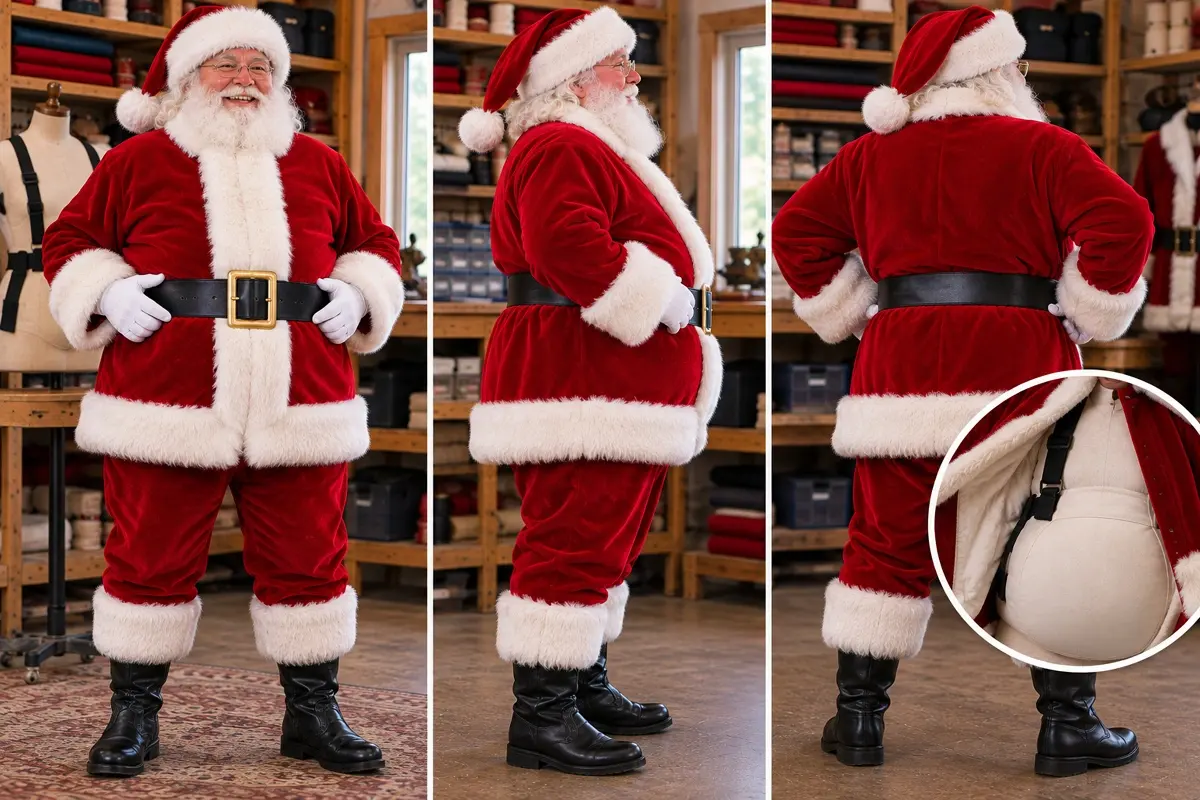
There is no single correct position for every performer. The goal is a balanced appearance that remains comfortable during movement.
Santa costume tip: If your belt is too short for the padded belly, use a longer belt rather than forcing the existing one to close tightly. An adjustable costume belt can also make fitting easier.
Step 7: Use the Right Undergarments Beneath the Santa Belly
What you wear beneath your DIY Santa belly can affect both comfort and appearance.
A soft undershirt provides a comfortable layer between the skin and the harness or supporting vest. It can also reduce rubbing around the shoulders and waist.
For extended Santa appearances, consider the following:
- Breathable cotton T-shirt: A practical choice for occasional costume wear.
- Moisture-wicking undershirt: May help manage perspiration during longer indoor performances.
- Smooth-fitting base layer: Reduces fabric bunching beneath the supporting vest.
- Lightweight undershirt: Helps avoid unnecessary bulk and overheating.
Avoid wearing several thick clothing layers beneath the belly unless the costume requires them. Extra fabric can create wrinkles, increase heat buildup, and interfere with the harness fit.
Comfort reminder: Santa suits can become surprisingly warm, especially when combined with foam padding, a beard, gloves, and a hat. Take regular breaks, stay hydrated, and remove the costume if you begin to overheat.
Step 8: Make Sure the Santa Jacket Hangs Naturally
Even when the padding is properly shaped, the jacket itself may create wrinkles or folds that make the stomach look unnatural.
This is particularly common around the front closure, lower chest, and belt.
To improve the fit:
- Put on the Santa jacket and fasten it completely.
- Smooth the fabric gently over the upper stomach.
- Check for tight horizontal wrinkles across the belly.
- Examine the jacket's front closure for pulling or gaps.
- Adjust the belly position if the padding pushes unevenly against the fabric.
- Check that the jacket hem hangs evenly when standing.
- Sit down and stand again to make sure the fabric returns to its normal position.
If the jacket remains too tight, you may need to reduce the padding or alter the garment.
Adding more batting to conceal a tight jacket usually makes the problem worse.
Professional fitting tip: If you are making a Santa suit specifically for use with a padded belly, complete the belly first. Then fit or alter the jacket while the performer is wearing the finished padding.
Step 9: Check the Santa Belly from Every Angle
A costume that looks convincing from the front may reveal obvious padding edges when viewed from the side or back.
Before wearing your Santa suit at a Christmas event, perform a complete visual inspection.
| Viewing Angle | What to Check | Possible Correction |
|---|---|---|
| Front | Balanced, rounded stomach | Adjust padding distribution |
| Side | Smooth curve from chest to hips | Feather foam edges |
| Three-quarter | Natural transition into the waist | Add thin side padding |
| Back | No visible harness or bulky straps | Reposition support system |
| Sitting | No excessive bunching or upward movement | Reduce lower foam thickness |
| Walking | Belly remains centered | Adjust harness and waist support |
Take several photographs while wearing the complete Santa costume. If possible, ask someone else to photograph you from different angles.
Pay particular attention to photographs taken at waist height. This perspective can reveal uneven padding and unnatural shapes that may be less noticeable when looking down at the costume.
Step 10: Make Final Adjustments Before Your Christmas Appearance
Once the belly looks convincing beneath the Santa suit, wear the complete costume for approximately 30 minutes.
Walk around, sit in a chair, bend slightly, and practice ordinary movements you expect to make during the event.
Watch for these common problems:
- Visible upper ridge: Taper the foam and add a thin layer of batting.
- Uneven stomach shape: Redistribute the padding or adjust the foam layers.
- Jacket pulls tightly: Reduce the padding or use a roomier Santa jacket.
- Belt creates a deep indentation: Loosen or reposition the belt.
- Belly slides downward: Adjust the shoulder straps or supporting vest.
- Lower padding interferes with sitting: Reduce the thickness near the hips.
- Harness shows through the costume: Reposition the straps or add a smooth fabric layer.
- Costume becomes uncomfortable: Check for excessive weight, tight straps, or heat buildup.
Make small adjustments rather than changing several things at once. This makes it easier to identify which correction improves the fit.
Budget Santa Suit vs. Professional Santa Suit: Does Fabric Make a Difference?
The type of Santa suit you wear can affect how successfully the belly padding is concealed.
Inexpensive Santa costumes often use lightweight polyester fabric. These suits can work well for parties and occasional appearances, but thinner material may reveal padding edges or wrinkles more easily.
Professional Santa suits frequently use heavier velvet, velour, or lined fabrics. These materials can provide a smoother appearance over shaped foam padding, although the exact result depends on the garment's construction and fit.
| Feature | Budget Santa Suit | Professional Santa Suit |
|---|---|---|
| Common fabric | Lightweight polyester | Velvet, velour, or lined fabric |
| Padding visibility | May reveal more imperfections | Often conceals minor contours better |
| Weight | Usually lightweight | Often heavier |
| Heat buildup | Varies by fabric | May be warmer |
| Best padding choice | Smooth, carefully shaped foam | Flexible foam or layered batting |
| Best use | Parties and occasional appearances | Frequent performances and photography |
You don't need an expensive Santa suit to achieve a convincing appearance. A properly fitted budget costume with carefully shaped padding can look excellent, particularly when the jacket provides enough room for the belly.
Professional Costume Trick: Use a Smooth Intermediate Layer
If your Santa jacket continues to reveal small padding imperfections, consider adding a lightweight stretch-fabric layer over the completed belly and supporting vest.
This can be as simple as a snug but comfortable stretch undershirt worn over the padding assembly.
The intermediate layer helps hold loose fabric edges flat and may smooth minor transitions between the foam and the natural torso.
To try this technique:
- Put on your completed Santa belly and supporting harness.
- Pull a soft stretch undershirt over the padding.
- Adjust the fabric so it lies smoothly across the stomach.
- Check that the undershirt does not compress the belly excessively.
- Put on your Santa jacket and compare the appearance.
Use a breathable fabric and avoid tight compression garments. The purpose is to smooth the costume, not squeeze the padding or restrict breathing.
Costume workshop tip: This additional layer may be particularly helpful when wearing a lightweight Santa jacket that tends to reveal the edges of the belly covering.
The Final Santa Suit Fitting Checklist
Before your first Christmas appearance, use this quick checklist to make sure your DIY Santa Claus belly is ready.
- The belly is positioned at a comfortable, natural height.
- The upper foam edge blends smoothly beneath the chest.
- The side contours taper naturally into the waist.
- The padding has no obvious lumps or hard ridges.
- The Santa jacket closes without pulling tightly.
- The belt rests securely without crushing the belly.
- The harness remains concealed beneath the costume.
- The belly stays centered while walking and turning.
- The lower padding allows comfortable sitting.
- The costume does not restrict breathing or normal movement.
- The performer can remove the belly quickly if necessary.
- The finished costume looks convincing in photographs from several angles.
Making Your Homemade Santa Belly Look Like Part of the Costume
The most convincing DIY Santa belly is one that nobody notices as a separate costume accessory. Instead, the padding should appear to be a natural part of Santa Claus's familiar rounded silhouette.
Achieving that appearance depends on careful fitting, smooth foam transitions, proper belt placement, and a Santa jacket that accommodates the added fullness without pulling or bunching.
Take the time to inspect the costume from different angles and make small adjustments until the belly looks balanced and comfortable.
Whether you're preparing for a family Christmas party, a community holiday parade, or a professional Santa Claus appearance, these finishing techniques can make your homemade belly look considerably more convincing.
With the costume properly fitted, we're almost finished. In the next section, we'll look at the most common DIY Santa belly mistakes, why they happen, and how to fix them without rebuilding the entire project.
DIY Santa Belly Problems and Fixes: Common Costume-Making Mistakes
Even with careful measuring and construction, your DIY Santa belly may need a few adjustments before it looks and feels right. Foam can develop uneven contours, batting may shift inside the covering, and a harness that seemed comfortable during fitting might become troublesome after an hour of wearing the costume.
Fortunately, most homemade Santa belly problems can be corrected without starting over. Whether you've built the inexpensive stuffed version or a professional theatrical foam belly, understanding what causes these problems will help you make practical repairs.
In this section, we'll troubleshoot the most common Santa Claus costume padding problems, explain why they happen, and show you how to correct them.
Problem 1: The Santa Belly Looks Like a Basketball Under the Jacket
This is probably the most recognizable mistake in homemade Santa costumes. Instead of a broad, naturally rounded stomach, the padding looks like someone strapped a basketball beneath a red jacket.
Why it happens: The padding is too narrow, too round, or concentrated in one small area. A large amount of stuffing placed in the center creates a pronounced bulge without the gradual contours of a natural stomach.
How to Fix an Unnaturally Round Santa Belly
- Remove the belly from the costume and lay it on your work surface.
- Examine the shape from the side and identify where the padding projects too sharply.
- If using foam, gradually trim the raised center and broaden the transition toward the sides.
- If using loose stuffing, redistribute some of the material toward the outer portions of the belly.
- Add thin polyester batting around the upper and side edges to soften the contours.
- Try the belly under your Santa jacket and check the silhouette again.
Professional costume tip: A convincing Santa belly should be broad enough to complement the chest and waist. Increasing the width slightly may produce a better result than simply adding more depth.
Problem 2: The Belly Padding Has Visible Lumps and Bumps
Uneven padding can make an otherwise attractive Santa suit look poorly fitted. These lumps are especially noticeable beneath lightweight polyester jackets.
Why it happens: Polyester fiberfill has collected in certain areas, foam layers have not been blended properly, or the fabric covering is pulling unevenly across the surface.
How to Smooth Lumpy Santa Belly Padding
- Remove the belly covering if your construction allows it.
- Inspect the foam and batting for raised areas.
- Redistribute loose stuffing so the thickness is more consistent.
- Trim any abrupt foam ridges with a suitable cutting tool.
- Cover the padding with a thin, continuous layer of polyester batting.
- Replace the fabric covering and smooth it gently over the surface.
If the batting continues to shift, secure it within a separate fabric lining or use a few loose stitches through the covering materials.
DIY tip: Several thin layers of batting are generally easier to shape smoothly than one thick, uneven layer.
Problem 3: The Santa Belly Keeps Sliding Down
Few things spoil a Santa Claus appearance faster than having to pull the belly back into position every few minutes.
Why it happens: The shoulder straps may be too loose, the supporting vest may not fit correctly, or the belly attachment points may be positioned too low.
How to Stop a Santa Belly from Slipping
- Put on the belly and position it at the correct height.
- Adjust the shoulder straps until they support the padding evenly.
- Check that the back panel or supporting vest remains centered.
- Inspect the fabric attachment points for stretching or loose stitching.
- Adjust the waist stabilizer to reduce unnecessary movement.
- Walk around for several minutes to confirm that the belly stays in place.
Do not solve slipping by tightening the waist strap excessively. The shoulder straps or supporting vest should carry most of the weight.
Costume tip: If the belly continues to slide downward, inspect the entire support system. A poorly balanced harness may need repositioned attachment points rather than tighter straps.
Problem 4: The Belly Looks Too Flat
Sometimes a homemade Santa belly looks impressive on the workbench but nearly disappears beneath the costume.
Why it happens: The foam may be too thin, the stuffing may be compressed, or the Santa jacket may be too loose to show the rounded shape.
How to Add More Fullness to a Santa Belly
- Try on the belly with your complete Santa suit.
- Determine whether the padding itself is too small or the jacket is concealing its shape.
- If needed, add a thin foam insert behind the main rounded section.
- Use polyester batting to blend the additional thickness into the surrounding padding.
- Check that the added material does not create a sharp central bulge.
- Adjust the Santa belt to complement the new stomach shape.
If your Santa jacket is extremely oversized, altering the garment may be more effective than adding excessive padding.
Professional tip: Add fullness gradually. A small increase in foam thickness can produce a noticeable difference beneath the finished costume.
Problem 5: The Foam Edges Show Through the Santa Suit
Visible padding edges are a common problem with theatrical body costumes. They often appear as horizontal ridges beneath the chest or abrupt lines around the sides of the waist.
Why it happens: The foam ends too abruptly, the batting does not extend far enough beyond the main padding, or the outer fabric is too tight.
How to Hide Santa Belly Foam Edges
- Remove the belly and inspect the perimeter of the foam.
- Mark any areas where the padding creates a sharp transition.
- Carefully feather the foam edges using shallow cuts.
- Add a thin layer of batting over the transition.
- Check that the fabric covering is not pulling the edges into a raised ridge.
- Try the belly beneath the Santa jacket and inspect it from the side.
A smooth stretch-fabric layer over the completed padding may also help conceal minor imperfections.
Hollywood-style costume trick: The outer edge of a padded belly should gradually become thinner as it approaches the natural torso. This technique helps the padding blend beneath clothing.
Problem 6: The Santa Belly Is Uncomfortable When Sitting
A Santa performer may spend hours seated in a decorated chair while greeting visitors and posing for photographs. A belly that feels comfortable while standing may become troublesome when sitting.
Why it happens: The lower foam is too thick, the padding extends too far toward the thighs, or the harness pulls the belly upward against the chest.
How to Make a Santa Belly Comfortable for Sitting
- Put on the belly and sit in a sturdy chair.
- Identify where the padding presses against your thighs or chest.
- Remove the belly and mark the uncomfortable areas.
- Gradually reduce the thickness of the lower foam.
- Replace rigid or overly firm padding with softer material if necessary.
- Check the harness adjustment and belly position.
- Try sitting again before making further changes.
The lower portion should compress gently without forcing the entire belly upward.
Santa performer tip: Test the completed costume in a chair similar to the one you'll use during your Christmas appearance.
Problem 7: The Belly Bounces or Swings While Walking
A little movement can make a padded stomach appear more natural, but excessive bouncing usually means the support system needs adjustment.
Why it happens: The harness is too loose, the belly is attached at too few points, or the padding is moving independently inside its fabric covering.
How to Reduce Excessive Santa Belly Movement
- Inspect the shoulder straps and supporting vest.
- Check that the belly is securely attached to its backing.
- Adjust the waist stabilizer without making it uncomfortably tight.
- Secure any loose foam inserts inside their pockets.
- Redistribute stuffing that has collected at the bottom of the covering.
- Walk around and observe whether the movement has improved.
For a large theatrical belly, a fitted vest generally provides more stable support than a simple elastic waist strap.
Problem 8: The Santa Belly Feels Too Heavy
An oversized belly may look impressive, but unnecessary weight can make it uncomfortable during long Christmas performances.
Why it happens: The construction may contain too much dense foam, excessive fabric, heavy hardware, or unnecessary layers of padding.
How to Make a Santa Belly Lighter
- Remove the belly and identify the heaviest components.
- Replace overly dense foam with lighter flexible upholstery foam where practical.
- Remove unnecessary padding from areas that do not contribute to the visible shape.
- Use lightweight polyester batting for final contouring.
- Eliminate unnecessary hardware or heavy fabric layers.
- Check that the harness distributes the remaining weight comfortably.
For an extra-large Santa belly, consider using shaped foam pieces rather than building every area into a thick solid mass. Any hollow or layered construction must still maintain adequate support and resist collapsing during movement.
Important: Never reduce the strength of the supporting vest or attachment points simply to save weight.
Problem 9: The Santa Belly Makes the Costume Too Hot
Santa suits are often made from warm fabrics, and adding foam padding can increase heat buildup considerably.
This can become especially uncomfortable during indoor Christmas events, crowded holiday gatherings, or performances beneath stage lighting.
Why it happens: Thick foam, multiple fabric layers, poor ventilation, and an already warm Santa jacket can trap heat against the body.
How to Keep a Santa Belly Costume Cooler
- Wear a lightweight, moisture-wicking undershirt.
- Use breathable fabric for the supporting vest.
- Avoid unnecessary layers of padding against the torso.
- Choose lightweight foam when possible.
- Take regular breaks in a cooler area.
- Drink water throughout extended appearances.
- Remove the costume if you begin feeling overheated.
Do not cut large ventilation holes into the foam without first checking how they affect the belly's structure and appearance.
Safety reminder: Dizziness, weakness, nausea, confusion, or feeling faint may indicate heat-related illness. Stop the activity, move to a cooler place, and seek appropriate medical help if symptoms are severe or do not improve.
Problem 10: The Foam Belly Loses Its Shape Over Time
A reusable Santa belly should maintain its appearance for more than one Christmas season, but foam and batting can gradually lose their original shape.
Why it happens: Repeated compression, unsuitable storage, aging foam, or moisture can cause padding to flatten or deteriorate.
How to Restore a Flattened Santa Belly
- Remove the padding from its fabric covering if possible.
- Inspect the foam for permanent compression, tears, or deterioration.
- Allow temporarily compressed foam to recover without weight on top of it.
- Replace foam that remains permanently flattened or damaged.
- Add fresh batting where the original padding has lost its loft.
- Reassemble the belly and check its shape beneath the Santa suit.
Foam that has become brittle, crumbly, or permanently deformed should be replaced rather than repaired with additional stuffing.
Storage tip: Never leave your Santa belly compressed beneath heavy Christmas decorations or storage boxes for months at a time.
Problem 11: The Harness Straps Dig into the Shoulders
Shoulder discomfort is particularly common with large Santa bellies supported by narrow straps.
Why it happens: Too much weight is concentrated on a small area, the straps are incorrectly positioned, or the harness is adjusted too tightly.
How to Make Santa Belly Shoulder Straps More Comfortable
- Check that both shoulder straps are carrying the load evenly.
- Loosen straps that are pulling unnecessarily against the shoulders.
- Replace narrow straps with wider webbing where appropriate.
- Add soft fleece or thin foam shoulder pads.
- Consider switching to a fitted supporting vest for a larger belly.
- Test the adjusted harness for at least 20–30 minutes.
If discomfort continues, reduce the belly's weight or redesign the support system. Padding the straps alone may not correct an improperly balanced harness.
Problem 12: The Santa Belt Keeps Sliding Out of Position
A traditional black Santa belt helps complete the costume, but it can also be difficult to position over a large rounded belly.
Why it happens: The belt may be too short, the jacket fabric may be slippery, or the belt may be positioned across the steepest part of the stomach.
How to Keep the Santa Belt in Place
- Put on the complete Santa suit and belly padding.
- Experiment with positioning the belt slightly higher or lower.
- Adjust the belt so it rests securely without compressing the foam.
- Check whether the jacket fabric bunches beneath the belt.
- If necessary, add discreet fabric belt loops to the Santa jacket.
- Walk and sit to confirm that the belt remains in position.
Fabric belt loops are often a better solution than tightening the belt excessively.
Costume tip: If the belt barely reaches around the padded stomach, replace it with a longer adjustable belt.
Quick DIY Santa Belly Troubleshooting Chart
Use this reference table when making final adjustments to your homemade Santa Claus belly.
| Problem | Likely Cause | Best Fix |
|---|---|---|
| Looks like a basketball | Padding too narrow or concentrated | Broaden and taper the shape |
| Visible lumps | Uneven stuffing or foam | Redistribute batting and smooth foam |
| Slides downward | Loose harness | Adjust shoulder support |
| Looks too flat | Insufficient padding | Add thin foam inserts |
| Visible foam edges | Abrupt transitions | Feather edges and add batting |
| Uncomfortable sitting | Lower foam too thick | Reduce lower padding |
| Bounces while walking | Loose attachment system | Secure vest and stabilizer |
| Feels too heavy | Excessive dense materials | Reduce unnecessary weight |
| Too hot | Heat trapped by padding | Use breathable layers and take breaks |
| Loses its shape | Compressed or deteriorated foam | Replace damaged padding |
| Shoulder discomfort | Poor weight distribution | Use wider straps or a fitted vest |
| Belt keeps slipping | Incorrect fit or position | Adjust belt or add fabric loops |
Five Mistakes to Avoid When Making a DIY Santa Belly
If you're building your first Santa belly, keep these five important lessons in mind:
- Don't use a single round pillow as your finished belly. It may be convenient, but a carefully shaped padding assembly usually creates a more convincing appearance.
- Don't make the belly larger than your Santa suit can accommodate. Excessive padding can cause the jacket to pull tightly and reveal the construction.
- Don't rely entirely on a tight waist strap. Use shoulder support or a fitted vest to distribute the weight comfortably.
- Don't permanently attach everything before testing the fit. Temporary assembly allows you to correct the shape before making irreversible cuts or connections.
- Don't ignore comfort and movement. A Santa belly that looks wonderful in photographs is of little use if the performer cannot sit, walk, or breathe comfortably.
When Should You Rebuild Your Santa Belly Instead of Repairing It?
Most minor problems can be corrected with additional trimming, fresh batting, or harness adjustments. However, there are situations where rebuilding part of the costume is the better choice.
Consider replacing the affected components if:
- The foam has become brittle, crumbly, or permanently compressed.
- The supporting vest has torn at several attachment points.
- The belly is significantly too large for the intended performer.
- The padding repeatedly collapses or shifts despite adjustments.
- The costume cannot be made comfortable without major changes.
- The foam or fabric has developed persistent moisture damage or mold.
A modular Santa belly makes repairs easier because individual foam inserts, fabric covers, and harness components can be replaced without rebuilding the entire costume.
The Secret to Fixing a Homemade Santa Belly
Most DIY Santa belly problems come down to three things: the shape of the padding, the fit of the supporting harness, and the way the Santa suit hangs over the finished belly.
Before making major changes, identify which of these areas is causing the problem. A visible lump may require smoother foam, while a slipping belly usually needs a harness adjustment. A jacket that pulls tightly across the stomach may simply be too small for the amount of padding you've added.
Work on one problem at a time, test each adjustment, and check the finished costume from several angles. With a little patience, even a beginner can correct many of the mistakes that make homemade Santa padding look unnatural.
Now that your Santa belly is properly shaped, fitted, and comfortable, there's one final step to consider. In the next section, we'll cover how to clean, maintain, and store your DIY Santa belly so it stays ready for Christmas celebrations year after year.
DIY Santa Belly Care and Storage: How to Keep Your Costume Padding Looking Great for Years
After all the work you've put into making your DIY Santa belly, the last thing you want is to discover that it has become flattened, misshapen, or damaged when you unpack your Christmas decorations next year.
Fortunately, a homemade Santa Claus belly can last for many holiday seasons when it is properly cleaned, maintained, and stored. Whether you made a simple stuffed belly using polyester fiberfill or a professional theatrical version using sculpted upholstery foam, a little care can help preserve its shape and appearance.
In this final section, we'll cover how to clean your Santa belly, protect the foam and fabric, prevent moisture damage, make minor repairs, and store the finished costume until Santa is needed again.
Step 1: Inspect Your Santa Belly After Every Christmas Appearance
Before putting your homemade Santa belly away, take a few minutes to inspect the padding and support system.
Even a well-constructed costume can experience wear during a busy Christmas event. Repeated sitting, standing, walking, and bending may gradually loosen stitching or shift the padding inside its covering.
Check the following areas:
- Foam padding: Look for tears, permanent creases, or areas that have become flattened.
- Polyester batting: Check for bunching, uneven thickness, or compressed areas.
- Fabric covering: Inspect the seams for loose stitches, holes, or stretched fabric.
- Shoulder straps: Look for fraying, twisting, or damaged adjustment hardware.
- Supporting vest: Check the shoulder seams and reinforced attachment points.
- Fasteners: Make sure buckles and hook-and-loop closures still work correctly.
- Moisture: Check for damp areas caused by perspiration or spills.
Correcting small problems immediately is usually easier than discovering them when you're getting ready for your next Christmas appearance.
Costume workshop tip: Keep a small repair kit with extra thread, spare buckles, hook-and-loop tape, and fabric patches. These inexpensive supplies can save time during a busy holiday season.
Step 2: Clean the Fabric Covering Without Damaging the Foam
The best way to keep a Santa belly clean is to make the outer fabric covering removable. This allows you to wash the fabric separately without exposing the foam padding to unnecessary moisture.
If your belly has a removable cover, follow these steps:
- Remove the foam inserts and polyester batting if the construction allows.
- Check the fabric for stains, loose seams, or damaged fasteners.
- Follow the fabric manufacturer's cleaning instructions.
- For washable fabric, use a gentle cycle with mild detergent and cool water when appropriate.
- Avoid chlorine bleach unless the fabric care instructions specifically permit it.
- Air-dry the covering completely before reinstalling the padding.
- Check that the fabric has not shrunk or become distorted before reassembling the belly.
If your Santa belly covering contains glued components, delicate trim, or materials that are not machine washable, use gentle spot cleaning instead.
Important: Never assume that the entire assembled belly is machine washable. Foam, adhesives, reinforcement materials, and hardware may require different cleaning methods.
Step 3: How to Clean Upholstery Foam Santa Belly Padding
Flexible upholstery foam generally requires more careful cleaning than ordinary costume fabric.
Some types of foam can absorb water and take a long time to dry. Excessive moisture may also weaken certain adhesives or contribute to unpleasant odors.
For routine cleaning, avoid soaking the foam unless the foam manufacturer's instructions specifically allow it.
Spot-Cleaning a Foam Santa Belly
- Remove the foam from its fabric covering if possible.
- Use a soft brush or vacuum with a gentle upholstery attachment to remove loose dust.
- For a small surface stain, lightly dampen a clean cloth with water and a little mild detergent.
- Gently blot the affected area without saturating the foam.
- Use a second barely damp cloth to remove detergent residue.
- Allow the foam to air-dry completely in a well-ventilated area.
- Inspect the foam before returning it to its fabric covering.
Avoid wringing, twisting, or aggressively scrubbing shaped foam. These actions can damage thin edges and delicate sculpted areas.
Do not use high heat, a clothes dryer, or direct contact with heaters to speed up drying. Polyurethane foam can be damaged by excessive heat and is combustible.
Professional costume tip: Test any cleaning product on a small, inconspicuous area first. Some chemicals can discolor or deteriorate upholstery foam.
Step 4: Remove Odors and Prevent Moisture Damage
A Santa Claus costume can become surprisingly warm during a long Christmas appearance. Perspiration may accumulate in the undershirt, supporting vest, or fabric covering.
If the belly is stored before these materials are completely dry, unpleasant odors or moisture damage may develop.
After wearing your costume:
- Remove the Santa belly from the supporting vest if your design allows.
- Open any removable fabric pockets to improve airflow.
- Hang the supporting vest in a well-ventilated area.
- Place the foam padding on a clean, dry surface where air can circulate around it.
- Allow all components to dry completely before storage.
- Clean or replace any fabric pieces that retain persistent odors.
Avoid spraying the foam with perfume, strong deodorizing chemicals, or household disinfectants unless the product is specifically suitable for the materials involved.
These products may leave residue, damage the foam, or introduce additional moisture.
Storage reminder: Never pack a damp Santa belly into a sealed plastic bag or airtight container.
Step 5: Keep the Santa Belly from Losing Its Shape
One of the most important rules for storing a DIY Santa belly costume is to avoid prolonged compression.
Flexible foam can recover from ordinary use, but storing it beneath heavy objects for months may create permanent indentations or flatten the rounded shape.
Polyester batting can also lose some of its loft when tightly compressed.
To preserve the belly's shape:
- Store the padding in its natural rounded position whenever possible.
- Avoid folding thick foam sections sharply.
- Do not place heavy Christmas decorations on top of the belly.
- Keep sculpted foam edges away from objects that could bend or crush them.
- Store removable inserts flat or loosely arranged.
- Use a large enough storage container to prevent squeezing the padding.
If you have a large professional Santa belly, consider placing it on a broad shelf where it can rest without pressure from other objects.
DIY tip: A large, lightweight cardboard box or roomy plastic storage tote can work well, provided the belly fits without being forced into a smaller space.
Step 6: Choose the Best Storage Container for Your Santa Belly
The right storage container depends on the size of the belly, the available space, and the conditions in your storage area.
For a small or traditional Santa belly, a large plastic tote may provide adequate protection from dust and accidental damage.
For an extra-large theatrical belly, a dedicated shelf or oversized costume storage box may be more practical.
| Storage Method | Advantages | Things to Watch For |
|---|---|---|
| Large plastic storage tote | Protects against dust and accidental contact | Padding must be completely dry before closing |
| Cardboard costume box | Lightweight and easy to label | Vulnerable to moisture and pests |
| Dedicated storage shelf | Helps preserve the belly's rounded shape | Requires protection from dust and sunlight |
| Breathable fabric storage bag | Allows airflow and reduces dust exposure | Does not protect against crushing |
| Hanging costume vest | Keeps the supporting garment accessible | Heavy attached padding may stretch the shoulders |
For most homemade Santa bellies, a roomy storage tote or a protected shelf offers a practical solution.
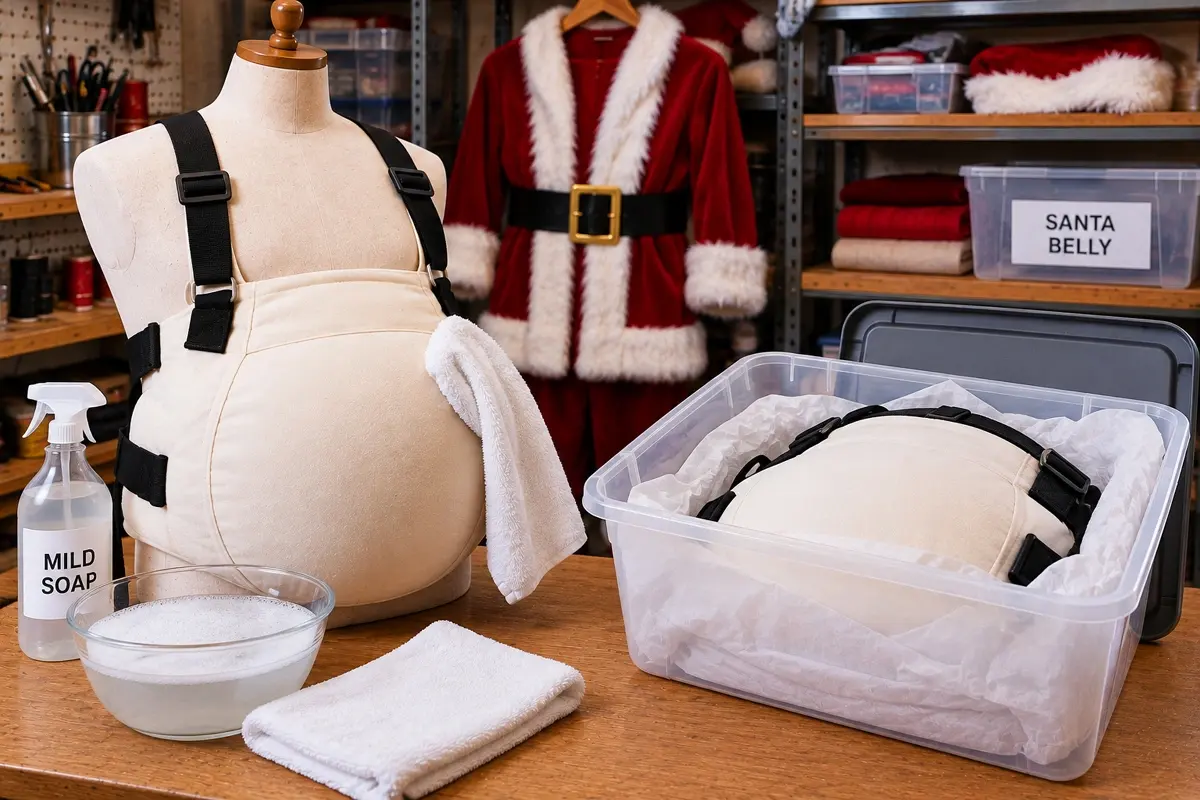
If you use a plastic container, make sure the materials are thoroughly dry and the storage area is not subject to severe temperature changes or condensation.
Step 7: Store the Santa Belly in a Cool, Dry Location
Where you store your Santa belly can be just as important as how you pack it.
Extreme heat, excessive humidity, and prolonged exposure to sunlight can shorten the useful life of foam and fabric.
Whenever possible, choose a storage location that is:
- Cool and relatively temperature stable.
- Dry and protected from leaks or condensation.
- Out of direct sunlight.
- Away from heaters, furnaces, and other heat sources.
- Protected from insects and rodents.
- Free from heavy objects that could crush the padding.
A climate-controlled closet or indoor storage area is generally preferable to a hot attic, damp basement, or uninsulated garage.
Polyurethane foam should also be kept away from open flames, ignition sources, and high-temperature equipment.
Professional costume tip: If you store several Christmas costumes together, keep foam padding separate from sharp accessories, metal decorations, and heavy boots that could damage the surface.
Step 8: Store the Harness and Supporting Vest Properly
The supporting harness is an important part of your homemade Santa belly, and it deserves the same attention as the foam padding.
Before storage, inspect the shoulder straps, buckles, seams, and reinforcement patches.
For a separate harness:
- Remove the harness from the belly if possible.
- Clean the straps according to their material care instructions.
- Allow the harness to dry completely.
- Loosen adjustable straps to relieve unnecessary tension.
- Fasten loose buckles to prevent tangling.
- Fold or roll the harness loosely and place it in a labeled fabric bag.
For a fitted theatrical vest, use a broad hanger if the vest is light enough to hang without stretching.
If the vest carries heavy foam padding, consider storing the padding separately and laying the vest flat.
Costume maintenance tip: Keeping the harness and foam together in the same storage area makes it easier to locate all the components when Christmas season returns.
Step 9: Make Small Repairs Before Storing the Costume
It's tempting to pack away the Santa costume immediately after the final holiday appearance. However, repairing minor damage before storage can save considerable time the following year.
Common repairs include:
- Loose seams: Reinforce them with matching thread.
- Frayed straps: Replace damaged webbing before it becomes unsafe.
- Worn hook-and-loop fasteners: Replace sections that no longer hold securely.
- Flattened batting: Replace or redistribute the affected padding.
- Small foam tears: Repair them with an adhesive confirmed suitable for the foam, when appropriate.
- Damaged buckles: Replace cracked or unreliable hardware.
- Stretched fabric covers: Adjust or replace the covering if it no longer holds the padding securely.
When using foam adhesive, follow the manufacturer's ventilation, application, curing, and fire-safety instructions.
Never use a hot glue gun directly on foam unless both the foam and adhesive are specifically rated for that application.
Important: Replace deteriorated foam or structurally damaged harness components rather than relying on temporary repairs that may fail during a performance.
Step 10: Label Your Santa Belly for Next Christmas
If you've made several belly sizes or removable foam inserts, labeling the components can save time when the next holiday season arrives.
A simple label can include:
- The size of the Santa belly.
- The name or initials of the intended performer, if applicable.
- The year the belly was made.
- The number of removable foam inserts.
- Any special fitting instructions.
- Notes about repairs or adjustments needed.
For example, a label might read:
Traditional Santa Belly | Medium | 3 Foam Inserts | Adjustable Vest | Made 2026
You can also take a photograph of the assembled belly before disassembling it for storage.
This is particularly useful if you've created a modular design with several interchangeable padding layers.
How Long Does a Homemade Santa Belly Last?
The lifespan of a homemade Santa Claus belly depends on the materials, frequency of use, cleaning methods, and storage conditions.
A lightly used belly made with quality flexible foam and a durable fabric covering may remain usable for many Christmas seasons.
However, there is no guaranteed lifespan. Foam gradually ages, elastic loses some of its recovery, and repeated use can weaken stitching and fasteners.
Inspect the costume before each season rather than assuming it is safe and ready to wear simply because it looked fine the previous year.
Replace components when they show significant wear, permanent deformation, or deterioration.
Getting Your DIY Santa Belly Ready for the Next Christmas Season
When Christmas approaches again, remove the belly from storage at least several days before you plan to wear it.
This gives you time to inspect the costume and make any necessary adjustments.
- Unpack the belly and remove any protective coverings.
- Inspect the foam for damage, compression, or deterioration.
- Check the batting and fabric covering.
- Examine the harness straps, buckles, and attachment points.
- Reassemble any removable foam inserts.
- Try on the belly with the supporting vest or harness.
- Put on the complete Santa suit and check the fit.
- Walk, sit, and bend to confirm that the padding remains comfortable.
- Make any necessary adjustments before your first Christmas appearance.
If the belly was stored correctly, it may need little more than a quick inspection and fitting adjustment.
Santa performer tip: Try on the entire costume before the holiday season begins. Changes in body size, clothing, or the supporting harness can affect the fit even when the foam padding remains in excellent condition.
DIY Santa Belly Care and Storage Checklist
Before putting your Santa belly away for the year, use this checklist to make sure everything is ready for the next Christmas season.
- Inspect the foam for damage or permanent compression.
- Check the batting for lumps and flattened areas.
- Clean the removable fabric covering when appropriate.
- Allow all padding and fabric components to dry completely.
- Inspect and repair loose seams.
- Check the harness straps and buckles.
- Replace worn fasteners or damaged components.
- Remove unnecessary tension from adjustable straps.
- Store foam without excessive compression.
- Keep the belly in a cool, dry location.
- Protect the padding from dust, sunlight, and pests.
- Label removable inserts and accessories.
- Keep fitting notes or photographs for future reference.
Final Thoughts: Making a DIY Santa Belly That Lasts for Christmas After Christmas
Creating your own DIY Santa belly is a rewarding costume project because it allows you to control the size, shape, comfort, and appearance of one of Santa Claus's most recognizable features.
From an inexpensive belly made with basic foam and batting to a carefully sculpted theatrical version, the techniques in this guide can help you create a rounded Santa silhouette without relying on an uncomfortable pillow or poorly fitting commercial padding.
The key is to build the belly in stages. Start with the correct proportions, use flexible materials, blend the edges carefully, and support the padding with a comfortable harness or fitted vest. Then make your final adjustments while wearing the complete Santa suit.
And once the Christmas celebrations are over, don't simply toss the belly into a box with the rest of the decorations. Clean it, inspect it, and store it properly so your work will be ready for another holiday season.
After all, Santa has enough to worry about on Christmas Eve without having to rebuild his belly every December.
With a little planning, the right materials, and some patience, your homemade Santa belly can become a dependable part of your Christmas costume for years to come.
Bring Your Santa Claus Costume to Life
A great Santa Claus costume is about more than a red suit, white beard, and black boots. It's about creating that familiar, larger-than-life character everyone recognizes and loves. With the right materials, a little patience, and the techniques covered in this DIY Santa Belly guide, you can create a comfortable, realistic belly that looks convincing, moves naturally, and lasts for many Christmas seasons. Whether you're entertaining family, greeting children at a holiday event, or playing Santa professionally, the finishing touches make all the difference. Now pull on that red suit, buckle up your belt, and get ready to bring a little Christmas magic to life. Ho, ho, ho! 🎅