🎄 DIY Ugly Christmas Sweater: 9 Hilarious No-Sew Ideas to Make
Every December, otherwise sensible people pull on sweaters covered in tinsel, pom-poms, and blinking lights. They do it on purpose, and they do it proudly. A DIY Ugly Christmas Sweater takes that tradition one step further. Instead of buying a mass-produced design, you build something gloriously tacky that nobody else will be wearing.
A DIY Ugly Christmas Sweater is a handmade holiday sweater decorated with felt, tinsel, pom-poms, ornaments, and battery-operated lights, attached using no-sew methods like hot glue, fabric glue, fusible web, and safety pins. Ugly sweater parties took off around 2002 near Vancouver, Canada. National Ugly Christmas Sweater Day is now celebrated on the third Friday in December.
The best part is that you do not need to sew a single stitch. Every idea in this guide uses hot glue, safety pins, fabric glue, or iron-on materials. If you can squeeze a glue gun and plug in an iron, you can make any of these sweaters.
This guide starts with a short history of the ugly sweater. Then it covers supplies and the no-sew techniques that hold everything together. Next you will find nine complete sweater ideas, each with its own how-to. They range from classic and cozy to light-up, horror-themed, and movie-inspired. There is even a matching his and hers set for couples.
DIY Santa Belly: From Budget Padding to Hollywood-Quality Costume
📜 A Short History of the Ugly Christmas Sweater
Holiday knitwear is older than most people think. According to Mental Floss, an 1896 Boston Globe ad was already promoting Christmas sweaters. By the mid twentieth century, stores sold festive sweaters called jingle bell sweaters. These early designs were meant to look charming and elegant, not silly.
Designs grew bolder through the 1960s and 1970s. By the 1980s, holiday sweaters were packed with reindeer, snowflakes, and Christmas trees all at once. Chevy Chase helped make them famous as Clark Griswold in the 1989 film National Lampoon’s Christmas Vacation.
For a while, these sweaters fell out of fashion and filled thrift store racks. Then pop culture brought them back. In the 2001 film Bridget Jones’s Diary, Colin Firth’s character wears a memorable reindeer sweater at a holiday party.
Around 2002, friends Chris Boyd and Jordan Birch threw an ugly Christmas sweater party near Vancouver, Canada. The idea caught on quickly. Their party eventually moved to Vancouver’s Commodore Ballroom and drew huge crowds. Similar parties soon spread across North America.
Today, the ugly sweater has its own celebration. National Ugly Christmas Sweater Day falls on the third Friday in December. Offices, schools, and charities use the day for contests and fundraisers. What started as a joke has become a beloved holiday tradition.
🏆 Key to a Great Ugly Christmas Sweater
The secret is commitment. A sweater with one small snowflake is just a sweater. A DIY Ugly Christmas Sweater should be bold, crowded, and slightly ridiculous. When in doubt, add one more pom-pom.
Use the 20-foot rule to plan your design. From across a room, people should see one big, clear theme. A giant Christmas tree, a reindeer face, or a wall of lights reads instantly. Small details like googly eyes and sequins reward people who come closer.
Texture and dimension also matter. Flat designs look store bought. Raised pom-poms, dangling ornaments, fluffy tinsel, and real bells make a sweater feel handmade. That 3D quality is what wins ugly sweater contests.
Finally, keep it wearable. Heavy decorations can stretch the knit and drag the neckline down. Spread the weight evenly and choose lightweight materials whenever possible.
DIY Christmas Mouse Costume – 6 Whimsical Holiday Steps!
🧶 Step 1: Find the Perfect Base Sweater
Every DIY Ugly Christmas Sweater starts at a thrift store. Holiday sweaters fill the racks from October through December, and they are usually inexpensive. Plain sweaters in red, green, white, or navy also work well as blank canvases.
Choose a sweater with a tight, smooth knit. Chunky cable knits are bumpy, which makes it hard for decorations to lie flat. A cotton or acrylic blend with a fine knit gives glue and felt the best surface.
Check the fiber content on the tag before you start. Acrylic sweaters can melt or shine under a hot iron. Wool and cotton handle heat better. This matters if you plan to use iron-on materials.
Buy the sweater one size larger than usual. Decorations make the fabric stiffer and less stretchy. A slightly roomy fit lets you layer a shirt underneath and still move comfortably.
Wash and dry the sweater before decorating. This removes any fabric softener or residue that can stop glue from sticking. It also handles any shrinking before your hard work goes on.
A plain crew neck sweatshirt is another great base. The flat, smooth surface makes gluing and iron-on work much easier. Sweatshirts also handle heavy decorations without stretching out of shape.
🧰 Step 2: Gather Supplies and Learn the No-Sew Methods
Every DIY Ugly Christmas Sweater in this guide uses the same basic toolkit. Gather felt sheets in red, green, white, brown, and gold. Add pom-poms in several sizes, tinsel garland, small jingle bells, googly eyes, and ribbon.
For attaching everything, you will need a low temperature hot glue gun and plenty of glue sticks. Pick up a bottle of permanent fabric glue as well. Safety pins, iron-on letters, and fusible web round out the kit.
Fusible web is a thin, paper-backed adhesive sheet sold in craft and fabric stores. You iron it onto the back of felt or fabric, peel the paper, and iron the piece onto your sweater. It creates a flat, flexible bond without any sewing.
Hot glue is best for 3D items like pom-poms, bells, and ornaments. Always slide a piece of cardboard inside the sweater before gluing. This stops glue from seeping through the knit and sticking the front to the back.
Use a low temperature glue gun whenever possible. It is less likely to scorch the yarn or burn your fingers. Press each item gently and hold it for a few seconds. Avoid pushing hard, since glue can squeeze through the knit.
Fabric glue works best for flat felt shapes and ribbon. It stays flexible after it dries, so the sweater still bends naturally. Most fabric glues need several hours to dry, so plan ahead and check the bottle for timing.
Safety pins are perfect for heavy or removable items. Pin from the inside of the sweater so the pins stay hidden. They let you swap decorations each year or remove lights before washing.
When ironing anything onto a sweater, always use a pressing cloth. A thin cotton dish towel works well. Set the iron to the lowest heat the product allows. Test on an inside seam first, especially with acrylic sweaters.
DIY Mrs. Claus Costume – 6 Festive & Simple Christmas Steps!
🎄 Idea 1: The Classic 3D Christmas Tree
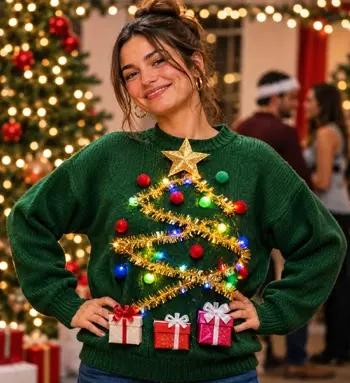
This is the timeless DIY Ugly Christmas Sweater, and it never fails. Start by cutting a large triangle from green felt. It should cover most of the sweater front, from the collar to just above the hem.
Cut zigzags along the sides of the triangle to create layered branches. Attach the tree with fusible web or fabric glue. Add a small brown felt rectangle at the bottom for the trunk.
Now decorate. Hot glue pom-poms all over the tree as ornaments, mixing red, gold, white, and blue. Drape a thin strand of tinsel garland diagonally across the branches. Secure it every few inches with small dots of hot glue.
Cut a gold felt star for the top of the tree. Glue a few sequins or a bit of glitter onto it. Hot glue the star right below the collar.
Finish with presents under the tree. Cut small squares of felt in bright colors. Add crossed ribbon strips to make tiny gift boxes. Glue them around the trunk for a cozy holiday scene.
💡 Idea 2: The Light-Up Sweater

Nothing draws attention like a sweater that actually glows. Buy a strand of battery-operated LED fairy lights on thin copper wire. These lights are lightweight, flexible, and stay cool to the touch.
Never use plug-in Christmas lights on clothing. They get warm and create a real safety hazard. Battery-powered LEDs are the only safe choice for a light-up DIY Ugly Christmas Sweater.
Plan your light pattern first. A simple zigzag, a spiral, or the outline of a tree all look great. Sketch the design lightly with chalk on the sweater front.
Turn the sweater inside out. Poke the end of the light strand through the knit at the start of your design. Weave it in and out along your chalk line, so each bulb peeks through to the front.
Secure the wire on the inside with small safety pins every few inches. Do not glue the wire, since you will want to remove the lights before washing.
Tuck the battery pack into a small pocket on the inside. Safety pin a fabric scrap or an old sock inside the hem to make one. Make sure you can reach the switch easily.
For extra flair, choose lights with a twinkle or flash setting. Combine the lights with the Christmas tree design for a tree that really sparkles.
✨ Idea 3: Tinsel Overload

This design is pure, shiny chaos. Buy several strands of tinsel garland in different colors. Silver, gold, red, and green all work well together.
Lay the sweater flat with cardboard inside. Start at the hem and work upward in rows. Run a thin line of hot glue across the sweater, then press the tinsel into it.
Leave a gap of an inch or two between each row. Alternate the colors so the sweater looks striped. Keep the tinsel away from the neckline and underarms, where it can scratch.
Add pom-poms or jingle bells between the rows for extra texture. A few dangling mini candy canes look fun too. Hang them from short loops of ribbon glued to the sweater.
Finish with a tinsel collar. Glue a short piece of garland around the neckline, but leave the inside edge soft. This frames your face and adds to the over-the-top look.
🔴 Idea 4: The Ornament Explosion

Mini shatterproof ornaments turn a DIY Ugly Christmas Sweater into a walking Christmas tree. Buy a pack of small plastic ornaments, about one inch across. Glass ornaments are too heavy and too dangerous to wear.
Remove the metal hanging caps if they are loose. Then hot glue each ornament directly to the sweater. Spread them evenly across the front, so the weight does not pull in one spot.
Mix colors and finishes for maximum impact. Combine shiny, matte, and glittery ornaments. Fill the gaps with small bows and jingle bells.
For a dangling effect, pin a few ornaments instead of gluing them. Thread a safety pin through each ornament loop, then pin it from the inside. They will swing and clink as you move.
Keep ornaments off the elbows and underarms. These areas bend constantly and will knock decorations loose.
🦌 Idea 5: The Reindeer Face
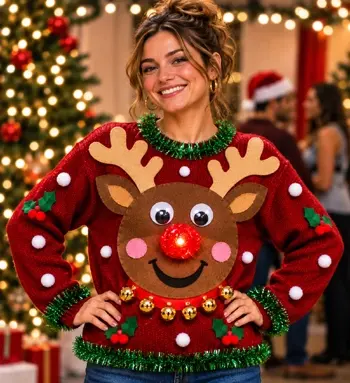
A giant reindeer face is a fun, classic look. Cut a large oval from brown felt for the head. Make it big enough to cover most of the chest.
Cut two antler shapes from tan or light brown felt. Glue them above the head so they stretch toward the shoulders. Attach everything with fusible web or fabric glue.
Add two large googly eyes near the top of the face. Glue a big red pom-pom in the center for a bright, shiny nose. A small red light-up nose from a craft store makes it even better.
Cut a smiling mouth from black felt and glue it below the nose. Add two small pink felt circles for rosy cheeks.
Finish with a festive collar of jingle bells. Hot glue a row of bells along a ribbon. Then glue the ribbon across the reindeer’s neck, just below the face.
😈 Idea 6: The Krampus Horror Sweater

This idea is perfect for horror fans who want Christmas with a spooky edge. Krampus is the horned figure from Alpine folklore who punishes naughty children. A Krampus-themed DIY Ugly Christmas Sweater is darkly funny and always sparks conversation.
Start with a black, dark red, or forest green sweater. Cut a Krampus face from dark brown or black faux fur. Cut the fur from the backing side with a craft knife to keep the fibers long.
Glue the fur face onto the center of the sweater with fabric glue. Cut two curved horns from tan felt. Add brown stripes with a fabric marker for texture.
Glue red felt eyes and a long, red felt tongue onto the face. Add a few small white felt fangs at the corners of the mouth.
Drape a strand of lightweight plastic chain across the sweater. Safety pin it from the inside at each shoulder. Paint the chain with rusty brown tones first for a weathered look.
Finish with iron-on letters across the bottom hem. Spell out a cheeky phrase like Naughty List Enforcer. Add a few small jingle bells around the face for a festive touch.
DIY Krampus Costume: 9 Terrifying Steps to a Pro Look
🎬 Idea 7: The Major Award Leg Lamp

This idea honors A Christmas Story, the 1983 holiday classic. In the film, Ralphie’s father wins a lamp shaped like a woman’s leg. It is one of the most recognized props in Christmas movie history.
Start with a black or dark green sweater. Cut a leg shape from tan felt, with a black felt high heel at the bottom. Make it tall enough to run down the center of the sweater.
Attach the leg with fusible web or fabric glue. Cut a lampshade shape from cream or gold felt. Glue it at the top of the leg, just below the collar.
Glue a strip of gold fringe trim along the bottom of the lampshade. This detail makes the design instantly recognizable. Add a small battery-operated LED light behind the shade for a warm glow.
Finish with a wooden crate below the lamp. Cut a brown felt rectangle and draw wood lines with a black fabric marker. Add iron-on letters reading “Fragile” across the front.
🍪 Idea 8: The Gingerbread House
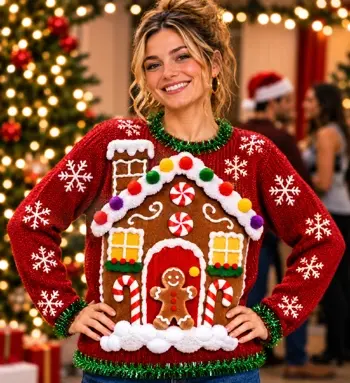
This sweet design looks good enough to eat. Cut a large house shape from brown felt. Cut a triangle roof from a darker brown felt and place it above the house.
Glue both pieces onto the sweater with fusible web or fabric glue. Use white puffy fabric paint to draw icing along the roof edges and windows. Puffy paint dries raised and looks just like frosting.
Decorate the house with candy. Glue small colored pom-poms along the roof as gumdrops. Cut little peppermint circles from white felt and draw red swirls with a fabric marker.
Add a door and windows cut from yellow and red felt. Glue mini candy canes beside the door. Finish with a few white pom-poms across the bottom as snow.
For extra fun, glue a small felt gingerbread figure in the doorway. Draw his face and buttons with white puffy paint.
💑 Idea 9: His and Hers Matching Sweaters
A matching DIY Ugly Christmas Sweater set is perfect for couples, best friends, or siblings. The trick is designing two sweaters that work alone but tell a joke together.
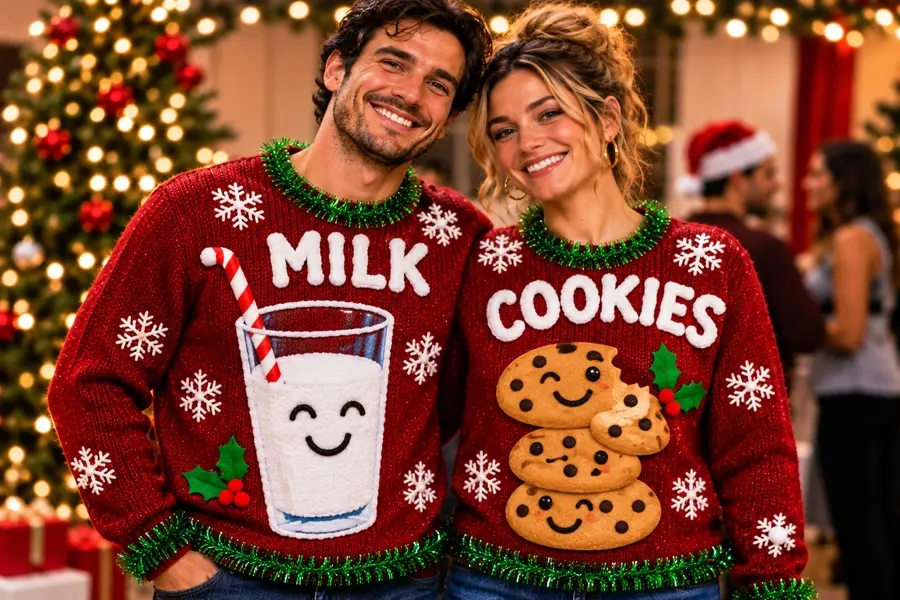
The easiest version is Naughty and Nice. Use iron-on letters to spell “Naughty” on one sweater and “Nice” on the other. Decorate the naughty sweater with coal, chains, and dark colors. Give the nice sweater halos, stars, and sparkles.
Another favorite is Milk and Cookies. Cut a large milk glass from white felt for one sweater. Cut a stack of chocolate chip cookies from brown felt for the other. Add brown puffy paint dots for chocolate chips.
For a split design, create one image across both sweaters. Put the top half of a snowman on one sweater and the bottom half on the other. When you stand side by side, the snowman is complete.
Use the same base color for both sweaters. Repeat a few small details, such as matching bells or the same tinsel. This keeps the set looking coordinated, even when the designs are different.
🎀 Hair, Makeup, and Accessories
The right accessories finish the look of any DIY Ugly Christmas Sweater. A festive headband is the easiest add-on. Choose reindeer antlers, a mini Santa hat, or a headband covered in tinsel.
For hair, weave thin strands of tinsel into a braid or ponytail. Small jingle bells tied onto hair ties add sound and sparkle. Battery-operated light-up hair clips create a fun glow at night.
Keep makeup playful and bright. Red or green eyeliner adds instant holiday color. A little cosmetic glitter on the cheekbones catches the light. Use only glitter made for skin, since craft glitter can scratch the eyes.
Draw a few small holiday shapes near the eyes with face paint. Tiny stars, snowflakes, or holly leaves all work well. Keep them small so they complement the sweater rather than compete with it.
Beards offer a great opportunity. Clip small, lightweight ornaments or beard baubles into the beard. Weave a little thin tinsel through it for extra shine.
If you do not have facial hair, a fake festive beard is an easy workaround. Look for a white or red novelty beard at a party store. Decorate it with pom-poms and tiny bows using hot glue.
Finish the outfit with festive earrings, a tinsel scarf, or holiday socks. Red or green pants and novelty slippers complete the over-the-top look.
🎉 Movement and Presence
Wearing an ugly sweater is all about confidence. Stand tall, smile big, and own every ridiculous detail. The sillier the sweater, the prouder you should look.
At a party or contest, be ready to show off your work. Turn slowly so people can see the 3D details. Switch on your lights at the right moment for a big reveal.
Move carefully in crowded rooms. Dangling ornaments and tinsel can catch on chairs and doorways. Sit gently so decorations on the back do not get crushed.
If you made a his and hers set, stay close to your partner. Strike a pose together whenever someone pulls out a camera. Matching designs make the biggest impact side by side.
📸 Capture the Moment
Ugly sweaters photograph best in warm, cozy settings. Pose in front of a decorated Christmas tree or a fireplace. Twinkling string lights in the background add holiday sparkle.
If your sweater lights up, turn down the room lights. Use a phone’s night mode to capture the glow without a flash. A flash can wash out the lights completely.
Take close-up shots of the best details, such as pom-poms, googly eyes, and tinsel. Then step back for a full-length photo. Hold a mug of cocoa or a plate of cookies as a fun prop.
For group photos, line everyone up from least ugly to most ugly. It makes a funny photo and settles any arguments about who won.
🧼 Care, Storage, and Safety
A DIY Ugly Christmas Sweater should never go in the washing machine. Spot clean small stains with a damp cloth and a drop of gentle soap. Remove lights and pinned items before cleaning.
If a sweater truly needs washing, turn it inside out. Hand wash it in cool water and lay it flat to dry. Hot glue can soften in warm water, so avoid heat.
Store your sweater folded flat in a box or a large bag. Do not hang it, since heavy decorations stretch the shoulders. Place tissue paper between layers to protect the 3D details.
Check every sweater before wearing it. Re-glue any loose pom-poms or bells. Small decorations can be a choking hazard, so keep them secure around young children.
Always remove battery packs before storing a light-up sweater. Take the batteries out completely to prevent corrosion over the year.
🎁 Why Go DIY?
Store bought ugly sweaters often look the same at every party. A DIY Ugly Christmas Sweater is one of a kind, and it shows off your creativity. Your handmade design is far more likely to win a contest.
It is also budget friendly. A thrift store sweater, a glue gun, and a bag of craft supplies cover nearly everything. Best of all, you can add new decorations every year, making your DIY Ugly Christmas Sweater even uglier over time.