🥊 DIY Black Eye Makeup: For Stage Screen and Halloween
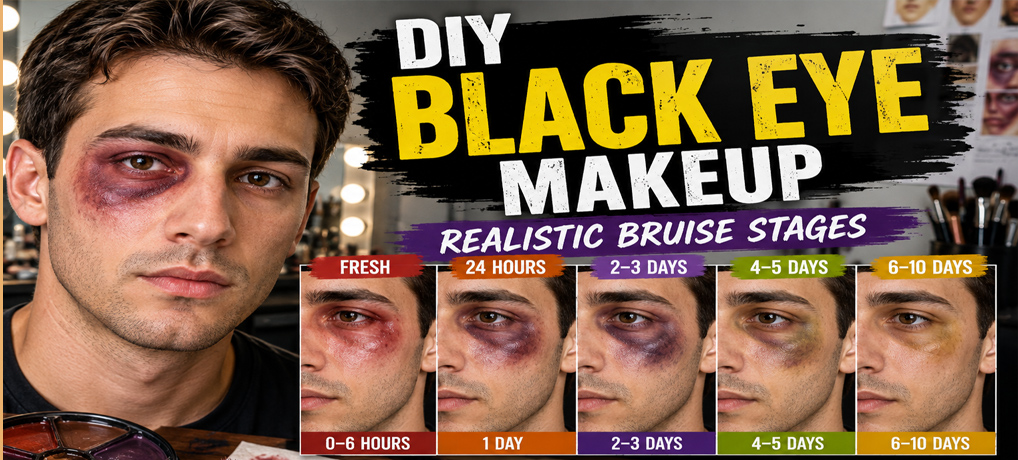
A convincing black eye takes more than smearing purple makeup around your eye and calling it finished. Good **DIY Black Eye Makeup** uses several colors, irregular edges, careful placement, and subtle changes in tone to create the illusion of an actual injury. Where you put those colors matters just as much as which colors you choose. Real bruising is rarely a perfect circle, and covering the entire eye socket with one shade of purple is one of the quickest ways to make the effect look painted on.
There is another detail that can make a huge difference: **a black eye changes as it heals**. A fresh injury does not look like one that happened three days ago, and an older bruise may develop greens, yellows, and fading brown tones as it disappears. In this guide, we will build several stages of a black eye so you can choose the right appearance for a Halloween character, theatrical production, haunted attraction, photo shoot, or independent film. The goal is not simply to make a bruise. It is to make one that looks like it has a history.
🎨 What You’ll Need for DIY Black Eye Makeup
You do not need a professional movie makeup kit to create convincing DIY Black Eye Makeup, but having the right colors makes the job much easier. A theatrical bruise wheel is ideal because it puts several useful injury colors in one small palette. Look for shades such as red, burgundy, purple, blue, yellow, green, and brown. Cream-based theatrical makeup is especially useful because the colors can be blended, layered, and softened instead of sitting on the skin like a solid painted patch.
For application, gather a few small makeup brushes, a makeup sponge, and a stipple sponge if you have one. A stipple sponge creates broken, irregular patches of color that are excellent for bruising. Cotton swabs can help with tiny areas around the eye, while an ordinary cosmetic sponge can soften edges and remove excess color. You will also want translucent setting powder, a powder puff or soft brush, tissues or paper towels, a mirror, and makeup remover for cleanup.
If you are working on a Halloween budget, check the makeup you already own before buying an entire special-effects kit. Matte eyeshadows in purple, burgundy, blue, brown, yellow, and muted green can provide useful color, particularly for lighter bruising and the later healing stages. Red or burgundy cream blush and dark matte eyeshadow can also fill gaps in a basic kit. Avoid glitter, shimmer, and metallic makeup because real bruises do not sparkle when the light hits them.
A professional bruise wheel is still worth considering if you plan to make more theatrical injuries. The colors are selected specifically for creating bruises, wounds, and discoloration, and one small wheel can last through many Halloween costumes or stage productions.
Keep anything used close to the eye cosmetic-grade and approved for use in that area. Do not substitute craft paint, markers, food coloring, or other household pigments simply because the color looks right. Check product labels before applying makeup near the eyelids or lash line, and never put theatrical makeup directly into the eye.
One last tool costs nothing: a good reference photograph. Before you begin, look closely at how real bruising changes around the brow bone, eyelid, inner corner, and upper cheek. You are not trying to copy every mark exactly. The reference simply keeps you from falling into the classic Halloween trap of painting a neat purple circle around the eye and wondering why it looks like makeup.
👁️ Step 1: Understand What a Real Black Eye Looks Like
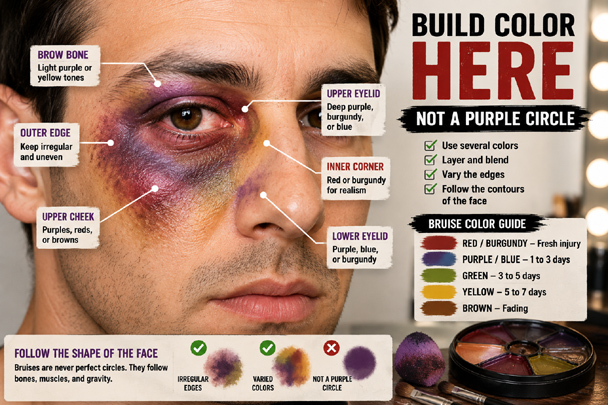
Before you touch the makeup, forget the perfect purple circle you see on cheap Halloween costumes. A real black eye develops when bleeding beneath the skin causes discoloration around the eye. Because the skin here is thin and the shape of the eye socket affects where that discoloration appears, the result is usually irregular. Some areas may be dark and concentrated while others barely show any color at all.
Look closely at your own eye in a mirror. Notice the brow bone, upper eyelid, lower eyelid, inner corner of the eye, and the area just above the cheekbone. These natural shapes should guide your makeup. Bruising can collect around the eyelids and spread into the surrounding tissue, but it should not look like somebody drew a neat ring around the entire eye.
The biggest mistake is using one color. Real bruises contain variations. Even when purple or blue dominates, you may see areas of red, burgundy, brown, or other tones blending into normal skin. The edges are usually uneven and soft rather than sharply outlined. Leaving some normal skin showing through can actually make the injury more convincing.
Another detail to remember is that the darkest color does not need to cover the largest area. A small patch of deep purple near the eyelid surrounded by lighter reds and softer discoloration can create more depth than covering half the face with dark makeup. Build the effect in thin, transparent layers and allow the skin underneath to remain visible.
⏳ A Bruise Changes With Time
This is where DIY Black Eye Makeup becomes much more interesting. You are not simply creating a black eye. You are deciding when the injury happened.
A newly injured eye may show redness and early discoloration. As time passes, deeper blues, purples, and burgundy tones can become more noticeable. During healing, the appearance can shift again, with greens, yellows, and brownish tones appearing as the bruise fades. These changes vary considerably from person to person, so think of the stages in this guide as visual references for character makeup rather than an exact medical timetable.
For Halloween, you can simply choose whichever stage looks best for your character. For theater or film, however, the age of the bruise can become part of the story. If a character gets punched in one scene and appears three days later in another, the makeup should change with them.
That little bit of attention is often what separates a person wearing bruise makeup from a character who looks like something actually happened to them.
🔴 Step 2: Create a Fresh Black Eye
For fresh DIY Black Eye Makeup, resist the temptation to reach immediately for the darkest purple in your kit. At this stage, the effect should suggest fresh irritation and early bruising rather than a fully developed black-and-blue eye. Reds, pinks, muted burgundy, and small touches of blue-purple will do most of the work.
Begin with a very light wash of red or pink around the affected area. Use a sponge or soft brush and apply the color unevenly. Concentrate some of the redness around the upper and lower eyelids, the inner corner, and selected areas beneath the eye. Do not completely surround the eye with red. Leave patches of normal skin showing through so the makeup has natural variation.
Next, introduce a deeper red or burgundy. Use much less of this color. Dab it into a few areas where you want the bruising to appear more concentrated, then gently blend the edges into the lighter redness. A stipple sponge works particularly well because it naturally leaves an irregular pattern instead of a smooth patch of color.
Now add a small amount of blue or purple. For a fresh injury, this should usually be an accent rather than the dominant color. Try a little near the eyelid, beneath the eye, or beside an area of deeper red. Blend it enough that you cannot easily tell where one color ends and another begins.
Keep checking the effect from a normal viewing distance. If your first thought is, “That is some nice purple makeup,” you probably have too much. If the skin simply looks irritated, discolored, and increasingly unpleasant the longer you study it, you are getting somewhere.
You can suggest mild puffiness with makeup as well. Subtle highlights beside slightly darker shading can create the illusion that an area is raised without attaching a prosthetic. Keep this restrained. Trying to paint a huge swollen lump onto otherwise flat skin usually calls attention to the trick.
Finally, soften any obvious edges with a clean sponge and set the finished makeup with translucent powder if appropriate for the products you are using. Check the result under the actual lighting where the character will appear. Bathroom lighting is not necessarily going to tell you what the makeup will look like on stage, outdoors at night, or in front of a camera.
🎬 Stage & Screen Tip
For stage: You can usually push the colors and contrast farther. An audience sitting 20 or 30 feet away may not see the delicate mottling that looks obvious when you are standing inches from a mirror. Deepen selected reds and purples and make the overall shape readable from a distance, while still keeping the edges irregular.
For camera: Back off. A close-up can reveal every brushstroke, hard edge, and heavy patch of makeup. Use thinner layers, softer transitions, and more variation in the skin. After finishing, take a few photographs under the lighting you expect to use. The camera can reveal problems your eye overlooked.
The goal in both cases is the same. The audience should notice that the character has a fresh black eye, not that the actor is wearing black-eye makeup.
Check Out The DIY Fake Blood Article
🟣 Step 3: Build the 24-Hour Bruise
About a day after the fictional injury, you can move into the classic black-and-blue look most people associate with a black eye. The early redness has not necessarily disappeared, but deeper purples, blues, and burgundy tones can now become much more noticeable. The trick is keeping those colors broken and uneven instead of turning the entire eye socket purple.
If you are continuing from the fresh black eye in Step 2, leave some of that red and burgundy visible. If you are starting directly with the 24-hour look, begin with a light, irregular base of muted red or burgundy. Dab rather than paint, concentrating the color around selected portions of the upper and lower eyelids.
Now introduce purple. Use a sponge, stipple sponge, or small brush to place deeper color close to the eye, particularly around parts of the eyelid and beneath the eye. Do not follow the eye socket like you are coloring inside a line. Let some areas extend farther than others, and leave occasional breaks where your natural skin remains visible.
Add blue sparingly to selected areas of the purple. Blue can create wonderful depth, but too much produces the familiar Halloween raccoon-eye effect. Try putting a little blue-purple into one or two of the darkest areas while allowing burgundy and red to remain visible elsewhere.
This is also a good time to vary the intensity between the upper and lower portions of the bruise. One eyelid might carry a dense patch of purple while the area below the eye has softer mottled discoloration extending toward the cheekbone. Slight differences like these make DIY Black Eye Makeup look much less symmetrical and much more convincing.
Use a clean sponge or fingertip to soften obvious boundaries between colors. Do not blend everything until you have one smooth shade. You want purple flowing into burgundy, blue disappearing into purple, and occasional reddish areas showing through. Think in patches and layers rather than one continuous coat of makeup.
Step back from the mirror every few minutes. Up close, you may be tempted to keep adding detail because the individual colors look too subtle. From several feet away, those layers combine visually and can appear much darker than you expected.
🎬 The Classic “Yesterday’s Fight” Look
For a character who supposedly got into a fight the night before, this is probably the most useful stage. Keep some reddish irritation near the eye, deepen selected areas with burgundy and purple, and add just enough blue to suggest that the bruising has developed overnight.
Do not make it too pretty. A perfectly blended purple gradient may demonstrate excellent makeup technique, but injuries are messy. A convincing bruise should have little areas that seem almost misplaced, uneven, or strangely colored.
That controlled imperfection is what sells the illusion.
🔵 Step 4: Create a 2–3 Day Old Black Eye
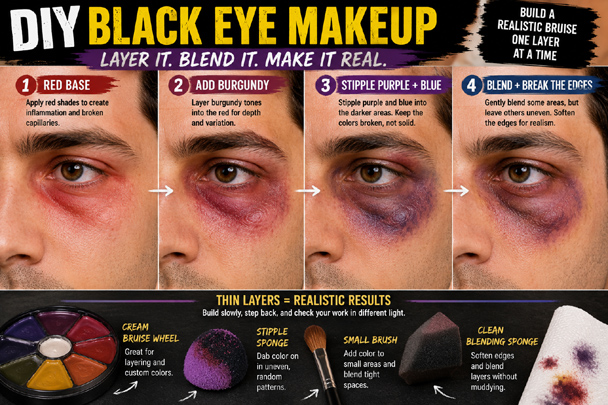
By the second or third day in your character's story, the black eye can look fully developed. This is where deeper blue, purple, burgundy, and almost-black tones can become more prominent. Even at its darkest, though, a convincing bruise is still made from several colors. Painting one solid purple patch around the eye will flatten the effect instead of making it look more severe.
Begin with a thin, uneven layer of burgundy or muted red. You may wonder why we are putting red underneath colors that will eventually be much darker. That underlying color gives the bruise depth. When small areas remain visible through the purple and blue layers, the makeup looks more like discoloration beneath the skin instead of paint sitting on top of it.
Next, stipple purple over selected portions of the red. Concentrate the strongest color around parts of the eyelids and other areas where you want the injury to appear deepest. Keep your pressure light and build the color gradually. Some areas should receive several layers while others may get little or no purple at all.
Now introduce blue into a few of the darker sections. Do not simply cover the purple with blue. Dab small amounts beside and partially over it so the two colors visually mix in some places while remaining distinct in others. You can also add a tiny amount of very dark burgundy, brown, or deep purple to create the darkest points of the bruise.
Be extremely careful with black. Pure black makeup can quickly make the effect look dirty, theatrical, or painted. If you need an almost-black area, try creating it by layering dark purple, blue, burgundy, and brown first. The resulting color usually has much more life than a stripe of straight black.
🎨 Think in Layers, Not Colors
The easiest way to understand realistic bruise makeup is to stop thinking, “Now I paint it purple.” Instead, think about building transparent layers.
You might start with red, stipple burgundy over part of it, add purple over part of that, touch blue into two smaller areas, then return with a little red to break up an edge that has become too smooth. Each layer should allow pieces of the previous colors and your natural skin tone to remain visible.
A stipple sponge is especially useful at this stage. Lightly load it with color, remove most of the excess on a tissue, then gently tap it against the skin. Rotate the sponge as you work so you do not create a repeating pattern. You want irregular specks, patches, and broken edges.
Use a small brush for tighter areas around the eye, but keep any product away from places where its label does not approve eye-area use. You do not need makeup directly against the eyeball or inside the lash line to make the injury convincing.
Once the major colors are in place, use a clean sponge to soften selected edges. Do not blend the entire bruise. Some transitions should disappear gently into the surrounding skin while other small areas remain noticeably mottled.
Step several feet away from the mirror and look again. At this stage, your DIY Black Eye Makeup should read immediately as a serious bruise, but moving closer should reveal reds, blues, purples, and natural skin rather than one flat patch of color.
For film work, take a photograph before moving on. A 2–3 day bruise may appear in several scenes, and recreating all those little irregular patches from memory is much harder than you might expect. In special-effects makeup, a quick reference photo can save a remarkable amount of aggravation later.
Check out the DIY Fake Teeth Article
🟢 Step 5: Make a 4–5 Day Healing Black Eye
This is where bruise makeup gets more interesting. Your character's black eye is no longer fresh, but it has not disappeared either. Depending on the person and the injury, some deep purple, blue, or burgundy may remain while muted greens, yellows, and brownish tones can begin changing the overall appearance.
This stage is also where many Halloween makeup tutorials fall short. They teach you how to make a dramatic purple bruise, but not how to make that same injury look several days older. For stage or film, knowing how to age an injury can be just as useful as knowing how to create it in the first place.
If you are continuing from Step 4, begin by softening some of the darkest areas. Do not erase all the purple and blue. Instead, reduce their dominance by stippling muted green and yellow-green around selected edges and into portions of the existing discoloration.
If you are creating the 4–5 day look from scratch, begin with a very light, irregular base of yellow-green or muted yellow. Add small areas of green, followed by remnants of purple, blue, burgundy, or brown where you want the older bruising to remain visible.
Green can be surprisingly powerful on skin, so use very little at first. Bright green makeup will quickly turn your actor into a comic-book character. A convincing healing bruise usually benefits from dull, dirty, or slightly yellowed greens rather than vivid emerald shades.
The same rule applies to yellow. Do not paint a yellow circle around the purple bruise. Stipple it irregularly around portions of the outside edge and allow a little to creep into areas where the darker colors are fading. Leave some natural skin visible between colors.
Brown can help connect everything. A tiny amount of muted brown worked into the purple, green, or yellow areas can take away the artificial brightness of theatrical makeup and give the bruise an older, less colorful appearance.
🧽 Let the Old Bruise Show Through
Do not completely cover the earlier colors. That is the secret to this stage.
Leave a small patch of deep purple near part of the eyelid. Let a little burgundy survive beneath the eye. Allow blue to peek through an area that is beginning to turn green. Then surround those darker remnants with softer healing colors.
The result should look uneven because different portions of the bruise appear to be fading at different rates.
Step back and compare this stage with your 2–3 day version. The difference should be obvious without making the injury look like an entirely different black eye. The shape remains related, but the colors have moved forward in your character's timeline.
🎬 Stage & Screen Tip: Aging an Injury
If you are making DIY Black Eye Makeup for a film, photograph each stage from the same angle and under similar lighting. Record which colors you used and roughly where you placed them. A simple phone photograph labeled Day 2, Day 4, or Day 6 can become an invaluable continuity reference.
For theater, you can exaggerate the green, yellow, and remaining purple enough to make the healing stage readable from the audience. From the back row, subtle color changes can disappear under stage lighting.
The important thing is that the bruise looks like the same injury getting older. If yesterday's black eye was dark purple and today's suddenly becomes a completely unrelated green patch, the audience may not know exactly what is wrong, but something about the effect will feel off.
🟡 Step 6: Create a 6–10 Day Fading Bruise
For this later stage in your character's fictional timeline, we are creating a black eye that appears to be well into the healing process. The dramatic blues and purples have mostly faded, leaving softer yellow, yellow-green, muted brown, and occasional traces of the darker colors that dominated the earlier stages. This is not the most dramatic black eye in the tutorial, but for stage and film it can be one of the most useful because it tells the audience that the injury happened some time ago.
Start with a very light wash of muted yellow around portions of the original bruised area. Keep it transparent enough that the skin shows through. You are trying to create fading discoloration, not yellow face paint. A sponge with most of the makeup removed before application works particularly well.
Add small, irregular areas of yellow-green around some of the remaining discoloration. As in Step 5, avoid bright green. You want a dull, almost unhealthy tint that seems to be sitting beneath the skin. Blend some areas softly while leaving others slightly mottled.
Next, introduce tiny amounts of muted brown or brownish-yellow. This can help knock down colors that look too bright and create the dirty, fading quality of an older bruise. Keep the brown translucent. Heavy brown makeup can quickly make the effect resemble dirt instead of an injury.
Now bring back a very small amount of purple, burgundy, or blue. That may sound strange when we are trying to make the bruise disappear, but a few remnants of older discoloration help connect this makeup with the earlier stages. Try a faint patch near part of the eyelid or a tiny area beneath the eye rather than rebuilding the entire dark bruise.
🧽 Make Some of It Disappear
One of the easiest mistakes at this stage is adding too much makeup. A healing black eye needs areas where almost nothing remains.
Use a clean sponge to soften and partially remove some of the color you just applied. Break apart larger patches. Let normal skin interrupt the yellow and green. Allow one side of the old bruise to appear almost healed while another area retains a little discoloration.
Think of this stage as taking the bruise away rather than adding another one.
If you are continuing makeup from an earlier stage for practice, compare the fading version with photographs of your darker black eye. The general location should still make sense, but the intensity should be dramatically reduced.
🎬 The Almost-Healed Version
For an even older injury, use the same technique but reduce everything further. A little yellow-brown discoloration beneath the eye and perhaps the faintest trace of purple may be enough. Under close-up photography, subtle makeup can communicate an old injury surprisingly well.
For stage, you may need to exaggerate these remaining colors because pale yellow and green can vanish under theatrical lighting. Check the effect from the audience's viewing distance rather than judging it only from a dressing-room mirror.
This is where DIY Black Eye Makeup becomes useful for storytelling. You can show a character immediately after a fight, the following morning, several days later, and nearly recovered without anyone having to explain how much time has passed.
A good fading bruise should make the audience think, “That happened days ago.” If they are thinking about the yellow makeup around the actor's eye, you have probably gone too far.
🧽 Step 7: Blend, Set, and Add the Final Details
Whichever bruise stage you have chosen, the final few minutes can make the difference between convincing DIY Black Eye Makeup and an obvious painted-on effect. Before adding anything else, step away from the mirror and look at the entire face. A black eye that seems subtle from six inches away may look surprisingly strong at normal viewing distance.
Start by hunting for hard edges. If you can clearly see where the makeup begins and normal skin ends, use a clean sponge or soft brush to break up that boundary. Dab and stipple rather than rubbing everything together. Some areas can fade almost completely into the skin while others remain slightly more defined.
Do the same thing inside the bruise. Look for large areas that have accidentally become one solid color. Break them apart with a little of the surrounding shade, your foundation color, or careful removal with a clean sponge. You should still be able to find several colors when you examine the makeup closely.
👁️ Suggest Swelling Without a Prosthetic
You can create the impression of mild swelling with nothing more than light and shadow. Place a very subtle darker tone beside the area you want to appear raised, then add a small amount of lighter makeup on the area that would catch the light.
Keep this extremely restrained. You are creating an optical illusion, not drawing a ridge around the eye. Blend until you cannot easily identify the highlight and shadow separately.
For more pronounced swelling, professional productions may use prosthetic appliances or other specialized techniques. Do not put household adhesives, waxes, or improvised materials close to the eye simply to create a larger effect.
🪞 Check the Whole Face
Now look at the unaffected eye.
This is an excellent reality check because it shows you the shadows, folds, highlights, and colors already present on the actor's face. Compare the two sides. Your injured eye should still look like it belongs to the same person.
Also consider what supposedly caused the injury. If your character has been in a serious fight, a perfectly clean face surrounding an enormous black eye may look incomplete. A tiny amount of safe theatrical dirt, a split-lip effect, or another appropriate detail can sometimes help tell the story, but do not automatically pile on more injuries. The black eye should remain readable.
🧴 Set the Makeup
Once you are satisfied, set cream makeup according to the manufacturer's directions. For many theatrical cream products, this means lightly applying translucent setting powder with a powder puff or soft brush, allowing it to sit briefly, and then removing the excess. Other products may require a compatible setting spray or no additional setting product at all.
Be especially careful around the eye. Keep loose powder out of the eye itself and use only products approved by their manufacturer for the area where you are applying them.
Setting the makeup helps reduce unwanted smearing and transfer, but it does not make the effect indestructible. Rubbing the eye, sweating heavily, costume changes, and long performances can still disturb it.
💡 Check Your Actual Lighting
Do not declare your DIY Black Eye Makeup finished until you have seen it under the lighting where it will actually appear.
For Halloween, check it indoors and outside if you will be moving between both. For theater, walk onto the stage and turn on the show lighting. For a haunted attraction, inspect it under the colored or dim lighting used in the scene. For film, put the actor in position and look through the actual camera.
Lighting can completely change bruise makeup. Purple can turn almost black, subtle yellow can disappear, and beautifully blended details can become invisible from twenty feet away.
Make your final adjustments there, not under the bathroom light.
When the effect is right, people should notice the injury before they notice the makeup. That is the standard you are aiming for.
🎬 Making a Black Eye Work for Stage or Camera
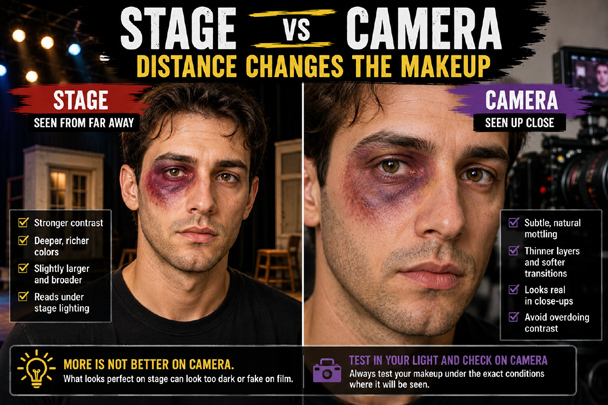
A black eye that looks terrific in your bathroom mirror may fail completely once it reaches a stage or movie set. Distance, lighting, cameras, and the order in which scenes are performed can all change how the makeup needs to be handled. This is where DIY Black Eye Makeup moves beyond a Halloween effect and becomes useful practical FX knowledge.
For theater, distance is your biggest enemy. Fine mottling and subtle color variations that look wonderfully realistic from two feet away may disappear entirely for someone sitting 30 feet from the stage. The basic shape and age of the bruise still need to be readable from the audience.
That usually means increasing selected colors and contrast rather than simply making the entire bruise darker. Preserve the reds, purples, greens, or yellows appropriate to the injury's age, but strengthen enough of them that the effect survives the viewing distance.
Stage lighting creates another problem. Colored lights can dramatically alter makeup. A bruise that looks purple and burgundy in the dressing room may become nearly black under one lighting cue or almost disappear under another. Whenever possible, test important makeup under the actual show lighting before opening night.
📹 The Camera Sees Everything
Film requires almost the opposite approach.
Modern cameras can reveal tiny makeup edges, obvious stipple patterns, thick cream makeup, poorly blended colors, and details that an audience would never notice from a theater seat. A close-up may put your black eye across an entire television or movie screen.
For camera work, build your DIY Black Eye Makeup with thin layers and subtle color changes. Step away from the actor occasionally, but also look closely at the makeup through the camera rather than relying entirely on your eyes.
Shoot a test. Look at it on a larger screen if possible. Something that seemed too subtle while applying it may be perfectly convincing on camera.
📸 Continuity Can Save an Independent Film
Here is a problem that has nothing to do with applying makeup and everything to do with making a movie.
Movies are rarely filmed in story order.
Your actor might film the scene occurring three days after the fight on Monday, the actual fight scene on Wednesday, and the following-morning scene two weeks later. If you simply make a different black eye each day, the injury can jump backward and forward in age throughout the finished movie.
Before shooting, decide exactly when the injury occurs in the story. Then mark every later scene according to how much fictional time has passed.
A simple continuity record might say:
Fight Scene: Fresh injury
Next Morning: 24-hour bruise
Day 3: Dark developed bruise
Day 5: Green and yellow healing stage
Day 8: Mostly faded
Now the makeup department knows which version to create regardless of when that scene is actually filmed.
📷 Photograph Everything
Once your DIY Black Eye Makeup looks right, photograph it before shooting.
Take a straight-on photograph and close-ups from both sides. If the effect is complicated, photograph individual details around the upper eyelid, lower eye, and cheek. Try to use consistent lighting for these reference photographs.
Also write down what you used. Record the makeup colors, products, brushes or sponges, and any unusual mixing you did. If you created a particularly convincing muddy purple by combining burgundy and blue, write it down rather than assuming you will remember three weeks later.
For a small independent movie without a dedicated makeup department, these photographs and notes can be invaluable. They allow someone to recreate an effect closely enough that shots filmed weeks apart can be edited together without the black eye mysteriously changing shape.
🎭 Let the Injury Help Tell the Story
The best DIY Black Eye Makeup does more than make an actor look injured. For stage or screen, it can quietly support the story.
A fresh red and swollen-looking eye tells us something happened recently. A dark purple bruise suggests some time has passed. Yellow and green discoloration tells us the character has been carrying that injury for days.
The audience does not need to know why those colors are changing. They may never consciously notice the progression at all.
They simply believe the injury.
And for practical special effects, that is the whole point.
Find other Easy DIY Costume Ideas Here
🎭 Why Go DIY?
The biggest advantage of DIY Black Eye Makeup is control. You are not stuck with one generic purple-and-black Halloween bruise that is supposed to represent every possible injury. You decide how severe the black eye looks, how old it appears, which colors are still visible, and how strongly the effect needs to read.
For Halloween, that means matching the injury to your character instead of simply adding a bruise because it looks scary. A battered zombie, exhausted survivor, horror-movie victim, boxer, vampire hunter, or character who supposedly walked away from a fight may all need completely different versions of the same basic effect.
For theater, you can strengthen the contrast so the injury remains visible from the audience. For film and photography, you can pull everything back and concentrate on thin layers, broken color, and tiny details that survive a close-up. You can even create several versions of the same injury so it appears to heal as the story moves forward.
That last part is where learning the technique becomes especially useful. Once you understand how the colors, placement, layering, and apparent age work together, you are no longer following a single Halloween makeup design. You can create the injury that a particular scene actually requires.
Professional special-effects makeup is built around that same idea of serving the character and the story. The materials, equipment, and techniques used on a professional production may be more advanced, but learning to observe an injury, break it into colors and shapes, reproduce it, photograph it, and recreate it for continuity teaches genuine practical FX skills.
A cheap Halloween makeup kit can give you a black eye for one night. Understanding why a black eye looks the way it does gives you a technique you can use again for Halloween, haunted attractions, community theater, stage productions, photography, and independent films.
And that is really the point of going DIY. You are not just painting a bruise.
You are learning how to create an effect.
🥊 Your Character Has Been Through Something
A convincing injury can tell part of a character's story before that character says a single word. A fresh, angry-looking black eye suggests something happened very recently. A deep, developed bruise tells a slightly different story, while faded yellows and greens can suggest that whatever happened is already several days behind them.
That is what makes DIY Black Eye Makeup more useful than simply painting something scary around an eye. You can choose the stage of the injury to match the story you are trying to tell. For Halloween, that adds another layer to the costume. For theater or film, it can quietly help the audience understand how much time has passed.
The best practical effect does not need to announce itself. If people look at your character and wonder what happened to them instead of wondering how you did the makeup, the effect has done its job.
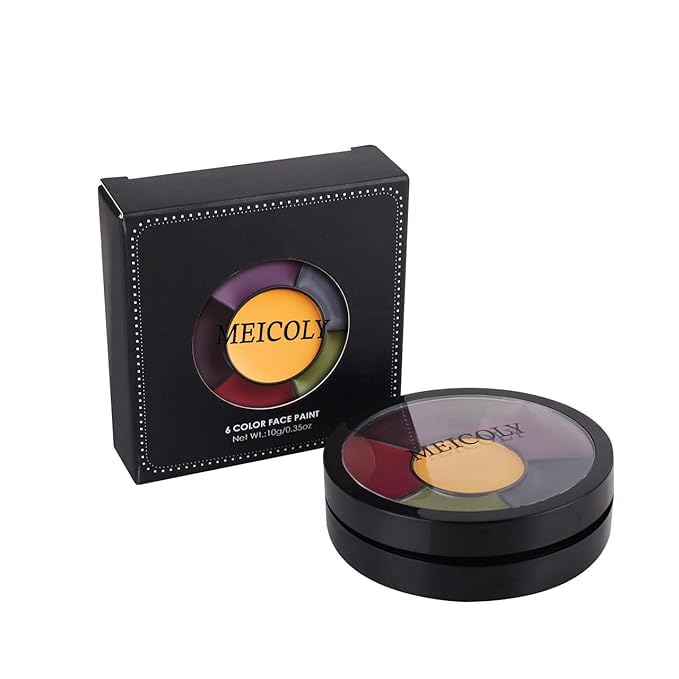
Special Effects Bruise Wheel Makeup Kit
Product Description:
Whether you're creating a movie-quality injury effect or adding realism to a Halloween costume, this bruise wheel is an excellent tool for DIY Black Eye Makeup. Featuring six blendable colors, it allows you to build convincing bruises, cuts, and impact effects for cosplay, theater, photography, and special effects makeup.
Key Features:
• Six realistic bruise colors for layered special effects makeup
• Highly pigmented cream formula with excellent coverage
• Includes three bruise wheels and three stipple sponges
• Oil-based formula blends smoothly for realistic effects
• Vegan, cruelty-free, non-toxic, and easy to remove with soap and warm water
Why This Works:
Realistic bruises are created by layering several colors rather than using a single shade. This palette makes it easy to build convincing DIY Black Eye Makeup for zombie costumes, movie makeup, theatrical performances, haunted attractions, or Halloween characters. The included stipple sponges help add texture and depth for a more natural-looking effect.
Buy on Amazon