👗 Craft the Perfect DIY Sally Look
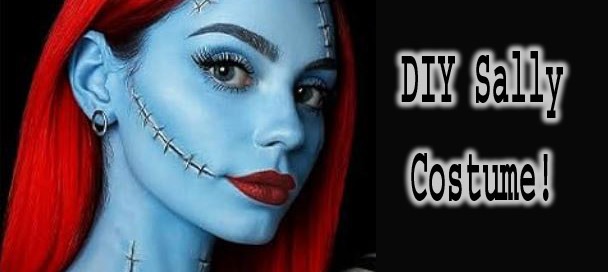
DIY Sally Look with stitched face and patchwork dress
If you've ever dreamed of stepping into Halloween Town, the DIY Sally Look is your chance to bring the beloved ragdoll to life. Sally isn’t just stitched together with thread she’s held together by heart, hope, and a little rebellion. Her gentle voice and soulful stare make her one of Tim Burton’s most iconic creations.
This look combines whimsical patchwork, bold makeup, and eerie elegance in a way that’s unmistakably Sally. From the mismatched fabrics of her dress to the black stitches across her face, every detail adds charm and personality. It’s a costume that balances spooky and sweet, all with a handmade touch.
With the DIY Sally Look, you’re not just wearing a costume you’re embodying a character full of quiet strength and unspoken dreams. Whether you're haunting a costume contest or pairing up with Jack Skellington, this look will sew its way into everyone's memory.
🧥 Step 1: Build the Patchwork Ragdoll Dress
To begin your DIY Sally Look, start with a simple base an old dress, oversized T-shirt, or jumper in a dull tone like beige, gray, or light blue. This will act as your canvas for Sally’s signature patchwork style. Choose a silhouette that feels comfortable and ragdoll-like, preferably something loose and slightly worn.
Cut fabric scraps in mismatched colors and patterns: think reds, teals, purples, yellows, and swirls. You can hot glue or sew these patches directly onto the base dress, overlapping edges slightly and leaving some threads loose for a handmade effect. Don’t worry about making it perfect Sally’s charm comes from her imperfect stitching.
To complete the first layer of your DIY Sally costume, draw black stitch marks where the patches meet using a fabric marker or paint. For extra character, add a torn hemline, mismatched sleeves, or one longer side of fabric. This ragdoll dress becomes your blank canvas for everything spooky and sweet that follows.
✂️ Step 2: Add Texture & Stitches to the Dress
Now that your patchwork base is in place, it’s time to enhance the texture and make your DIY Sally Look truly pop. Begin by fraying the edges of each patch using scissors, sandpaper, or even a cheese grater for a timeworn, distressed effect. Gently tug at threads to give it that unraveling ragdoll vibe.
Next, highlight the borders between patches with black fabric paint or a thick marker, mimicking Sally’s iconic hand-sewn seams. Use short, uneven lines or crisscross stitches to give the illusion of uneven, rushed sewing. For added visual interest, layer on netting, sheer fabrics, or thin strips of lace to give the costume more depth and dimension.
Finally, dust select patches with light glitter or shimmer fabric paint if you want a magical glint when the light hits. This step isn’t necessary, but it gives your DIY Sally costume a dreamy, whimsical quality like she just stepped out of Halloween Town and into your world.
Explore other Great Halloween Ideas Here
💄 Step 3: DIY Sally Makeup
Sally The Nightmare Before Christmas Sally Makeup Tutorial
The makeup is what transforms your costume into a full DIY Sally Look. Start with a base of pale blue or light teal cream foundation, applying it evenly across your face, neck, and any visible skin. Blend well for that stitched doll appearance that feels both eerie and soft.
Use black eyeliner or face paint to draw long stitch lines across your face, mouth, neck, and collarbone. Make the lines slightly curved and uneven for a handmade feel. Add small “X” stitches or crisscrosses to complete the thread effect. Around the eyes, apply red or burgundy eyeshadow in a wide oval shape to mimic Sally’s tired, soulful look.
Finish the DIY Sally Look with deep red lipstick and subtle gray contouring along the cheek hollows. Optional false lashes and white eyeliner in the waterline can make your eyes appear larger and doll-like. Set everything with translucent powder so your stitched-up beauty lasts all night long.
💀 Step 4: Hair & Accessories

Sally Costume Long Straight Dark Red Wig
No DIY Sally Look is complete without her unmistakable bright red hair. The easiest option is a long yarn wig made of thick strands, but a synthetic red wig works beautifully too. Go for center-parted styles with soft waves or leave it hanging loose and stringy for that handmade doll effect.
If you're using yarn, tie or glue the strands onto a beanie cap for a secure fit. Add subtle accessories like a stitched headband, mismatched ribbons, or even a small black bow to enhance the look without overpowering it. The goal is a slightly messy, whimsical charm true to Sally's spirit.
Complete your DIY Sally costume with optional extras like striped arm warmers, fingerless gloves, or even stitched-together fabric sleeves. These small touches help sell the full ragdoll fantasy and make your costume feel cohesive from head to toe.
🧠 Step 5: Movement & Expression
To truly embody the DIY Sally Look, your movements should feel thoughtful and deliberate like a stitched doll navigating the world with quiet grace. Walk slowly, keeping your arms gently bent or loosely at your sides. Avoid sharp motions; instead, move with soft, almost hesitant gestures that echo Sally’s delicate nature.
When interacting or posing for photos, tilt your head slightly or hold one hand to your chest. A dreamy, faraway gaze or subtle smile captures Sally’s wistful longing for something more. Her strength comes through her stillness, so embrace calm, gentle energy in everything you do.
The more you channel her personality, the more your DIY Sally costume transforms from a costume into a living tribute. It’s not just what you wear it’s how you carry her quiet charm that makes the magic real.
Sally was voiced by Catherine O’Hara and originally inspired by Frankenstein’s bride but with a tender twist!
📸 Step 6: Perfect Ragdoll Photos
Your DIY Sally Look deserves a setting that brings her world to life. Seek out moody, atmospheric backdrops pumpkin patches, spooky forests, or candlelit porches make excellent choices. Overcast days or twilight hours enhance the eerie yet gentle vibe Sally embodies.
When posing, keep your movements soft and your expression thoughtful. Look away from the camera, clutch your arms gently, or tilt your head like a curious doll. Close-up shots highlighting your stitched makeup and patchwork details really showcase the craftsmanship in your look.
If you’re pairing with a Jack Skellington or other Halloween Town characters, use contrasting heights and poses for visual impact. Whether you’re standing alone in the shadows or side-by-side with Jack, your DIY Sally costume will steal the spotlight with haunting beauty.
🏆 Why Go DIY?
Creating your own DIY Sally Look gives you the freedom to capture every stitched detail just the way you envision it. Unlike mass-produced costumes, a handmade version lets you tailor the fit, colors, and fabric choices to your exact liking bringing authenticity and creativity to every inch.
With DIY, you control the quality. You can add as many patches, stitches, and custom touches as you want, ensuring your Sally stands out in any crowd. Whether it’s textured fabrics, hand-painted seams, or personalized accessories, your version becomes a one-of-a-kind tribute to a beloved character.
Most importantly, the DIY Sally costume lets you express your love for The Nightmare Before Christmas in a way that feels genuine and heartfelt. It’s not just a costume it’s a character you’ve stitched to life with imagination, effort, and a touch of spooky flair.
🕸️ Related Costumes to Try
DIY Corpse Bride Look
DIY Witch Look
DIY Bride of Frankenstein Costume
DIY Ghost Girl Look
🧵 Sally Makeup Kit – Complete Halloween Face & Eye Set
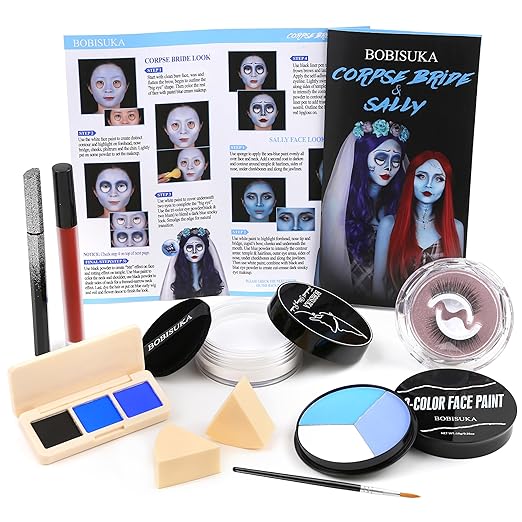 Create the ultimate DIY Sally Look with this all-in-one makeup kit by BOBISUKA. It includes a Tri-color Facepaint Palette (white, pastel blue, sea-blue), Tri-color Eyeshadow (black, sea-blue, royal blue), Faux Eyelashes, Black Liquid Eyeliner, Red Matte Lipstick, and Setting Powder with puff. You’ll also get a detail brush and two sponge applicators.Each component helps you craft Sally’s signature look stitched skin, wide eyes, bold lips, and soft blue tone. Whether you're heading to a cosplay event or trick-or-treating in style, this kit offers the perfect blend of color and detail.
Also ideal for other blue-skin characters like Corpse Bride or Avatar, this skin-safe kit is suitable for both kids and adults. Easy to apply, easy to remove, and totally unforgettable.
Further Reading & Resources
📖 Read: How to Do The Nightmare Before Christmas Sally Costume Makeup
🔍 Explore: The Nightmare Before Christmas - Keiko Lynn

ML Lamp is the owner of Kilroy Was Here. After his 20 years of working in Las Vegas in the entertainment promotions field, Mr. Lamp retired in 2002 from his job to pursue his passion for collectibles. Now as a guest speaker and author he’s living the dream, and sharing his warmth with You.