🧟 Create the Ultimate DIY Zombie Look Without Breaking the Bank
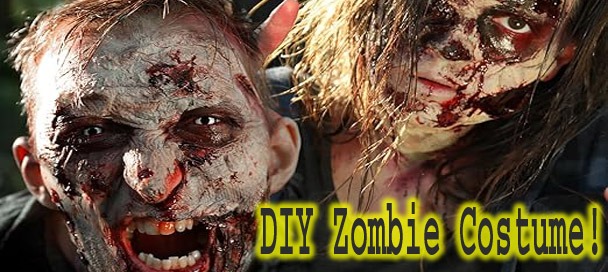
DIY zombie costume guide using old clothes and fake blood
Want to look like the undead without spending a fortune? You’re in the right place. Whether you're gearing up for Halloween, a costume contest, or a spooky photoshoot, this DIY zombie costume guide is all about creepy, cheap, and easy success.
Zombies are timeless. From The Walking Dead to Night of the Living Dead, the shambling corpse has earned its place as a Halloween icon. But you don’t need a movie budget to capture that decayed, flesh-eating look.
With a few household items, thrift store finds, and basic makeup tricks, you can transform into a horrifying masterpiece. Let’s break it down limb by limb.
🧥 Step 1: Raid Your Closet or Thrift Stores
You don’t need a tailor to look like the undead just some old clothes and imagination. Start by digging through your closet for anything you no longer wear: button-up shirts, jeans, jackets, even nightgowns work. The key is layering textures and finding pieces you can destroy guilt-free.
If your wardrobe’s too clean, hit up local thrift stores or yard sales. Look for items with patterns, faded colors, or a slightly ragged look. Think funeral attire, old work uniforms, or dated styles they make the best zombie costumes with very little effort.
Avoid anything brand-new or bright-colored. Instead, choose dark, earth-toned, or neutral pieces that look like they’ve been through a graveyard or two. Once you've got your outfit base, it’s time to get messy.
✂️ Step 2: Shred, Burn & Distress
Now that you’ve gathered your zombie wardrobe, it’s time to make it scream undead. This is where the transformation begins and it’s crucial for your DIY Zombie Costume Guide to feel authentic, not store-bought. Grab a pair of scissors and start cutting jagged tears in the fabric. Focus on sleeves, hems, and knees to simulate years of decay and damage.
Next, take sandpaper, cheese graters, or even rocks to rough up the edges. Want to go darker? Carefully burn small holes in safe areas (outside, with supervision) to mimic fire damage or rot. For bloodstains and grime, soak parts of the outfit in tea, coffee, or diluted brown paint for that aged, grave-soaked look.
Every rip and stain adds realism to your DIY zombie costume and the more destroyed it looks, the better. Don't forget: a zombie's been through hell... and it should show.
Explore other Great Halloween Ideas Here
💄 Step 3: DIY Zombie Makeup on a Budget
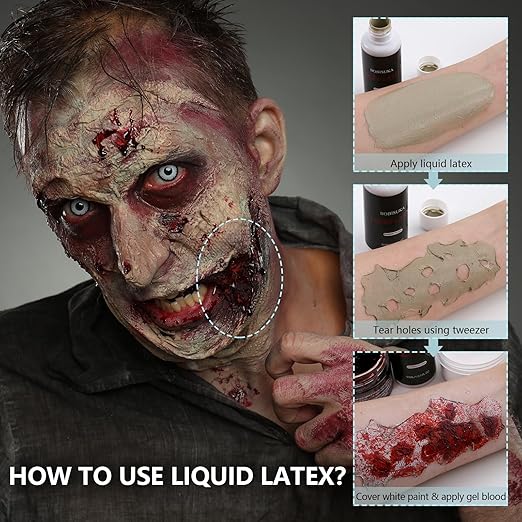
Applying liquid latex to create decayed skin in your DIY Zombie Costume Guide
No zombie is complete without terrifying facial features, and the best part of this DIY Zombie Costume Guide is that you can create jaw-dropping effects with everyday items. No need for expensive prosthetics or professional kits just a little creativity and a few things from your kitchen or bathroom.
Start with a simple DIY latex by mixing flour and water into a thick paste. Apply it in patches on your face or arms to add lumpy, decaying skin. Once it dries, dab it with foundation and grey or green eyeshadow to match your undead complexion. Want wounds? Combine red lipstick with black eyeshadow to make fake cuts and bruises that pop on camera and in low light.
For peeling skin or rotting flesh, layer small pieces of toilet paper onto your skin with white glue. Let it dry, then tear parts of it for texture. Finish with red and purple makeup for a truly gruesome look. You can use what’s already in your makeup drawer or grab cheap Halloween palettes from dollar stores without going over budget. With a little time and effort, your DIY zombie makeup will be just as creepy as anything on the big screen.
🩸 Step 4: Blood & Gore Effects
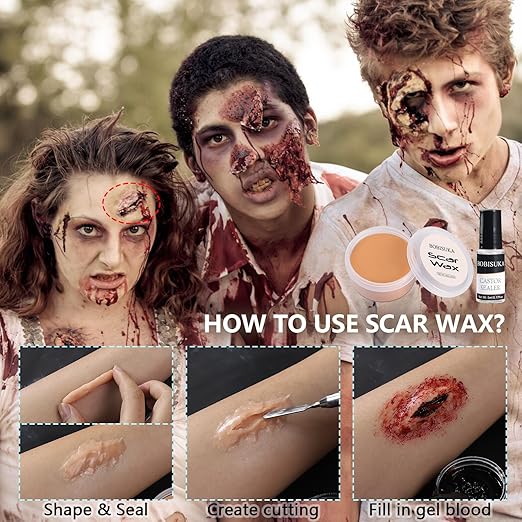
Building raised scars using wax for a realistic DIY Zombie Costume Guide look
Here’s where your DIY Zombie Costume Guide gets deliciously disgusting no zombie is complete without blood and gore. The trick is using just the right amount of mess to make your costume scream horror without becoming a walking hazard.
Make your own DIY fake blood using a simple recipe: mix corn syrup with red food coloring and a dash of cocoa powder for depth. The result is thick, dark, and disturbingly realistic. Want variation? Add blue or green food coloring for oxygen-deprived, old blood effects. For a drier, crustier look, smear some on and blot it with tissues or let it partially dry.
Apply the blood strategically splatter it across your shirt with a toothbrush, drip it from your mouth, or drag a crimson trail down your arms and hands. Add it to your previously shredded clothes and latex makeup for maximum undead impact. Don’t overdo it, though; a few gory accents go further than full-body saturation in creating a believable DIY zombie costume.
🧠 Step 5: The Walk & Growl
How to Walk Like a Zombie From a Classic Horror Film
A terrifying look is only half the battle your movements bring the horror to life. In this DIY Zombie Costume Guide, mastering the undead shuffle is what truly sells the illusion. Think slow, uneven steps, dragging one foot, and leading with your shoulders as if your joints barely work. Keep your arms limp, then jerk them forward unpredictably for a shock factor.
Add a chilling growl or raspy moan to complete the effect. Practice breathing through your mouth with occasional gurgles, as if something’s lodged in your throat. Vary your sounds long groans, sudden snarls, and labored wheezes work well to keep people unsettled.
For inspiration, rewatch scenes from The Walking Dead or Dawn of the Dead (1978) classic George A. Romero films. Acting is free and it’s the final piece that makes your DIY zombie costume unforgettable.
🧟 Complete Zombie SFX Makeup Kit
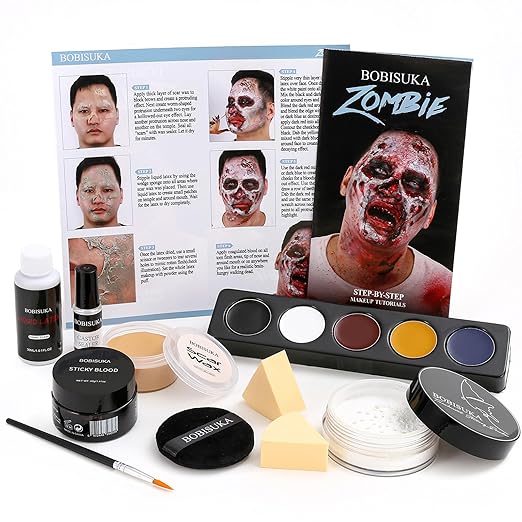
Complete Zombie SFX Makeup Kit by BOBISUKA – all-in-one DIY Zombie Costume Guide.
Includes: 5-Color Zombie Face Paint (white, black, yellow, dark red, dark blue), Liquid Latex (30g), Scar Wax (30g) with Sealer (5ml), Coagulated Fake Blood (40g), Setting Powder (10g) with Puff, Sponge Wedges (2pcs), Detail Lining Brush, and Step-by-Step Instructions.
Realistic Effects: Oil-based cream paints for bruises, hollow eyes, and decayed flesh. Latex and scar wax help build prosthetic wounds, aged skin, and torn effects. Coagulated blood and detail brush add finishing gore with precision.
Easy to Apply: Start with scar wax and sealer for raised effects, add latex layers, color with face paints, highlight with white, and finish with blood accents. The kit simplifies complex SFX for beginners and pros alike.
Perfect For: Halloween, cosplay, haunted house actors, film shoots, costume parties, and stage shows. Skin-friendly and non-toxic for safe extended wear.
📸 Step 6: Final Touches for Photos or Parties
Your DIY Zombie Costume Guide wouldn't be complete without capturing your undead transformation for posterity. Whether you're attending a Halloween bash or orchestrating a spooky photoshoot, these final touches will ensure your zombie persona is both haunting and memorable.
🧟 Accessorize Your Undead Ensemble
Add props like rubber maggots, fake fingers, or exposed bone accessories tucked into sleeves or pants. Dust yourself with baby powder for a pale, ashen finish or use black hairspray to give your hair that dusty grave look. Bonus points if you carry a blood-splattered doll, tattered teddy bear, or even a fake severed hand.
Props: Incorporate items like faux weapons, tattered umbrellas, or eerie dolls to add depth to your character.
Body Jewelry: Consider adding themed body jewelry, such as zombie-themed earrings or necklaces, to enhance the overall look.
Contact Lenses: White-out or blood-red lenses can give your eyes a lifeless stare, amplifying the creep factor.
📷 Capture the Perfect Zombie Moment
If you're snapping photos, consider using a grayscale or greenish filter to mimic old horror film tones. And if you’re attending a party, queue up a zombie-themed sound app on your phone to add ambiance with groans and shrieks. These final, frightful flourishes ensure your DIY zombie costume grabs attention long after the lights go out. Documenting your look is essential. Here are some photography tips to showcase your costume effectively:
Lighting: Utilize natural light during the golden hour (just before sunset) for a soft, eerie glow. If indoors, dim lighting with strategic shadows can add to the horror ambiance.
Angles: Experiment with low-angle shots to make your zombie appear more menacing. Tilted angles can also create a sense of disorientation, fitting for the undead theme.
Background: Choose settings that complement your look abandoned buildings, foggy woods, or dimly lit alleys can provide the perfect backdrop.
Candid Shots: Capture moments of you interacting with your environment or other "victims" to bring your character to life.
🎉 Make an Impression at the Party
If you're heading to a Halloween party:
Stay in Character: Maintain your zombie persona throughout the event with slow, deliberate movements and guttural sounds.
Interact with Guests: Playfully "chase" or surprise friends to add fun and fright to the festivities.
Photo Booths: Take advantage of any themed photo areas to capture professional-looking shots of your costume.
By paying attention to these final details, your DIY zombie costume will not only be a hit at any event but also leave a lasting impression in photos for years to come.
🏆 Why DIY Zombie Costume?
Creating your own costume isn’t just about saving money it’s about unleashing creativity, standing out, and having fun in the process. This DIY Zombie Costume Guide proves that you don’t need to spend big to look like a million-dollar corpse.
Store-bought costumes often look mass-produced and lack personality. With a DIY approach, every rip, stain, and makeup smear tells your unique undead story. Plus, you get full control over the look from subtle decay to full-blown gore.
Most importantly, making your own DIY zombie costume is a blast. Whether you’re crafting solo, with friends, or involving the whole family, the process becomes part of the celebration. You’re not just dressing up you’re creating an experience.
🕸️ Related Costumes to Try
DIY Mummy Costume
DIY Vampire Look
DIY Scarecrow Costume
Further Reading & Resources
📖 Read: Easy DIY Zombie Makeup and Costume Tutorial
🔍 Explore: 7 Easy Zombie Makeup Ideas for Fun Halloween
ML Lamp is the owner of Kilroy Was Here. After his 20 years of working in Las Vegas in the entertainment promotions field, Mr. Lamp retired in 2002 from his job to pursue his passion for collectibles. Now as a guest speaker and author he’s living the dream, and sharing his warmth with You.