🧟 DIY Zombie Mechanic Costume: Terrifying Tricks for an Undead Mechanic
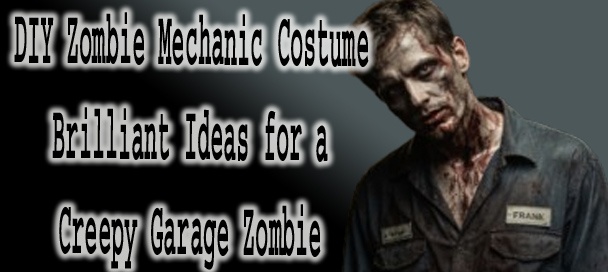
DIY Zombie Mechanic Costume inspired by classic horror films
The idea behind the DIY Zombie Mechanic Costume comes from a long tradition of working-class horror imagery. For decades, horror films have loved placing ordinary people in extraordinary situations, and few settings feel more grounded than a roadside garage or small-town service station. Grease, worn denim, heavy boots, and stained shop shirts already carry a certain grit. When that everyday world collides with the slow decay of a zombie story, the visual contrast becomes instantly striking.
Mechanics have appeared in countless horror settings, sometimes briefly and sometimes as key characters. In George A. Romero’s zombie universe, the infected were always ordinary people first. Farmers, nurses, police officers, and laborers became the walking dead. That simple idea made the horror believable. When audiences saw someone in work clothes stumble across the screen, it felt uncomfortably close to reality. The DIY Zombie Mechanic Costume taps directly into that tradition.
Meanwhile, classic zombie films such as Night of the Living Dead and Dawn of the Dead created a visual language that still defines the genre today. Actors like Duane Jones, Judith O’Dea, and Ken Foree grounded those films with performances that felt human rather than theatrical. The horror worked because the characters looked like people you might see every day. A grease-stained mechanic wandering out of a garage with clouded eyes would fit perfectly into that cinematic world.
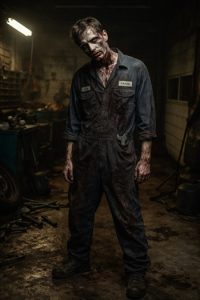
Visually, the concept is powerful because it blends blue-collar authenticity with slow decay. A mechanic’s uniform already tells a story. The stains, the worn stitching, the heavy fabrics, and the practical boots all suggest long hours of physical work. When those same clothes are aged, torn, and darkened with zombie makeup, the transformation feels believable rather than theatrical.
That is what makes the DIY Zombie Mechanic Costume so effective. It does not rely on elaborate props or complicated construction. Instead, it builds on clothing that already carries character. In truth, the strength of this costume lies in texture, posture, and subtle detail. With the right approach, the result looks less like a party costume and more like a figure that wandered straight out of a forgotten horror film.
👗 Step 1: Create the Base
The foundation of the DIY Zombie Mechanic Costume begins with practical work clothing. Mechanics traditionally wear durable fabrics designed for long hours in rough environments. Denim, heavy cotton, canvas, and twill are the materials that immediately create the right silhouette.
A classic mechanic’s work shirt works particularly well as the centerpiece. These shirts often come in dark blue, charcoal, or faded gray tones, sometimes with stitched name patches or garage logos. Even if the patch reads a random name like “Frank” or “Eddie,” it adds authenticity rather than distraction. The goal is not perfection but believability.
Coveralls are another strong option. Full mechanic coveralls carry a distinctive shape that audiences instantly recognize. In many horror films, including modern entries like Zack Snyder’s 2004 Dawn of the Dead remake, the clothing of background characters helps build the realism of the infected world. A worn pair of coveralls gives the DIY Zombie Mechanic Costume that same grounded look.
The color palette should lean toward muted, industrial tones. Deep navy, faded black, dusty gray, and oil-stained brown work particularly well. These colors reflect the visual language of garages and machine shops. Bright or clean clothing immediately weakens the illusion, while faded fabrics suggest years of labor.
Meanwhile, the clothing should look lived in rather than freshly purchased. Light distressing around the cuffs, small tears near the knees, and subtle discoloration around pockets help the outfit feel authentic. The idea is not theatrical damage but believable wear. When this base layer looks like real work clothing, the zombie transformation that follows becomes far more convincing.
Explore other Great Halloween Ideas Here
🧵 Step 2: Add the Details
DIY Zombie Mechanic Costume inspired by classic zombie films
Once the base clothing is established, the next step in the DIY Zombie Mechanic Costume is layering in the small details that tell the story of the character. Mechanics interact with machines all day, and their clothing naturally collects marks from that work.
Dark grease smudges around the chest pocket area feel natural. Hands often wipe across the shirt while holding tools or cleaning oil from parts. These stains should appear irregular rather than painted. In many cases, real motor oil mixed lightly with dark makeup can create an effect that looks surprisingly authentic under low lighting.
Small tears in the fabric also contribute to the illusion. Zombies rarely remain intact for long in horror films. A ripped sleeve or a split seam along the shoulder suggests that the character struggled during the early stages of infection. The clothing becomes part of the storytelling.
Meanwhile, subtle grime along the collar and cuffs adds depth to the costume. Horror makeup artists often emphasize contrast between clean and dirty textures. By lightly darkening certain areas of the clothing, the DIY Zombie Mechanic Costume begins to feel like it exists inside a harsh environment rather than a costume shop.
A pocket tool can also strengthen the character. A worn wrench sticking halfway out of a chest pocket or tucked into a belt loop quietly reinforces the mechanic identity. The key is restraint. One or two tools feel believable, while too many props start to feel theatrical.
In truth, these details work because they suggest a life that existed before the infection. The viewer can imagine the mechanic working under the hood of a car only hours before everything went wrong.
💄 Step 3: Makeup & Hair
Zombie makeup has evolved dramatically since the early black-and-white days of Night of the Living Dead. In that 1968 film, actors like Bill Hinzman relied largely on lighting and simple shading to create the appearance of decay. Modern audiences expect a little more texture, but the spirit of those early effects still works well.
For the DIY Zombie Mechanic Costume, the goal is a tired, decaying appearance rather than a grotesque monster. Pale foundation mixed with gray tones creates a slightly lifeless complexion. Dark shading beneath the eyes helps create the hollow look associated with classic zombie characters.
Meanwhile, subtle green or purple tones along the temples and jawline can suggest bruising beneath the skin. These colors should blend softly rather than appearing painted. The most effective zombie makeup always looks accidental rather than designed.
Small streaks of dried blood around the mouth or along the collar can also add realism. In films such as The Walking Dead television series, actors often carry these faint marks as reminders of earlier encounters. The DIY Zombie Mechanic Costume benefits from similar restraint.
Hair should appear neglected and slightly damp. Mechanics often wear their hair short for practical reasons, but the style should look unwashed and uneven. A light mist of water or styling gel can help create a slightly greasy texture that fits the character.
🎀 Step 4: Accessories
Accessories provide the final layer of realism for the DIY Zombie Mechanic Costume. A worn leather belt, heavy work boots, and possibly a shop rag tucked into a back pocket help reinforce the identity of the character.
Boots in particular carry visual weight. Steel-toe work boots or thick leather work shoes ground the costume in reality. These shoes should appear dusty or oil-marked, as though they have spent years walking across concrete garage floors.
Meanwhile, a small mechanic’s flashlight clipped to the belt can add a subtle narrative element. In horror films, flashlights often appear during moments of tension. Even if the light never turns on, its presence suggests the character was once trying to fix something before the infection took hold.
Gloves are another interesting addition. A single torn mechanic’s glove, perhaps hanging loosely from one hand, can add asymmetry to the look. The slight imbalance makes the character feel more unsettling.
🕺 Step 5: Movement and Presence
Clothing alone never completes the illusion. The success of the DIY Zombie Mechanic Costume depends just as much on movement and posture. Classic zombie performances often rely on restrained physicality rather than exaggerated gestures.
The body should appear slightly stiff, as though the joints no longer function smoothly. Shoulders slump forward, and the head tilts slightly downward. This posture reflects the slow, mechanical movement often seen in Romero’s original films.
Meanwhile, the hands should move with hesitation. Mechanics are used to precise hand movements while working with tools, but the zombie version of that character might carry faint echoes of that habit. Fingers twitch slowly as if searching for a wrench that is no longer there.
Facial expression also matters. A distant, unfocused gaze helps sell the illusion. Actors in films like Shaun of the Dead demonstrated how subtle changes in eye movement can completely transform a character’s presence.
When these small behaviors come together, the DIY Zombie Mechanic Costume stops feeling like clothing and starts feeling like a character.
📸 Step 6: Capture the Moment
Photographing the DIY Zombie Mechanic Costume works best in environments that echo the world of the character. A dim garage, an alleyway, or even a driveway lit by a single overhead light can create a powerful backdrop.
Lighting should lean toward shadows rather than brightness. Horror cinematography often emphasizes contrast between dark areas and small points of light. A flashlight beam or a flickering garage light can create dramatic highlights across the costume’s textures.
Meanwhile, camera angles that sit slightly below eye level help the character feel more imposing. Classic horror films frequently used this technique to give simple scenes extra tension.
A few scattered tools on the ground or a partially opened car hood can complete the setting. In truth, the environment becomes part of the storytelling. The viewer should feel as though the mechanic was interrupted mid-repair by the events that created the zombie outbreak.
🏆 Why Go DIY?
The lasting appeal of the DIY Zombie Mechanic Costume lies in its simplicity and authenticity. Horror fans have always appreciated characters who feel real rather than theatrical. By building the costume from familiar clothing and subtle details, the result feels connected to the tradition of classic zombie storytelling.
Meanwhile, DIY costumes allow people to reinterpret familiar horror imagery through their own creativity. A mechanic zombie might belong in a Romero-style apocalypse, a modern television series, or even a roadside horror film set in rural America.
In truth, the DIY Zombie Mechanic Costume works because it respects the visual language of the genre. The clothing looks practical, the makeup suggests slow decay, and the posture reflects the quiet menace that has defined zombies for generations.
For Halloween, horror photography, or themed events, this costume reminds us that the most effective horror often begins with ordinary people. Sometimes all it takes is a pair of work boots, a grease-stained shirt, and the uneasy feeling that something has gone terribly wrong in the garage.
🕸️ Related Costumes to Try
DIY Zombie Waitress Costume
DIY Zombie Nurse Costume
DIY Zombie Truck Driver Costume
DIY Zombie Short Order Cook Costume
🧟 Complete Zombie SFX Makeup Kit
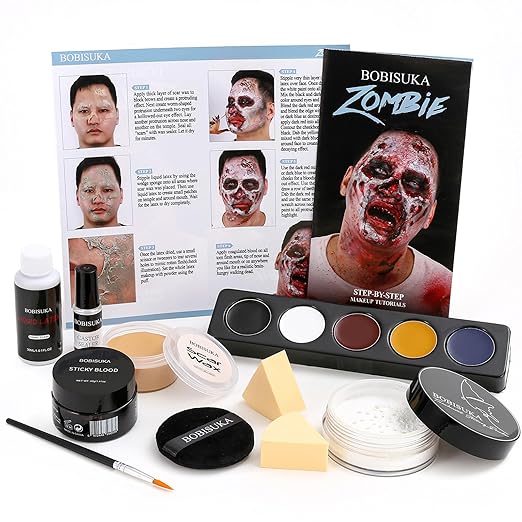
Complete Zombie SFX Makeup Kit by BOBISUKA – all-in-one DIY Zombie Costume Guide.
Includes: 5-Color Zombie Face Paint (white, black, yellow, dark red, dark blue), Liquid Latex (30g), Scar Wax (30g) with Sealer (5ml), Coagulated Fake Blood (40g), Setting Powder (10g) with Puff, Sponge Wedges (2pcs), Detail Lining Brush, and Step-by-Step Instructions.
Realistic Effects: Oil-based cream paints for bruises, hollow eyes, and decayed flesh. Latex and scar wax help build prosthetic wounds, aged skin, and torn effects. Coagulated blood and detail brush add finishing gore with precision.
Easy to Apply: Start with scar wax and sealer for raised effects, add latex layers, color with face paints, highlight with white, and finish with blood accents. The kit simplifies complex SFX for beginners and pros alike.
Perfect For: Halloween, cosplay, haunted house actors, film shoots, costume parties, and stage shows. Skin-friendly and non-toxic for safe extended wear.
Further Reading & Resources
📖 Read: Easy DIY Zombie Makeup and Costume Tutorial
🔍 Explore: 7 Easy Zombie Makeup Ideas for Fun Halloween
ML Lamp is the owner of Kilroy Was Here. After his 20 years of working in Las Vegas in the entertainment promotions field, Mr. Lamp retired in 2002 from his job to pursue his passion for collectibles. Now as a guest speaker and author he’s living the dream, and sharing his warmth with You.