👴 DIY Old Age Makeup: Tricks for Realistic Aging
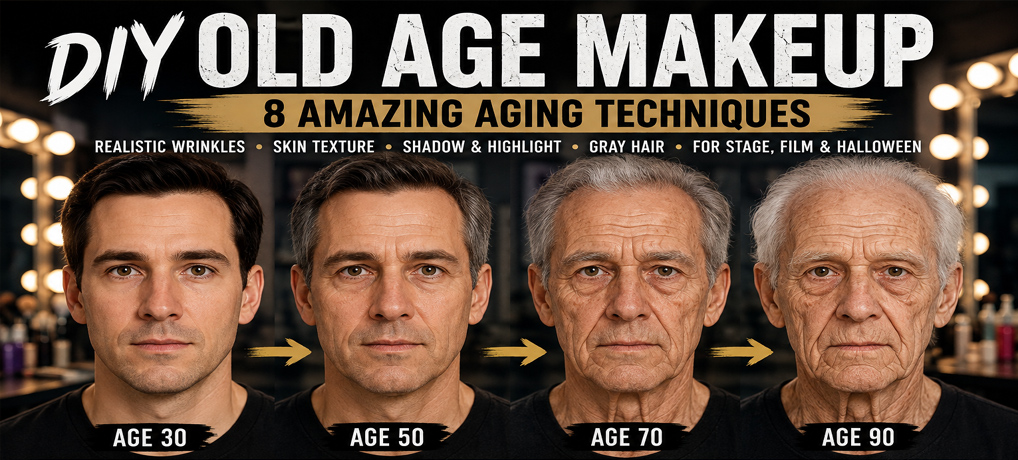
DIY Old Age Makeup can transform the same face from age 30 to 90 by gradually building realistic wrinkles, facial shadows, aged skin texture, and gray hair.
Convincing DIY Old Age Makeup is not about drawing a few dark lines across your forehead and adding white powder to your hair. Real aging changes the entire appearance of a face. Shadows become more noticeable, skin tone becomes less even, facial features can appear more defined or sunken, and the areas around the eyes and mouth develop distinctive folds and changes in texture. Eyebrows, lips, hair, the neck, and even the hands can also help sell the illusion. The trick is learning to reproduce those changes without making the actor look like someone simply painted wrinkles on their face.
How much aging makeup you need also depends on where the character will be seen. For film and photography, subtle shading, thin layers, and small changes in color may be enough because the camera can see every detail. On a theater stage, those same delicate wrinkles might disappear completely from twenty or thirty feet away, so highlights, shadows, and other features often need to be stronger. In this guide, we will use the same basic principles to create believable aging for Halloween, theater, haunted attractions, photography, and independent film while learning how to adjust the effect for both stage and camera.
🎨 What You’ll Need for DIY Old Age Makeup
You do not need an expensive professional makeup case to create convincing DIY Old Age Makeup. Most of the effect comes from understanding where to place highlights, shadows, wrinkles, and changes in skin tone. A small collection of the right makeup and tools will take you much farther than a giant kit filled with colors you never use.
For the basic effect, start with a cream foundation or theatrical makeup close to the actor's natural skin tone. You will also need a lighter color for highlights and a darker brown, taupe, or muted gray-brown for shadows. Avoid using pure black for wrinkles. Black usually creates harsh lines that look drawn onto the skin instead of natural folds and shadows.
A few simple tools will make the application much easier:
- Cream foundation or theatrical face makeup
- Light cream makeup for highlights
- Brown, taupe, and muted gray-brown colors for shadows
- Muted red, tan, and brown shades for skin variation and age spots
- Translucent setting powder
- Fine makeup brushes for wrinkles and small details
- Cosmetic sponges for blending larger areas
- A stipple sponge for broken skin texture
- Cotton swabs for blending and correcting small areas
- Temporary gray or white hair color for aging the hair, eyebrows, or facial hair
- Makeup remover
- Several good reference photographs of naturally aging faces
You can substitute ordinary cosmetics for many professional theatrical products. Matte eyeshadows in taupe, brown, muted red, and gray can work surprisingly well for subtle shadows and discoloration. A lighter matte foundation or concealer can create highlights, while cosmetic sponges and inexpensive makeup brushes are perfectly adequate for practicing the techniques in this guide.
Whatever products you choose, keep them matte whenever possible. Glitter, shimmer, and highly reflective cosmetics can make aging effects look artificial, especially under stage lights or a camera. Use only cosmetic products intended for the part of the face where you are applying them, and follow the manufacturer's instructions.
Finally, keep a few reference photographs beside your mirror. Photographs of real older faces are more useful than photographs of other people's old-age makeup. Look closely at where shadows form, how wrinkles change direction, where pigmentation becomes uneven, and how different every face actually is. Those observations will become some of the most important tools in your entire makeup kit.
Professional Old Age Makeup Kit
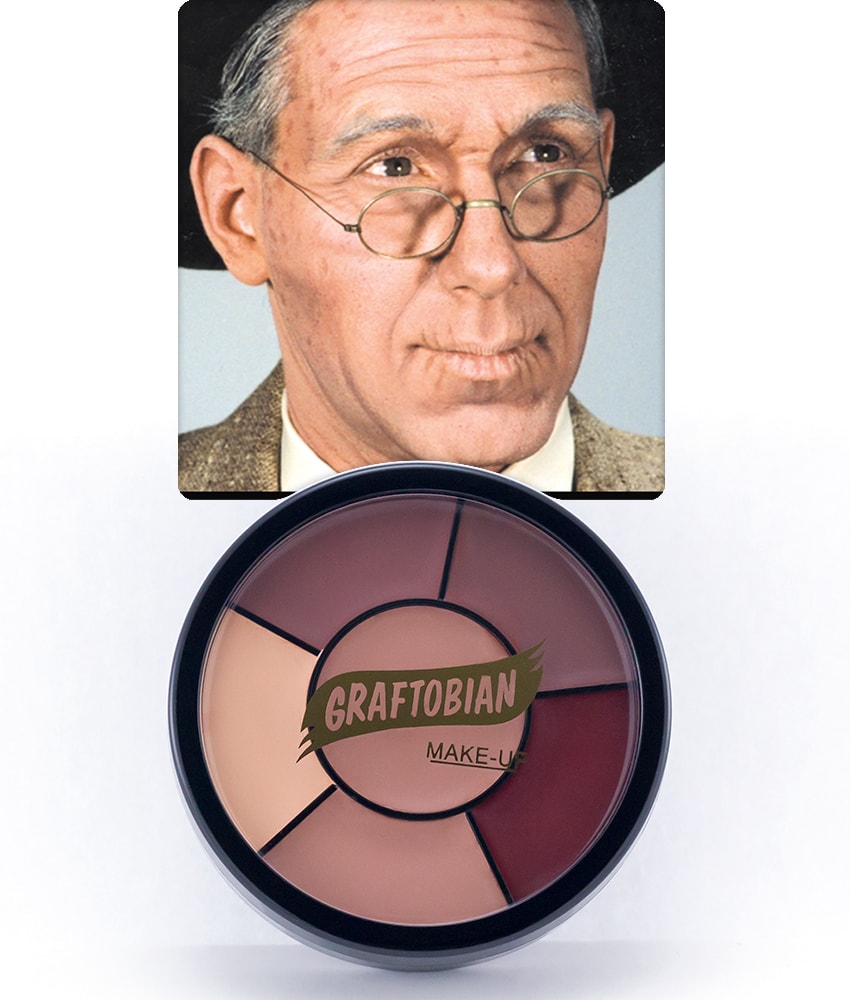
Professional Old Age Makeup Kit for DIY Old Age Makeup
Product Description:
Creating convincing wrinkles and aged skin is much easier with the right makeup. This professional theatrical kit provides everything needed for realistic DIY Old Age Makeup, including cream makeup, contour colors, setting powder, applicators, and detailed step-by-step instructions. It's an excellent choice for Halloween, theater productions, cosplay, and film projects.
Key Features:
• Complete professional old age makeup kit in one box
• Includes foundation plus multiple contour and accent colors
• Cream-based makeup blends smoothly for realistic aging effects
• Comes with face powder and puff to help set the makeup for long-lasting wear
• Includes detailed full-color step-by-step instructions for creating believable age makeup
Why This Works:
Successful DIY Old Age Makeup relies on careful shading, highlighting, and blending rather than simply drawing wrinkles on the face. This complete kit gives beginners and experienced makeup artists the tools needed to create realistic elderly characters for Halloween costumes, haunted attractions, theatrical performances, photography, and independent films.
Buy on Amazon
🪞 Step 1: Study How a Face Actually Ages
Before applying any DIY Old Age Makeup, spend a few minutes studying the face you are going to age. You already have a map showing where many of the wrinkles should go. You just need to make that map easier to see.
Stand in front of a mirror under good lighting and relax your face. Then slowly raise your eyebrows. Notice where horizontal lines naturally appear across the forehead. Squint slightly and watch what happens at the outer corners of your eyes. Smile and look at the lines that develop beside the eyes, around the mouth, and between the nose and corners of the lips.
Now try several expressions:
- Raise your eyebrows to find the forehead lines.
- Frown to reveal lines between the eyebrows.
- Squint to locate crow's-feet around the eyes.
- Smile to reveal folds running from the nose toward the corners of the mouth.
- Purse your lips to see where small vertical mouth lines naturally want to form.
- Tighten and relax your jaw to study the chin and lower face.
Do not stop at the obvious wrinkles. Look beneath the eyes, along the cheekbones, around the corners of the mouth, beneath the lower lip, and along the jaw. Then look at the neck. Aging makeup that ends sharply at the jaw can create an old face sitting on top of a noticeably younger neck.
🎬 FX Principle: Wrinkles Follow the Face
One of the biggest mistakes in old-age makeup is treating wrinkles like random cracks in a sidewalk. Wrinkles follow movement and facial structure. They are not random lines.
Forehead wrinkles appear where the skin repeatedly folds when the eyebrows move. Crow's-feet radiate outward from the eyes because of years of squinting and smiling. The folds beside the nose and mouth follow the underlying structure of the cheeks. Lines around the mouth develop differently because the lips move in several directions throughout the day.
This is why drawing a collection of straight brown lines across someone's face rarely creates convincing old age. Even if the colors are perfect, lines in the wrong places will immediately look artificial.
👴 Every Face Ages Differently
Reference photographs are extremely useful, but do not simply copy every wrinkle from an 80-year-old person's photograph onto your own face. Bone structure, facial expressions, genetics, sun exposure, and many other factors influence how someone's appearance changes with age.
Instead, use photographs to understand the patterns of aging, then apply those patterns to the face in front of you.
Before picking up a brush, smile, squint, frown, and raise your eyebrows one more time. Watch where the face naturally folds and changes shape.
Those are the places where we will begin building our wrinkles.
✏️ Step 2: Map the Natural Wrinkles
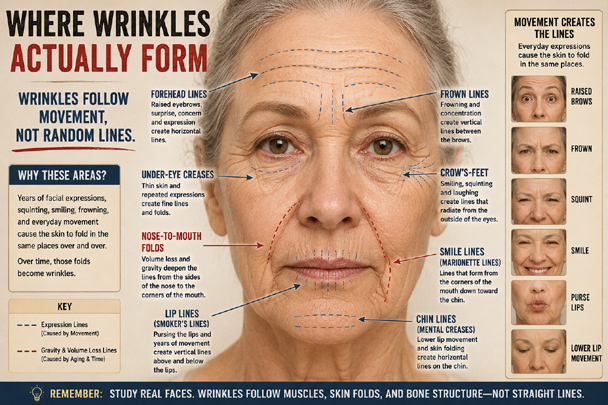
DIY Old Age Makeup looks more realistic when wrinkles follow natural facial movement, muscle structure, skin folds, and bone structure instead of appearing as random painted lines.
Now that you know where the face naturally folds, you can begin mapping the wrinkles. The goal is not to make them dark or dramatic yet. At this stage of DIY Old Age Makeup, you are creating a light guide that follows the movement and structure you discovered in Step 1.
Use a fine makeup brush and a muted taupe, gray-brown, or soft brown cream color. Avoid pure black. Make the person raise their eyebrows, squint, smile, or frown again, and lightly trace the creases while they are visible. When the face relaxes, you will have a much more believable wrinkle pattern than you would get by simply drawing lines where you think wrinkles should be.
Start with the major areas:
- Forehead: Follow the horizontal creases created when the eyebrows are raised. Vary their length and intensity rather than drawing several identical lines across the entire forehead.
- Crow's-feet: Add fine lines radiating outward from the corners of the eyes. Keep them irregular and avoid creating a perfectly even fan.
- Under the eyes: Use delicate broken creases rather than one heavy line beneath each eye. This area should usually remain softer than the deeper folds elsewhere on the face.
- Nose-to-mouth folds: Lightly emphasize the natural folds running from the sides of the nose toward the corners of the mouth. These can become important structural shadows as the character gets older.
- Mouth and chin: Add only the lines that make sense for the face. Small vertical lines may appear around the lips, while shadows and creases beneath the lower lip and across the chin can help change the apparent structure of the lower face.
Keep stopping and looking at the entire face. It is very easy to become fascinated with individual wrinkles and accidentally create far too many of them.
Check Out The DIY Fake Blood Article
🎬 FX Principle: A Wrinkle Is More Than a Line
Here is where old-age makeup starts becoming an illusion instead of a drawing.
A real wrinkle has depth. Light strikes one side of the fold while the recessed area appears darker. We can imitate that tiny change in the surface of the skin using two colors.
Place a thin line of shadow along the recessed side of the wrinkle. Then add an even thinner, softer highlight immediately beside it on the side that would catch the light.
Do not outline both sides heavily. The shadow should be stronger than the highlight, and both should eventually be blended into the surrounding skin.
From a short distance, that combination can fool the eye into seeing a shallow groove where the skin is actually completely flat.
🖌️ Break Up the Lines
Perfectly smooth, continuous wrinkles usually look painted on. Real skin is full of interruptions, texture, and changes in depth.
Break some lines into sections. Allow others to fade away gradually. Make a few slightly deeper and leave others barely visible. Crow's-feet should not all be the same length, and forehead wrinkles should not resemble evenly spaced lines on notebook paper.
After placing a wrinkle, soften it gently with a clean brush, fingertip, or cosmetic sponge. You want to blur the makeup without completely erasing the shadow-and-highlight relationship.
Then step several feet away from the mirror.
If the first thing you see is a collection of brown lines, they are probably too strong. If the face simply appears to have developed natural folds and texture, the illusion is beginning to work.
For camera makeup, keep these changes extremely subtle because close-ups will reveal every brushstroke. For the stage, we can strengthen them later once we know how far the audience will be from the performer.
For now, keep the wrinkle map light. We are building the structure of the aging effect one layer at a time.
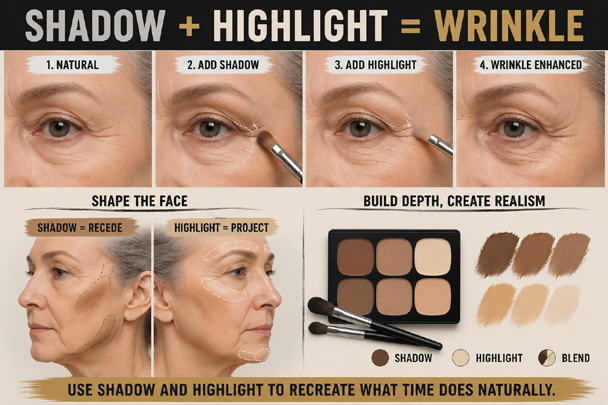
DIY Old Age Makeup uses carefully blended shadow and highlight to deepen wrinkles, reshape facial contours, and create the illusion of natural aging.
👁️ Step 3: Age the Eyes
The eyes are one of the most important areas in convincing DIY Old Age Makeup. Small changes around them can make a face appear noticeably older before you add another wrinkle anywhere else. The secret is creating changes in shape, shadow, and texture without simply painting two dark circles beneath the eyes.
Begin with the structure you studied earlier. Look at the upper eyelids, the area directly beneath the lower lashes, the outer corners of the eyes, and the space beneath the brow. Older eyes can appear less open or more deeply set because changes in the surrounding skin alter the shadows around the eye socket.
👁️ Build the Under-Eye Shadow
Use a muted taupe, gray-brown, or similar shadow color beneath the eye. Start with very little makeup and build it gradually.
Keep the darkest shading closer to the crease or hollow rather than covering the entire area beneath the eye. Blend the color downward and outward until it disappears into the surrounding foundation.
Avoid making both eyes identical. Slight differences in the shape and strength of the shadows usually look more natural.
Most importantly, do not paint solid black or dark brown bags beneath the eyes. That familiar cartoon technique can make someone look exhausted, sick, or like they have two black eyes instead of making them convincingly older.
🎬 FX Principle: Change the Shape With Shadow
You do not actually have to change the actor's face to make the eyes appear slightly more sunken.
A carefully placed shadow can suggest that an area recedes, while a highlight can make another area appear to project forward. By darkening the hollow beneath the eye and adding a very subtle highlight to the nearby raised area, you can exaggerate the existing structure of the eye socket.
The effect should be almost invisible up close.
Step back, and the eye may suddenly appear deeper in the face.
That is exactly what we want.
🖌️ Soften the Upper Eyelids
Youthful eyelids often appear smoother and more even in color. To age them, introduce a small amount of muted shadow into the crease of the upper lid.
Do not cover the entire eyelid with dark makeup. Instead, gently deepen the existing crease and soften the color outward. Depending on the character's age, a little irregular color around the lid can also help break up an overly smooth complexion.
Because you are working close to the eye, use only cosmetics specifically intended for use in that area and keep products out of the eye itself.
🕸️ Strengthen the Crow's-Feet
Return to the crow's-feet you mapped in Step 2.
Have the person squint or smile again and watch the lines appear naturally. Strengthen only some of those lines with a fine brush and a small amount of shadow color.
Add a tiny highlight beside selected deeper lines if the effect needs more dimension. Keep the ends soft and irregular. Crow's-feet should gradually disappear into the surrounding skin rather than ending abruptly.
For a younger aging effect, only a few faint lines may be necessary. An older character can have more visible lines and additional fine texture around them.
🤨 Don't Forget the Brows
The eyebrows help frame the entire aging effect.
A small amount of gray or muted color worked through the brows can reduce their youthful appearance. Depending on the character, you can also soften their definition or introduce a few lighter individual hairs.
Do not automatically make the eyebrows completely white. Just as with real hair, aging can appear gradually, with a mixture of the original color, gray, and lighter hairs.
🎭 Let the Eyes Tell You When to Stop
Look at the face from several feet away before adding more makeup.
The eyes should appear older because their structure and surrounding skin seem to have changed, not because they are surrounded by obvious dark makeup.
For stage work, these shadows and crow's-feet may eventually need more contrast so the audience can see them from a distance. For film and photography, subtlety is especially important. A camera close-up can turn one heavy brown line into an obvious piece of makeup.
If someone notices that the character suddenly looks older but cannot immediately point to what you changed around the eyes, you have probably found the right balance.
👃 Step 4: Change the Shape of the Face With Light and Shadow
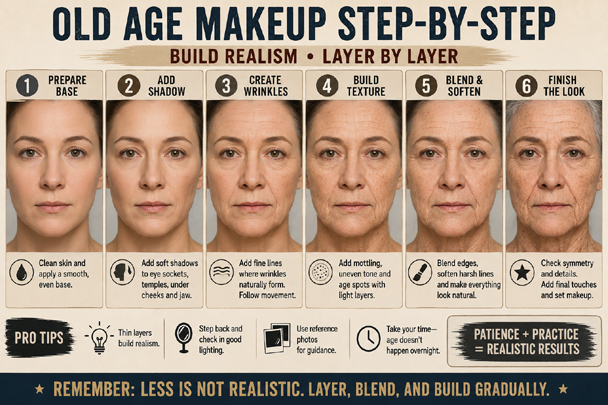
DIY Old Age Makeup looks more realistic when the effect is built gradually, starting with subtle shadows before adding wrinkles, aged skin texture, careful blending, and final details.
Wrinkles add age to the surface of the skin, but convincing DIY Old Age Makeup also needs to change the apparent structure of the face. As people age, changes in skin, soft tissue, and facial volume can make the cheekbones appear more pronounced, the cheeks and temples look more hollow, and the jawline appear softer. We cannot actually change the actor's bone structure with ordinary makeup, but we can fool the eye into believing that we did.
This is where old-age makeup becomes much more than drawing wrinkles. Using carefully placed highlights and shadows, we can make a completely flat layer of makeup create the illusion of a three-dimensional change in the face.
🦴 Bring Out the Cheekbones
Find the actor's natural cheekbone with your fingers or by having them turn slightly toward the light.
Apply a small amount of muted taupe or gray-brown beneath the cheekbone, not directly on top of it. Blend the shadow downward into the cheek so there is no obvious line.
Then place a subtle highlight along the upper portion of the cheekbone.
The combination makes the highlighted area appear to project forward while the shadow seems to recede. From a short distance, the cheekbone can suddenly look more pronounced even though nothing about the actual face has changed.
Do not turn this into modern beauty contouring with sharp, sculpted lines. Old-age makeup should look like facial structure, not cosmetic contour.
👴 Hollow the Cheeks
To suggest lost fullness in the cheeks, deepen the hollow beneath the cheekbone.
Have the actor gently suck in their cheeks if you have trouble locating the area. Use that only to find the placement, then have them relax their face before blending.
Build the shadow gradually with thin layers of taupe, muted brown, or gray-brown. The deepest color should remain near the hollow and become softer as it moves outward.
Avoid creating a long, dark stripe across the cheek. The transition should be gradual enough that someone looking at the finished character sees a hollow cheek rather than brown makeup.
🧠 Deepen the Temples
The temples are easy to overlook, but subtle shading here can make a surprising difference.
Place a small amount of shadow between the outer brow, hairline, and upper cheekbone. Blend it extremely well into the surrounding foundation.
You do not need much. Too much temple shading can quickly make the character look skeletal or sick rather than simply older.
For moderate aging, this effect may be barely noticeable. For a much older or deliberately frail character, it can be strengthened later.
👄 Deepen the Nose-to-Mouth Folds
Return to the folds running from the sides of the nose toward the corners of the mouth.
Instead of simply drawing darker lines over them, treat these folds as three-dimensional shapes.
Place a soft shadow into the recessed portion of the fold. Add a very narrow highlight along the raised side where light would naturally catch the skin. Blend both until the makeup itself becomes difficult to see.
The fold should appear deeper without looking outlined.
Continue the idea around the corners of the mouth if the actor's natural facial structure supports it. A little downward shadow at the mouth can also subtly change the apparent age and expression of the face, but use it carefully. Too much can make the character look permanently sad rather than older.
🧔 Soften the Jawline
A youthful jaw can have a crisp separation between the face and neck. For an older character, we can visually reduce some of that definition.
Use a small amount of shadow beneath the jaw and blend it downward into the upper neck. Depending on the character, subtle shading around the lower cheeks and beneath the chin can also suggest a softer facial outline.
Do not draw a dark line along the jaw. We are trying to make the boundary less obvious, not outline it.
This is also the point where you should begin making sure the face and neck belong to the same character. If all of your aging stops exactly at the jaw, the illusion may stop there too.
🎬 FX Principle: Flat Makeup Can Create Three-Dimensional Shapes
This technique is one of the fundamental illusions of theatrical makeup.
Dark colors tend to make an area appear to recede. Lighter colors can make an area appear to project forward.
Place them correctly beside one another and a flat surface can appear to have depth.
That is why we used shadow and highlight around individual wrinkles, and it is why the same principle works on a much larger scale across the cheeks, temples, jaw, and folds of the face.
You are essentially painting false light and false shadow onto the actor.
The important word is false. Your painted shadows must still make sense with the real structure of the face and the lighting where the character will appear.
💡 Test the Illusion From Different Angles
Once you have shaped the face, stop working and move around.
Look straight at the actor. Look from each side. Step several feet away. If you are preparing the makeup for film or photography, take a few test pictures.
A contour that creates a convincing hollow from the front may look like an obvious brown stripe from the side.
If that happens, do not make it darker.
Blend it.
The best structural aging often looks surprisingly subtle when examined inches from the mirror. Step back, however, and the cheekbones appear stronger, the cheeks seem thinner, the temples look deeper, and the entire face begins to take on a different shape.
No prosthetic has been added. Nothing about the actor's actual face has changed.
You have simply convinced the eye that it has.
Check out the DIY Fake Teeth Article
🧽 Step 5: Create Aged Skin Texture
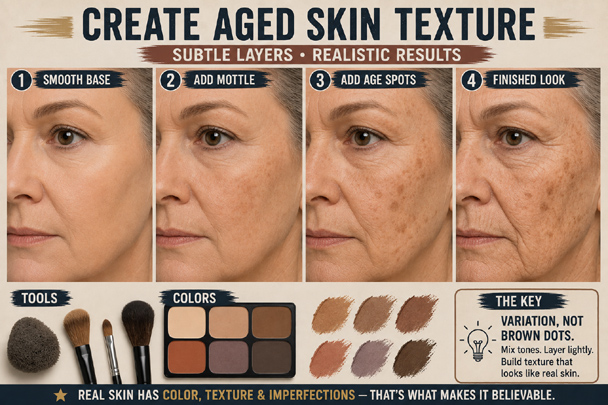
DIY Old Age Makeup creates believable aged skin by gradually layering mottled color, subtle age spots, and natural imperfections instead of painting obvious brown dots.
At this point, the wrinkles and facial structure may be convincing, but the skin between them can still look too smooth and even. Good DIY Old Age Makeup should also change the apparent texture and color of the complexion.
Real skin is not one perfectly even shade. Over time, uneven pigmentation, visible redness, small spots, and other variations in skin tone can become more noticeable. We can suggest some of those changes with very thin layers of makeup.
The key word is variation.
We are not going to cover the actor's face with brown dots.
🎨 Break Up the Perfect Foundation
If you applied a smooth foundation earlier, begin by breaking up some of that uniform color.
Choose a muted shade slightly different from the base skin tone. Depending on the complexion, this might be a soft tan, muted red, taupe, or warm brown.
Use a cosmetic sponge or stipple sponge with very little product on it. Dab most of the makeup onto a tissue or palette first, then lightly stipple the remaining color across selected areas of the face.
Do not cover everything.
Leave areas of the original foundation showing through so the skin develops subtle changes in tone.
🧽 Use a Stipple Sponge for Mottling
A stipple sponge is especially useful because its irregular surface naturally creates broken patterns.
Apply a tiny amount of muted color to the sponge and gently tap it onto the skin. Rotate the sponge occasionally so you do not repeat the same pattern.
Concentrate on areas such as the cheeks, forehead, temples, and sides of the face, but keep the placement irregular.
You can repeat the process with another subtle color rather than trying to create the entire effect with one shade.
A little muted red can suggest areas of visible redness. Taupe or brown can introduce pigmentation changes. Slight variations in the foundation itself can make the complexion appear less smooth and uniform.
🎬 FX Principle: Texture Comes From Imperfection
One of the easiest ways to make theatrical makeup look artificial is to make everything too perfect.
Perfectly blended foundation creates a smooth cosmetic finish. Perfectly spaced wrinkles look drawn on. Perfectly round age spots look stamped onto the face.
Natural skin contains countless tiny irregularities.
For special effects makeup, controlled imperfection is often what creates realism.
Change the size of your stippling. Leave some areas almost untouched. Allow one color to overlap another. Make some discolorations barely visible and others slightly stronger.
The viewer's eye combines those little differences into the impression of textured skin.
🔴 Add Subtle Redness
Aging does not mean making the entire complexion pale or brown.
Small amounts of muted red or reddish-brown can add life and variation to the skin. Depending on the character you are designing, you might introduce a little around the cheeks, nose, or other naturally flushed areas.
Keep it subtle.
Bright red patches can quickly make the character appear irritated, injured, or sunburned instead of older. Apply the color in thin, broken layers and blend it into the surrounding complexion.
🟤 Add Age Spots Carefully
Age spots can help sell an older character, but they are also one of the easiest effects to overdo.
Use a fine brush, sponge, or stippling technique with muted tan and brown shades. Create spots of different sizes, shapes, and strengths.
Some should be extremely faint.
Some can be slightly darker.
None of them should look like identical brown polka dots.
Soften the edges of many of the spots and occasionally place one partly over another area of pigmentation. Remember that sun-exposed areas such as the face and hands may show more visible changes than protected skin.
For a character who is only being aged moderately, you may need very few spots at all.
🪞 Keep Looking at the Whole Face
This is another stage where it is easy to become obsessed with tiny details.
After adding several areas of texture, stop and step away from the mirror.
You should not immediately see red stippling, brown spots, and taupe patches.
You should see skin that simply looks less smooth, less uniform, and older.
If one spot grabs your attention, soften it. If an entire area looks painted, remove or blend some of the color rather than adding more.
For film and photography, these details can be extremely subtle because the camera will pick them up in a close-up. Stage makeup can use somewhat stronger variations, but tiny individual age spots may be invisible to an audience sitting far away.
👴 Don't Make Aging Look Like Disease
There is an important distinction between making a character appear older and making a character appear unhealthy.
Heavy gray foundation, extreme hollows, excessive discoloration, and large patches of mottling can change the story completely. Those techniques may be useful when creating a sick, exhausted, or supernatural character, but they should not automatically be part of ordinary old-age makeup.
For now, we are aging the skin, not damaging it.
When this step is working correctly, the audience probably will not notice any individual spot or patch of color.
They will simply believe the skin has been there for many more years.
👄 Step 6: Age the Lips, Brows, and Facial Hair
By now, the wrinkles, shadows, and skin texture may be doing most of the work, but a few younger-looking features can still give the illusion away. Convincing DIY Old Age Makeup needs to treat the face as a whole, and the lips, eyebrows, mustache, and beard are details that inexpensive old-person makeup effects often forget.
These changes should usually be subtle. We are not trying to erase the lips or paint every eyebrow hair white. Instead, we want these features to belong to the same age as the rest of the face.
👄 Reduce the Youthful Color in the Lips
Young, healthy lips often have stronger natural color and a clearly defined edge. To age them, begin by reducing some of that color rather than covering them completely.
Use a small amount of foundation, concealer, or muted lip color to soften the natural pink or red. Blend it lightly so some of the original lip color remains visible.
Avoid making the lips completely beige. Unless the character is supposed to appear sick, the lips should still contain some natural color.
You can also soften the sharp outer edge of the lips slightly. This small change can make them appear less defined without looking obviously altered.
✏️ Add Fine Lines Around the Mouth
Have the actor purse their lips gently and look at where the skin naturally folds.
Using a fine brush and a very light taupe or muted brown, emphasize only a few of those natural lines. Keep them thin, irregular, and different lengths.
Do not draw a row of identical vertical stripes around the mouth.
For deeper lines, use the same principle we used earlier: a tiny amount of shadow can suggest the recessed portion of the crease, while an extremely subtle highlight beside it can create additional depth.
Blend everything carefully.
The lines should appear to belong to the skin rather than sitting on top of it.
🤨 Soften the Eyebrows
Dark, sharply defined eyebrows can sometimes look noticeably younger than the face surrounding them.
Instead of painting the eyebrows white, begin by reducing their intensity.
A little gray, taupe, or lighter color brushed through the existing hairs can break up a solid dark brow. Leave some of the actor's natural eyebrow color visible.
For moderate aging, a few lighter hairs may be enough. For an older character, increase the mixture of gray and lighter tones.
Apply the color in the direction the eyebrow hairs naturally grow rather than painting a solid stripe across the brow.
🎬 FX Principle: Gray Is Usually a Mixture
One of the reasons cheap old-age makeup can look artificial is that everything suddenly becomes pure white.
Real graying usually contains a mixture of tones.
A dark eyebrow might contain its original color, several gray hairs, and a few nearly white ones. A beard can contain dark hairs beside silver and white hairs. Even completely gray hair can contain several different shades.
Variation creates age. Solid white creates a costume.
Whenever possible, build the change gradually instead of covering the original color completely.
🧔 Age Mustaches and Beards
Facial hair can either help the illusion tremendously or ruin it.
If the actor has a natural mustache or beard, look at its original color before deciding how much aging it needs. Work small amounts of temporary gray or white cosmetic hair color through selected areas rather than immediately coating everything.
The chin, sideburns, mustache, and areas beside the mouth do not necessarily need exactly the same amount of gray.
That unevenness can make the effect much more believable.
If the character is supposed to be moderately older, scattered gray hairs may be all you need. A much older character can have considerably more gray or white while still retaining traces of the original color.
🪥 Apply Hair Color Lightly
For small areas such as eyebrows, mustaches, and beards, controlled application is better than spraying the entire face.
Depending on the cosmetic product, a clean spoolie, small brush, or similar applicator can help work temporary hair color through individual hairs. Follow the product instructions and use only products intended for the area where they are being applied.
Be especially careful around the eyes.
Do not use ordinary household paint, craft products, or improvised whitening materials on facial hair.
🪞 Look for the Feature That Doesn't Belong
Step back and look at the entire character again.
Does the face appear 75 while the eyebrows still look 30?
Are the wrinkles convincing while bright, sharply defined lips pull attention away from them?
Does an otherwise elderly character have a perfectly dark mustache that suddenly looks pasted onto the face?
These are small details, but the human eye is very good at noticing when something does not belong.
When the lips, brows, and facial hair are aged correctly, none of them should become the star of the makeup. They should simply stop contradicting everything else you have created.
That is one of the secrets of good practical effects: sometimes the detail nobody consciously notices is the detail that makes the entire illusion work.
Check out the DIY Black Eye Makeup Article
👨🦳 Step 7: Age the Hair
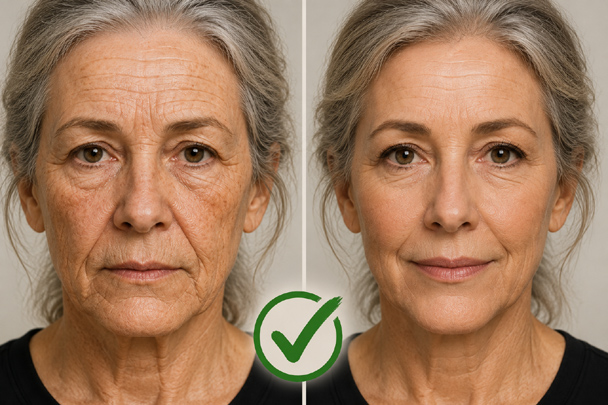
DIY Old Age Makeup becomes more convincing when temporary gray and white hair color is blended gradually with the natural hair instead of creating a solid white appearance.
Hair can complete an old-age effect, but it can also become one of the fastest ways to make good DIY Old Age Makeup look like a cheap costume. Covering someone's head with solid white spray does not automatically make them look elderly. In fact, plenty of people develop gray hair while their faces still look relatively young.
The hair needs to support the age you have already created on the face.
For many characters, the most believable approach is to build the gray gradually instead of making every hair white.
🩶 Start at the Temples
If you are creating moderate aging, begin at the temples and sides of the head.
Use a temporary gray or white theatrical hair product and apply a small amount at a time. Work it into the existing hair rather than completely covering the natural color.
The original hair showing through is useful.
Dark hair mixed with gray creates a completely different effect from solid white hair. Depending on the character, a little gray at the temples may be enough to suggest several additional years without changing the entire hairstyle.
Step back and look at the face after each application. You can always add more.
👴 Build Different Levels of Gray
Think about the age of the character before deciding how much hair color to change.
For a moderately older character, you might use:
- Gray concentrated around the temples
- A few lighter hairs throughout the rest of the head
- Small changes in the eyebrows or facial hair
For an elderly character, you can gradually increase the gray:
- More silver and white throughout the hair
- Less of the original color showing
- Additional gray in the eyebrows
- More visible gray or white in a beard or mustache
Even then, avoid automatically making everything exactly the same shade.
A mixture of the original hair color, gray, silver, and lighter strands usually looks more natural than a perfectly uniform white head.
🎬 FX Principle: Gray Hair Does Not Equal Old Age
This is an important lesson.
Gray hair alone does not necessarily make someone look old.
People can begin developing gray hair surprisingly early, while some older people retain much of their natural hair color. Hair color is only one clue the audience uses when deciding how old a character appears.
If you put white hair on a young face without changing anything else, you may simply create a young person with white hair.
But combine subtle graying with the wrinkles, eye changes, facial shadows, skin texture, and other details we have already created, and the hair becomes another piece of evidence supporting the illusion.
Good aging makeup works because many small clues agree with one another.
🖌️ Don't Paint a White Helmet
One of the classic old-age makeup mistakes is applying so much white product that the hair becomes a single solid mass.
That destroys the natural variation between individual hairs and can make the finished effect look like spray paint.
Apply temporary color lightly and work it through the hair. Leave some strands darker. Allow certain areas to contain more gray than others.
If the product begins looking chalky or unnaturally solid, stop adding more.
For close-up film work, individual variation becomes particularly important because the camera may clearly see the texture of the hair. Stage work can tolerate a stronger application because the audience is viewing the performer from farther away.
🤨 Match the Eyebrows and Facial Hair
Now compare the hair with the eyebrows, mustache, beard, and sideburns.
They do not need to match perfectly, but they should look like they belong to the same person.
A mostly white head of hair combined with perfectly dark, sharply defined eyebrows can sometimes pull attention away from the illusion. Likewise, an elderly character with gray hair and a completely untouched dark beard may need a little additional aging.
Use the controlled techniques from Step 6 rather than coating everything white.
Variation is still our friend.
💇 Age the Hairstyle Too
Color is not the only thing that can change the apparent age of hair.
The way the hair is styled can strongly influence how the audience reads the character. A hairstyle associated with a younger character may fight against otherwise excellent aging makeup.
You do not necessarily need to create thinning hair or a receding hairline. Simply changing the part, reducing a highly styled appearance, or choosing a hairstyle appropriate to the character can help the illusion.
Remember that we are creating a person, not a generic old-age costume.
⚠️ Use Products Made for Hair
Use temporary theatrical or cosmetic hair-color products according to their instructions. Protect clothing and nearby surfaces when using sprays, and avoid spraying toward the eyes or face.
Do not improvise with household paints, craft sprays, or other products that were never intended for hair or skin.
If you are working on a performer who will need the effect removed after the show or shoot, check how the product behaves on their particular hair before covering a large area. Temporary colors can behave differently depending on hair color, texture, and whether the hair has been chemically treated.
🪞 Check the Entire Character
When you finish, cover the actor's face with your hand for a moment and look only at the hair.
Does it look naturally gray, or does it look painted?
Then uncover the face and look at everything together.
The hair should not be screaming OLD PERSON!
It should quietly reinforce what the wrinkles, eyes, skin, and facial structure are already telling you.
When all those details agree, the audience stops seeing individual makeup techniques.
They simply see an older person.
🖐️ Step 8: Don’t Forget the Neck and Hands
You can create beautiful DIY Old Age Makeup on the face and lose the entire illusion the moment the actor turns their head or reaches for something. An 80-year-old face paired with a smooth, youthful neck and hands can immediately remind the audience that they are looking at makeup.
You do not need to reproduce every facial technique on the rest of the body. Instead, carry enough of the same colors, shadows, and texture onto exposed skin so everything appears to belong to the same character.
👴 Continue the Aging Down the Neck
Start by looking at the neck while the actor turns their head slightly from side to side. Just as we did with the face, use movement to find the natural folds instead of inventing random wrinkles.
Lightly emphasize selected horizontal neck lines with a muted taupe or gray-brown shadow. For deeper folds, add a very subtle highlight along the raised edge and blend both colors carefully.
Do not draw a stack of dark rings around the neck.
Use thin, broken lines and allow some creases to remain much softer than others.
You can also bring a little of the facial skin texture below the jaw using a cosmetic or stipple sponge. Subtle mottling, uneven pigmentation, and small changes in tone help prevent the makeup from ending abruptly at the face.
🎬 FX Principle: An Effect Needs an Ending Point
Every makeup effect eventually has to stop somewhere.
The trick is making sure the audience cannot easily see where that happens.
If an actor is wearing a high-collared costume, you may only need to age the small amount of neck that remains visible. If the costume exposes the entire neck and upper chest, the effect may need to continue farther.
This is especially important for film because the camera may move from a close-up of the face to a wider shot that suddenly reveals untreated skin.
Whenever possible, use the costume to help determine how much skin actually needs makeup.
🖐️ Age the Hands
Hands can reveal age almost as effectively as the face.
Start by having the actor relax their hands naturally. Look at the knuckles, joints, tendons, veins, and existing folds in the skin.
Use a small amount of shadow around selected knuckles and natural creases. A subtle highlight beside some of these areas can make the structure appear slightly more pronounced.
Keep everything well blended.
The goal is not to draw every bone in the hand.
🟤 Carry the Skin Texture Onto the Hands
Use the same general colors you used on the face.
A tiny amount of stippled tan, muted red, taupe, or brown can break up an overly even skin tone. Add a few irregular areas of pigmentation or age spots if they fit the character.
Pay particular attention to the backs of the hands, because they are frequently visible to an audience or camera.
Do not forget the fingers. A beautifully aged hand with completely untouched fingers can create the same problem as an aged face with a youthful neck.
🧽 Less Detail, Same Visual Language
You usually do not need the same amount of detail on the neck and hands that you used on the face.
Instead, repeat the visual language of the makeup.
If the face contains muted pigmentation, carry a little onto the hands.
If the face has strong structural shadows, subtly emphasize the knuckles and tendons.
If you created an extremely elderly character with considerable skin variation, allow some of that variation to continue onto other exposed areas.
Everything should look as though it has aged together.
🎭 Stage vs. Camera
For stage, the hands and neck usually need broader, stronger changes because tiny details will disappear at a distance. A few well-placed shadows and larger areas of color variation can be more effective than dozens of delicate lines.
For film and photography, use a much lighter touch. Close-ups can reveal obvious painted wrinkles, perfectly round age spots, and heavy contouring that looked completely believable from twenty feet away.
Take test photographs of the hands as well as the face.
If the actor will handle an important prop in a close-up, that hand may receive almost as much attention as the facial makeup.
👔 Check the Costume Before You Finish
Have the actor put on the actual costume whenever possible.
Roll up the sleeves if the character will wear them that way. Check the collar. Look at the wrists. See whether any part of the chest or shoulders becomes exposed when the actor moves.
This tells you where the makeup really needs to continue.
There is little reason to spend an hour aging skin that will remain underneath a costume, but any exposed youthful patch can become surprisingly noticeable once everything around it has been aged.
Finally, step back and look at the entire character, not just the face.
The face, hair, neck, and hands should all seem to belong to the same person at the same age.
When they do, you have stopped creating an old face.
You are beginning to create an old character.
🎂 Creating Different Ages: 50, 70, and 90
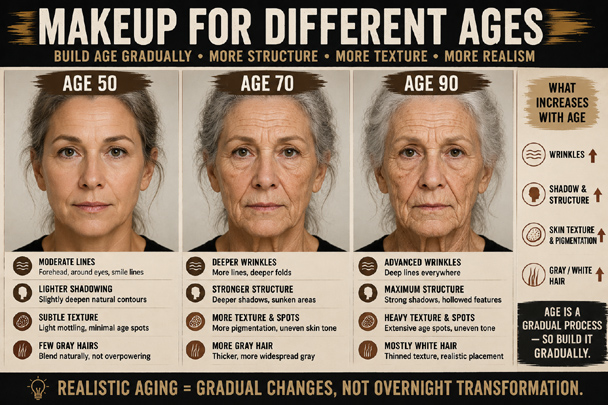
DIY Old Age Makeup can create different ages by gradually increasing wrinkles, facial structure, skin texture, pigmentation, and gray or white hair from age 50 through age 90.
One of the biggest mistakes in DIY Old Age Makeup is treating “old” as a single appearance. A 50-year-old character should not automatically have the same wrinkles, shadows, gray hair, and skin texture as a 90-year-old character.
Instead of asking, “How do I make this person look old?” ask a much better question:
“How old is this character supposed to look?”
Once you choose a target age, you can control the strength of every technique we have learned. The same wrinkles, highlights, shadows, pigmentation, and hair coloring can create very different characters simply by changing how much of each effect you use.
These ages are guides, not rules. Real people age differently, so reference photographs of people near your character's target age are still one of your best tools.
🎂 Around Age 50: Keep It Subtle
A character around 50 usually does not need dramatic old-age makeup at all.
This is where restraint becomes especially important.
Start with the actor's existing facial structure and emphasize only what is already there. Strengthen a few natural forehead lines, add subtle crow's-feet, and slightly deepen the folds beside the nose and mouth.
Keep the structural changes small.
A touch of shadow beneath the cheekbones or around the eyes may be enough. Introduce a little uneven pigmentation or a few subtle spots rather than heavily texturing the entire face.
The hair can remain mostly its natural color. Depending on the character, a little gray at the temples or scattered through the hair may help.
For an age around 50, think:
- Fine forehead lines
- Subtle crow's-feet
- Slight under-eye shadow
- Mild nose-to-mouth folds
- Small changes in skin tone
- Very light structural shading
- Limited gray in the hair, if appropriate
The danger at this age is doing too much.
If you add deep wrinkles, hollow cheeks, heavy age spots, and completely white hair, you have probably jumped several decades beyond your target.
👴 Around Age 70: Increase the Structure
For a character around 70, the techniques can become more noticeable.
Deepen some of the forehead lines and crow's-feet while still allowing smaller wrinkles to remain subtle. Strengthen the folds beside the nose and mouth and introduce more fine lines around the lips.
The structural makeup can also become stronger.
Use additional shadow beneath the cheekbones, around the temples, and beneath the eyes. Soften the jawline and continue those changes onto the neck.
Skin texture can become more varied. Add additional mottling, pigmentation changes, and irregular age spots while allowing plenty of natural skin tone to remain visible.
Hair can contain considerably more gray, but it still does not have to become completely white.
For an age around 70, think:
- More visible forehead wrinkles
- Stronger crow's-feet
- Deeper under-eye structure
- More pronounced nose-to-mouth folds
- Additional mouth and chin lines
- More noticeable cheek and temple shadows
- Greater skin-tone variation
- Additional age spots
- More gray throughout the hair, brows, and facial hair
At this stage, the face should begin looking structurally different, not simply more wrinkled.
👵 Around Age 90: Build on Everything
Creating a character around 90 allows you to push the techniques considerably farther, but that still does not mean covering every inch of the face with wrinkles.
Start with everything you created for the 70-year-old version and increase it selectively.
Deepen the major facial folds. Add more fine wrinkles between them. Strengthen the structural shadows around the eyes, cheeks, temples, mouth, and jaw.
The skin can show considerably more variation in tone and texture. Pigmentation changes can become more noticeable, and the overall complexion may be less even.
The lips can be softer in color and definition. Brows and facial hair may contain considerably more gray or white. The hair can be predominantly gray, silver, or white while still containing natural variation.
Do not forget the neck and hands. At this age, leaving those areas untouched can become particularly noticeable.
For an age around 90, think:
- Pronounced major wrinkles and folds
- Additional fine wrinkles
- Stronger structural shadows
- More visible cheek and temple hollows
- Softer jaw definition
- Increased skin texture and pigmentation
- Reduced lip color and definition
- More extensive gray or white hair
- Clearly aged neck and hands
Even here, avoid turning every technique up to maximum strength.
A 90-year-old person is still a person, not a collection of wrinkles.
🎬 FX Principle: Aging Is a Volume Control
Think of every technique in this guide as having its own volume control.
You can turn up the wrinkles without dramatically changing the hair.
You can increase pigmentation while keeping the cheeks relatively full.
You can create stronger structural shadows without covering the face in age spots.
That gives you tremendous control over the finished character.
Age 50 is not simply a weaker version of age 90, and age 90 is not age 50 with three times as many wrinkles.
The proportions of the different effects matter.
📸 Build an Aging Progression
If you really want to understand this technique, photograph the same face at several stages.
Start with the actor's normal appearance.
Create the 50-year-old version and take a photograph.
Without removing it, strengthen selected areas to create the 70-year-old version and photograph it again.
Then continue building until you reach the 90-year-old version.
Place the photographs beside one another.
This gives you something extremely useful: a visual record of how relatively small changes in wrinkles, structure, texture, pigmentation, and hair can add decades to the same face.
It also teaches one of the most important lessons in old-age makeup:
You do not create age with one trick. You create it by combining many small clues until the audience believes them.
🎬 Making Old Age Makeup Work for Stage or Camera
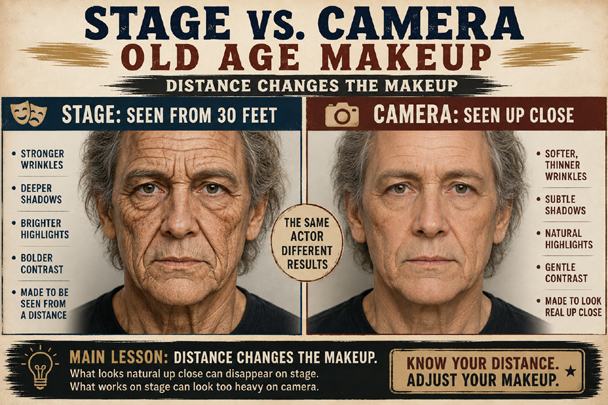
DIY Old Age Makeup should be adjusted for viewing distance, using stronger contrast for the stage and softer wrinkles, shadows, and blending for realistic camera close-ups.
The same DIY Old Age Makeup can look completely different depending on where the audience sees it. Makeup designed for a theater has to survive distance and stage lighting. Makeup designed for film or photography may be examined from only a few feet away, sometimes in an unforgiving high-resolution close-up.
This creates an interesting problem.
Old-age makeup that makes an actor look wonderfully 80 years old from thirty feet away might look like a 30-year-old covered in brown lines when photographed close up.
The techniques are the same. The strength of the illusion has to change.
🎭 Old Age Makeup for the Stage
On stage, distance removes detail.
Fine wrinkles that look obvious while standing inches from a mirror may become completely invisible to someone sitting several rows away. Subtle cheek hollows may disappear, and delicate skin mottling may contribute very little to the effect.
For stage makeup, concentrate on the larger features that communicate age:
- Stronger forehead lines and crow's-feet
- More visible highlights beside major wrinkles
- Deeper shadows beneath the cheekbones
- Stronger nose-to-mouth folds
- More noticeable under-eye structure
- Broader changes in skin tone
- More visible graying of the hair, brows, and facial hair
That does not mean making everything dark.
Contrast is more useful than simply adding more brown. A controlled highlight beside a wrinkle can make the neighboring shadow appear deeper without turning the wrinkle into a heavy painted line.
💡 Stage Lighting Changes Everything
Never judge theatrical aging makeup only under bathroom, dressing-room, or workshop lighting.
Stage lights can change the apparent strength of colors and flatten some of the carefully painted shadows. The actor's distance from the audience changes the effect again.
Whenever possible, test the makeup on the actual stage under the actual lighting.
Stand where the audience will sit.
If the character looks convincing from three feet away but loses twenty years when viewed from the middle of the theater, selected features probably need more contrast.
Do not automatically strengthen everything. Identify which important aging clues disappeared and strengthen those.
🎥 Old Age Makeup for the Camera
Camera work requires almost the opposite approach.
A close-up can reveal the edge of a brushstroke, an age spot that is too perfectly round, an obvious highlight beside a wrinkle, or stippling that looked beautifully textured from across the room.
For camera makeup, work in thin layers.
Keep wrinkle shadows soft. Blend highlights until they are barely noticeable. Use broken, irregular skin texture and avoid repeating patterns.
The closer the camera gets, the less you can rely on obvious painted lines.
Instead, concentrate on subtle changes in:
- Facial structure
- Skin tone
- Under-eye shadows
- Natural folds
- Pigmentation
- Lip color
- Hair and eyebrow color
- Fine skin texture
The camera will reveal details that a theater audience may never see.
📹 The Camera Sees the Brushstrokes
After finishing your DIY Old Age Makeup, take several photographs before deciding that it works.
Start with a full-face photograph.
Then move closer.
Take a photograph of the eyes. Photograph the cheek and nose-to-mouth fold. Check the forehead. Look closely at the skin texture.
Do not examine only whether the actor appears older. Look for evidence of how you created the effect.
Can you see a brown line instead of a wrinkle?
Can you see where the cheek contour begins and ends?
Does every age spot have the same color and size?
Does the highlight beside a wrinkle look like a stripe?
If you can easily identify the makeup technique, soften it.
🎬 FX Principle: Viewing Distance Controls the Effect
A practical effect is designed for the place from which it will be viewed.
That is why stage and camera makeup can use exactly the same principles while requiring very different applications.
Stage makeup often needs stronger contrast so the illusion survives distance. Camera makeup needs greater subtlety so the illusion survives scrutiny.
Neither approach is more realistic by itself.
The correct approach is the one that looks realistic to the intended audience.
📏 Use the Distance Test
For stage makeup, periodically stop working at the mirror and move away from the actor.
Try five feet.
Then ten.
Then twenty or thirty feet if the room allows it.
Watch what disappears.
You may discover that tiny age spots vanish completely while the cheek shadows remain effective. Fine mouth lines may disappear while the larger nose-to-mouth folds continue to read clearly.
That tells you where additional makeup will actually help.
For camera work, do the opposite.
Move closer.
If the effect becomes less convincing as you approach the actor, you probably need more blending rather than more makeup.
🎭 Don't Make the Mirror Your Audience
One of the easiest mistakes in theatrical makeup is creating an effect entirely for the person standing three feet from the dressing-room mirror.
That person is not necessarily your audience.
Likewise, makeup that looks beautifully subtle in person may become too strong once a camera lens fills the screen with the actor's face.
Always judge the effect under the conditions where people will actually see it.
For the stage, walk into the seats.
For film, look through the camera.
The makeup does not have to fool you while you are holding the brush.
It has to fool the audience when the performance begins.
📸 Continuity for Stage and Independent Film
Creating convincing DIY Old Age Makeup once is only half the challenge if the character has to look exactly the same tomorrow. Old-age makeup can contain dozens of small details, including individual wrinkles, highlights, shadows, age spots, hair color, eyebrow changes, and skin texture. Move enough of those details between scenes and the audience may not know exactly what changed, but they can sense that something looks different.
This is where continuity becomes part of the makeup process.
📷 Photograph Everything
As soon as the finished makeup looks right, photograph it before the performance or filming begins.
Do not take only one picture from straight ahead. Get several useful reference photographs:
- Full face from the front
- Left side of the face
- Right side of the face
- Three-quarter view from each side
- Close-up of the forehead and eyes
- Close-up of the mouth and chin
- Hair and hairline
- Eyebrows and facial hair
- Neck
- Backs of the hands
Use clear, even lighting whenever possible. These photographs are working references, not glamour shots. You want to be able to zoom in tomorrow and see exactly where the makeup was placed.
📝 Make a Makeup Map
Photographs show you where something went, but notes can tell you how you created it.
Write down the products and colors you used.
For example:
Wrinkle shadow: muted taupe
Wrinkle highlight: light cream
Cheek hollow: taupe mixed with gray-brown
Age spots: tan and muted brown
Skin mottling: muted red and taupe
Hair: gray concentrated at temples, light white through front
Brows: approximately half natural color, half gray
You do not need complicated professional paperwork. A notebook page or printed photograph with handwritten notes can save enormous amounts of time.
🎬 FX Principle: Continuity Is Part of the Effect
A beautiful makeup effect that changes accidentally between shots is not a successful film effect.
Movies are rarely filmed in the exact order in which the audience eventually sees the scenes. A scene taking place Tuesday morning might be filmed after one that takes place Thursday night.
That means the makeup artist cannot rely on memory.
The reference photographs become the character's visual blueprint.
If an age spot was beside the left temple yesterday, it should not mysteriously move to the right cheek today. If the actor had three noticeable forehead lines in one close-up, suddenly having five in the next can create a visible continuity error.
👴 Track the Major Wrinkles
You do not necessarily have to reproduce every microscopic piece of stippling perfectly.
Concentrate first on the features the audience is most likely to recognize:
- Major forehead wrinkles
- Crow's-feet
- Under-eye shadows
- Nose-to-mouth folds
- Mouth and chin lines
- Cheek hollows
- Prominent age spots
These larger landmarks establish the character's face.
Once they match your reference photographs, rebuild the smaller texture around them.
👨🦳 Hair Needs Continuity Too
Temporary gray or white hair color can be surprisingly difficult to reproduce exactly.
Record where the gray was concentrated and approximately how heavily it was applied.
Photographs of the front, sides, and back of the hair are useful, especially if the character has a mixture of natural color, gray, and white.
Do the same for eyebrows, mustaches, beards, and sideburns.
A character who has lightly graying temples in one scene should not suddenly have completely white hair in the next scene unless the story explains it.
🟤 Map Important Age Spots
If you created several noticeable age spots, treat the largest ones like landmarks.
Photograph their location and note their approximate size and color. You can even create a simple face diagram showing where the most important spots belong.
Smaller pigmentation and mottling do not need to be reproduced with mathematical precision. Natural skin variation gives you some freedom.
The distinctive details are the ones worth tracking carefully.
🎭 Continuity Matters in Theater Too
Stage productions usually perform scenes in order, so continuity works differently than it does in film. However, the character may need to look essentially the same night after night.
Your photographs become the standard.
If the opening-night makeup worked beautifully, do not reinvent it for Saturday's performance.
Use the same colors, placement, and approximate strength each time.
This is especially helpful when more than one person may eventually need to recreate the makeup.
⏱️ Time the Application
There is another practical reason to document everything.
Time how long the finished makeup takes to apply.
A complicated aging effect that requires two hours may be perfectly acceptable for a film close-up but impossible for a community theater production where the actor has forty minutes before curtain.
Once you know the important parts of the effect, you can determine which details are essential and which can be simplified.
📁 Build a Character Reference
For an independent film, student production, or theatrical show, keep everything together:
Reference photographs + makeup notes + product list + application order.
Now another makeup artist can understand what you did, or you can recreate the character weeks later without relying on memory.
That may sound like paperwork rather than special effects, but it is part of professional practical FX work.
Creating the illusion is one skill.
Being able to create the same illusion again tomorrow is another.
Find other Easy DIY Costume Ideas Here
🎭 Why Go DIY?
The biggest advantage of DIY Old Age Makeup is not saving money on a Halloween costume. It is learning how aging makeup actually works.
A generic “old person” makeup kit might give you a few colors and instructions telling you where to draw wrinkles. That can create a quick costume, but it does not teach you why those wrinkles belong there, how highlights and shadows create depth, or how to make the same person appear 50, 70, or 90 years old.
Once you understand those principles, you can build the effect around the character instead of the makeup kit.
A cheerful 70-year-old grandmother does not have to look like an exhausted 70-year-old drifter. A wealthy retired businessman may require a completely different design from an elderly farmer who has spent decades working outdoors. A supernatural character in a haunted attraction might exaggerate aging far beyond anything realistic.
The techniques can change with the story.
🎃 Halloween
For Halloween, you can decide how far you want to take the illusion.
A few wrinkles, subtle cheek shadows, skin texture, and gray at the temples might be enough for a recognizable older version of a character. Someone who wants a dramatic transformation can continue through every step in this guide.
More importantly, you are not locked into whatever “old person” face appears on the package of a costume makeup kit.
You control the character.
🎭 Community Theater
Old-age makeup is especially useful in community and school theater, where younger performers are often cast as characters decades older than themselves.
The stage techniques in this guide can be strengthened so the major wrinkles, structural changes, and aging cues remain visible to the audience.
Once the design is established, continuity photographs and makeup notes can help recreate the same character performance after performance.
👻 Haunted Attractions
Haunted attractions can push these techniques much farther.
The same principles used to create ordinary aging can become the foundation for witches, ancient caretakers, creepy grandparents, grave diggers, decaying characters, and other exaggerated personalities.
Learn realistic aging first, and then you know which rules you are breaking when you exaggerate it.
That is much more useful than randomly adding more wrinkles.
📷 Photography
Photography gives you the opportunity to work with much finer details.
Subtle pigmentation, individual hairs, delicate crow's-feet, softened lips, and carefully blended facial shadows can all contribute to the illusion.
It is also an excellent way to practice.
Photograph each version of the makeup and compare the results. The camera may reveal lines, edges, or patterns that were difficult to notice in the mirror.
Every photograph becomes another lesson.
🎬 Independent Film
For independent filmmakers, learning basic aging techniques can solve a surprisingly difficult problem without requiring elaborate prosthetics.
An actor may need to appear ten or twenty years older in one scene. Another character might need to age gradually throughout a story.
Understanding DIY Old Age Makeup gives you a starting point for creating those changes with ordinary makeup, careful observation, lighting, hair, and continuity.
For major transformations or demanding close-up work, professional prosthetic appliances and experienced makeup artists may produce results that simple makeup cannot. Knowing when basic techniques have reached their limit is part of learning practical effects too.
🎬 FX Principle: Learn the Technique, Not the Trick
That is really what this entire project is about.
A trick tells you to draw a brown line beside the mouth.
A technique teaches you that shadow makes an area appear recessed, highlight makes another area appear raised, and the natural fold beside the mouth tells you where those colors belong.
Once you understand the technique, you can use it on hundreds of different faces.
The same is true of wrinkles, cheek hollows, skin texture, pigmentation, hair, and every other part of the effect.
A cheap Halloween kit can help you make someone look old for one night.
Understanding why the illusion works gives you a practical FX skill you can keep using long after Halloween is over.
👴 Every Wrinkle Belongs to the Character
Good DIY Old Age Makeup should never begin and end with a number. Two people can be the same age and look remarkably different. The character's lifestyle, environment, health, personality, and history can all influence the aging effect you choose to create.
Think about the person behind the makeup.
A farmer who has spent fifty years working outdoors might have more visible sun-related skin changes, deeper squint lines, and a weathered complexion. An office worker of the same age might require a completely different design. A healthy and active 75-year-old may appear younger than a sickly or exhausted character who is only 65.
That does not mean every detail needs an explanation written into the script. It means the makeup should support the person the actor is portraying.
📖 Let the Story Design the Face
Before applying the first wrinkle, ask a few simple questions.
Where has this character lived?
What kind of work have they done?
Are they healthy, tired, wealthy, struggling, cheerful, bitter, elegant, rough, or somewhere in between?
How old does the audience need to believe they are?
Then decide which techniques from this guide actually belong on that character.
You might use strong crow's-feet on someone who has spent decades squinting outdoors. Another character might need softer wrinkles but more noticeable changes around the jaw and eyes. One person may have almost completely gray hair while another of the same age retains much of their original color.
You are designing a character, not completing an old-age checklist.
🎬 FX Principle: Makeup Should Tell a Story
This is one of the most useful principles you can carry into other practical effects.
A black eye tells the audience that something happened.
A scar suggests something happened a long time ago.
Old-age makeup tells them that many things have happened over many years.
The audience does not need to consciously identify every clue. In fact, it is usually better if they do not.
Wrinkles, shadows, pigmentation, hair, hands, and all the other details should work together quietly.
🪞 Know When to Stop
There is always another wrinkle you could add.
Another age spot.
Another shadow.
Another streak of gray.
Knowing when to stop is part of the skill.
Step away from the mirror and look at the entire character. If the person already appears to be the age you intended, adding more makeup may not improve the effect. It may only make the makeup easier to see.
The strongest practical effects are not necessarily the ones containing the most work. They are the ones containing the right work.
👴 Make Them Believe the Character
Old-age makeup teaches many of the foundations of practical FX: observation, color, highlight and shadow, facial anatomy, texture, blending, viewing distance, character design, and continuity.
Those same ideas will appear again when you create injuries, scars, monsters, creatures, and other transformations.
That is why learning the principles matters more than memorizing where somebody else placed a few wrinkles.
When the actor walks onto the stage, appears at a Halloween party, steps through a haunted attraction, or fills the screen in a close-up, people should not be studying your wrinkle lines or wondering which makeup colors you used.
They should be looking at the person standing in front of them.
The goal isn't to show people your makeup. The goal is to make them believe the character.
Professional Special FX Makeup Kit
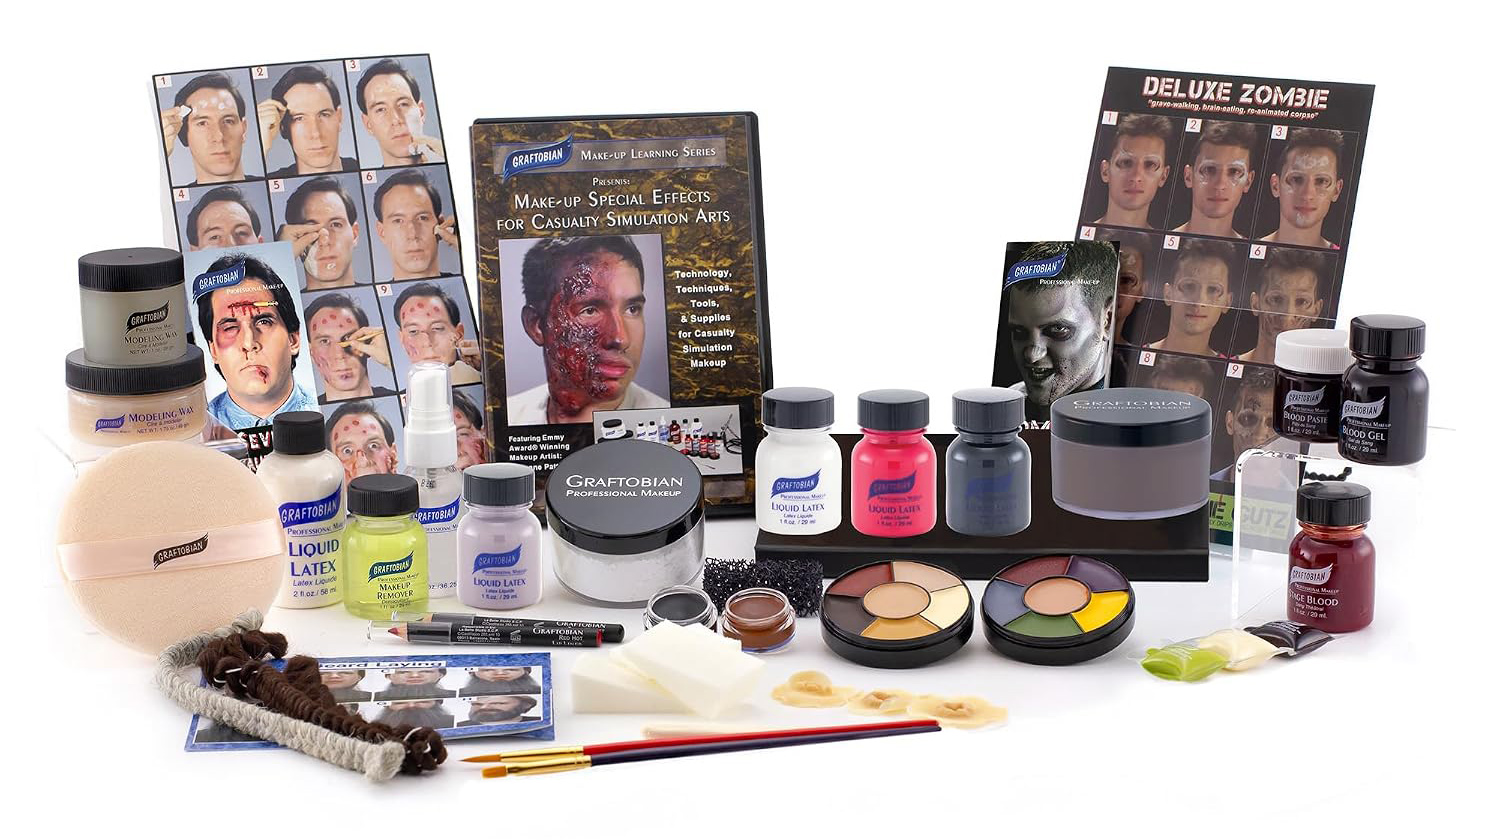
Professional Special FX Makeup Kit for DIY Old Age Makeup
Product Description:
If you're ready to move beyond basic makeup techniques, this professional Special FX kit has nearly everything needed to create convincing DIY Old Age Makeup along with realistic wounds, scars, bruises, and other theatrical effects. Packed with full-size products, makeup tools, and detailed training materials, it's an outstanding investment for serious Halloween enthusiasts, filmmakers, haunted attractions, and stage performers.
Key Features:
• Professional all-in-one Special FX makeup kit with full-size products
• Includes modeling wax, liquid latex, stage blood, blood gel, blood paste, and theatrical makeup
• Comes with brushes, stipple sponge, powder puff, makeup remover, and setting powder
• Includes instructional videos and full-color step-by-step guides for professional techniques
• Made in the USA with fragrance-free, cruelty-free products suitable for Halloween, theater, cosplay, film, and special effects makeup
Why This Works:
Realistic DIY Old Age Makeup depends on more than wrinkles alone. Professional aging effects often combine contouring, wax, latex, texture, shading, and subtle color changes to create believable skin. This complete kit gives you the same types of materials used by many makeup artists, allowing you to build convincing elderly characters as well as countless other Halloween and theatrical special effects from a single package.
Buy on Amazon
ML Lamp is the owner of Kilroy Was Here. After his 20 years of working in Las Vegas in the entertainment promotions field, Mr. Lamp retired in 2002 from his job to pursue his passion for collectibles. Now as a guest speaker and author he’s living the dream, and sharing his warmth with You.