😈 DIY Krampus Costume: 9 Terrifying Steps to Haunt Krampusnacht

Not every Christmas figure brings presents. In the Alpine regions of Europe, a horned, hairy creature arrives to deal with naughty children. His name is Krampus, and he has become one of the most popular dark holiday characters in the world. A DIY Krampus Costume lets you bring that wild, frightening figure to life without sewing a single stitch.
Krampus is a horned, hairy figure from Alpine folklore who accompanies St. Nicholas and punishes naughty children on Krampusnacht, December 5. A DIY Krampus Costume can be made without sewing using a thrift store faux fur coat, foil and clay horns finished with dry brushing, weathered plastic chains, bells, a birch switch, and a wicker basket.
Krampus belongs to a centuries-old folk tradition found in Austria, Bavaria, and neighboring regions. He travels alongside St. Nicholas, who rewards good children with gifts. Krampus handles the bad ones. He carries birch rods, rattles chains, and wears a sack or basket on his back for hauling children away.
His big night is December 5, known as Krampusnacht. It falls on the eve of St. Nicholas Day, which is celebrated on December 6. In many Alpine towns, costumed Krampus figures charge through the streets. These parades are called a Krampuslauf, or Krampus run. Their heavy bells clang loudly enough to be heard from far away.
Traditional Krampus suits are serious works of craft. Performers wear hand-carved wooden masks, real ibex or ram horns, and sheep or goat fur. In Saalfelden Leogang in Austria, a full suit and mask together can weigh about 30 kilograms. That is a lot of costume to carry while chasing spectators.
The tradition has not always been welcome. After the 1932 election in Austria, the Dollfuss government prohibited Krampus customs. In the 1950s, Austrian officials even handed out pamphlets warning that Krampus was an evil man. The tradition survived anyway and is stronger than ever today.
Krampus celebrations have spread across North America, with parades, parties, and pub crawls in many cities. The 2015 Universal Pictures horror comedy Krampus introduced the creature to an even wider audience. Today, Krampus is a favorite for anyone who loves Christmas with a spooky edge.
This guide shows you how to build a professional looking version using thrift store finds, craft supplies, and hot glue. Every step stands on its own. You do not need sewing skills, special tools, or a big budget.
🔥 Key to a Great Krampus Costume
The horns are the piece that makes or breaks this costume. A furry figure without horns looks like a bigfoot or a yeti. Big, twisted, weathered horns instantly say Krampus, even from across a dark street.
Use the 20-foot rule to plan your effort. From that distance, people should see horns, shaggy dark fur, and rattling chains. The makeup, claws, and birch switch reward people who come closer. Spend your most careful work on the horns and the fur.
Texture is the second key to a pro finish. Real Krampus suits look aged, rough, and handmade. Every piece in this guide gets weathered with paint so nothing looks shiny or store bought. That single habit separates a party costume from a parade quality DIY Krampus Costume.
Find other Easy DIY Costume Ideas Here
🧥 Step 1: Build the Fur Base
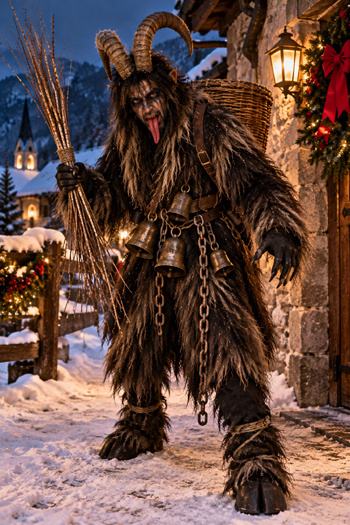
Every DIY Krampus Costume starts with a long pile faux fur coat in black, dark brown, or gray. Thrift stores often carry these, especially in fall and winter. Look for fur that is shaggy and at least two inches long. Short, sleek fur looks too polished for Krampus.
If you cannot find a coat, a large faux fur throw blanket works well. Cut a hole in the center for your head, creating a simple poncho. Belt it at the waist and it will look like a hairy beast’s body.
Wear black or dark brown pants and a dark long sleeve shirt underneath. These fill any gaps where the fur parts as you move. Choose lightweight layers, since fur gets warm quickly indoors.
Next, make leg wraps from a second faux fur throw or leftover fabric. Cut two rectangles long enough to reach from your knee to your ankle. Each should wrap fully around your leg with a few inches of overlap.
Cutting faux fur correctly matters for a professional look. Flip the fabric over so the backing faces up. Use a craft knife or the tips of sharp scissors to cut only the backing. Then gently pull the pieces apart. This keeps the long fibers intact and prevents a blunt, chopped edge.
Faux fur does not fray, so you never need to hem the edges. Attach adhesive backed hook and loop strips along the overlap of each leg wrap. Press them firmly and let the adhesive set for a full day. A dab of hot glue under each strip adds extra hold.
Now weather the fur so it looks wild and dirty. Brush sections in different directions with a wire pet brush. Twist small clumps between your fingers to create matted locks. Mix brown acrylic paint with plenty of water in a spray bottle. Mist it unevenly over the lower edges and let it dry completely.
Shake the fur coat and leg wraps outside before wearing them. Faux fur sheds loose fibers after cutting and brushing. A lint roller also helps clean up your dark clothing underneath.
🐐 Step 2: Sculpt the Horns
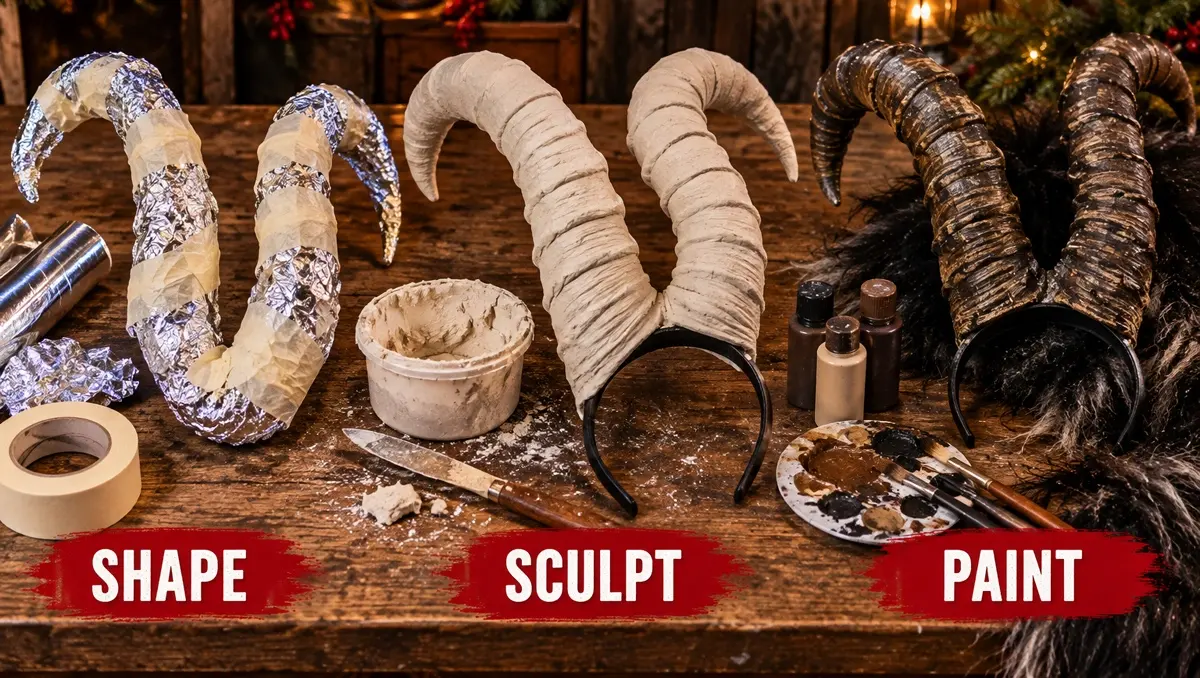
The horns deserve the most time in any DIY Krampus Costume. You will build them light enough to wear for hours, yet tough enough to survive a crowd. Plan on two or three days, since materials need time to dry.
Gather heavy duty aluminum foil, masking tape, air dry paper clay or foam clay, and a wide plastic headband. You will also need acrylic paints, a hot glue gun, and craft foam. A butter knife or clay tool helps with texture.
Start by building the core of each horn. Tear off a long sheet of aluminum foil. Squeeze and roll it into a thick cone that tapers to a point. Make the base about two inches across, about the size of a large coin roll.
Bend the foil cone into a curve as you shape it. Goat style horns sweep backward and slightly outward. Ram style horns curl in a wider spiral beside the head. Pick one style and keep both horns matching in size.
Make the second horn as a mirror image of the first. Hold them side by side often to compare length and curve. Small differences are fine, since real horns are never perfectly even.
Wrap each foil core tightly in masking tape. The tape smooths the surface and gives the clay something to grip. Keep the wrapping snug so the horn does not wobble or collapse.
Now add the clay layer. Roll paper clay or foam clay into a thin sheet, about the thickness of a cracker. Press it over the taped core, smoothing seams with a damp finger. Keep the layer thin so the horns stay lightweight.
Next, add the ridges that make horns look real. Press the edge of a butter knife into the clay every quarter inch. Follow the curve so the ridges wrap around the horn like rings. Make the ridges deeper near the base and fainter toward the tip.
Add a few small cracks and chips with a toothpick. Real horns show wear from years of use. These tiny flaws make the final paint job look far more convincing.
Let the horns dry completely. Paper clay usually needs a full day or two, depending on thickness. Turn them occasionally so every side dries evenly. Check the clay packaging for exact drying times.
If you are short on time, use a lighter quick method instead. Roll newspaper into tapered cones and wrap them tightly with masking tape. Create ridges by wrapping thin rings of tape around the cone. Cover everything with two layers of paper mache and let it dry.
🎨 Step 3: Paint and Mount the Horns
Painting turns gray clay into realistic horn and gives your DIY Krampus Costume its aged look. Start with a base coat of dark brown or black acrylic paint. Cover every surface, including the deep grooves between the ridges. Let the base coat dry completely.
Next, use a technique called dry brushing. Dip a stiff, flat brush in tan or bone colored paint. Wipe almost all the paint off onto a paper towel. Lightly drag the nearly dry brush across the ridges.
The paint catches only the raised areas and leaves the grooves dark. This creates instant depth and realism. Build up lighter tones toward the tips, since real horns often fade at the ends.
Finish with a wash of thinned brown paint. Brush it over the whole horn, then wipe off the excess with a paper towel. The wash settles into cracks and makes the horns look aged. Seal them with a matte or satin clear coat to prevent chipping.
Now attach the horns to your headband. Cut two small circles of craft foam slightly wider than each horn base. Hot glue each horn onto its own foam circle. The foam spreads the weight and gives the glue a larger surface to grip.
Place the headband on your head and mark where the horns should sit. Most Krampus horns rise from just above the temples. Hot glue each foam base onto the headband at those marks. Hold firmly until the glue cools.
Reinforce the joint by wrapping a thin strip of craft foam around the headband and horn base. Glue it in place. This creates a sturdy collar that keeps the horns from snapping off.
Finally, hide the headband completely. Glue scraps of faux fur over the band and around the horn bases. Blend the fur into your wig or hair. The horns should look like they grow straight out of your head.
If the headband feels unstable, attach the horns to a dark knit beanie instead. Glue a cardboard plate inside the hat for support. Then cover the outside with faux fur so it blends with the costume.
👹 Step 4: Hair and Makeup
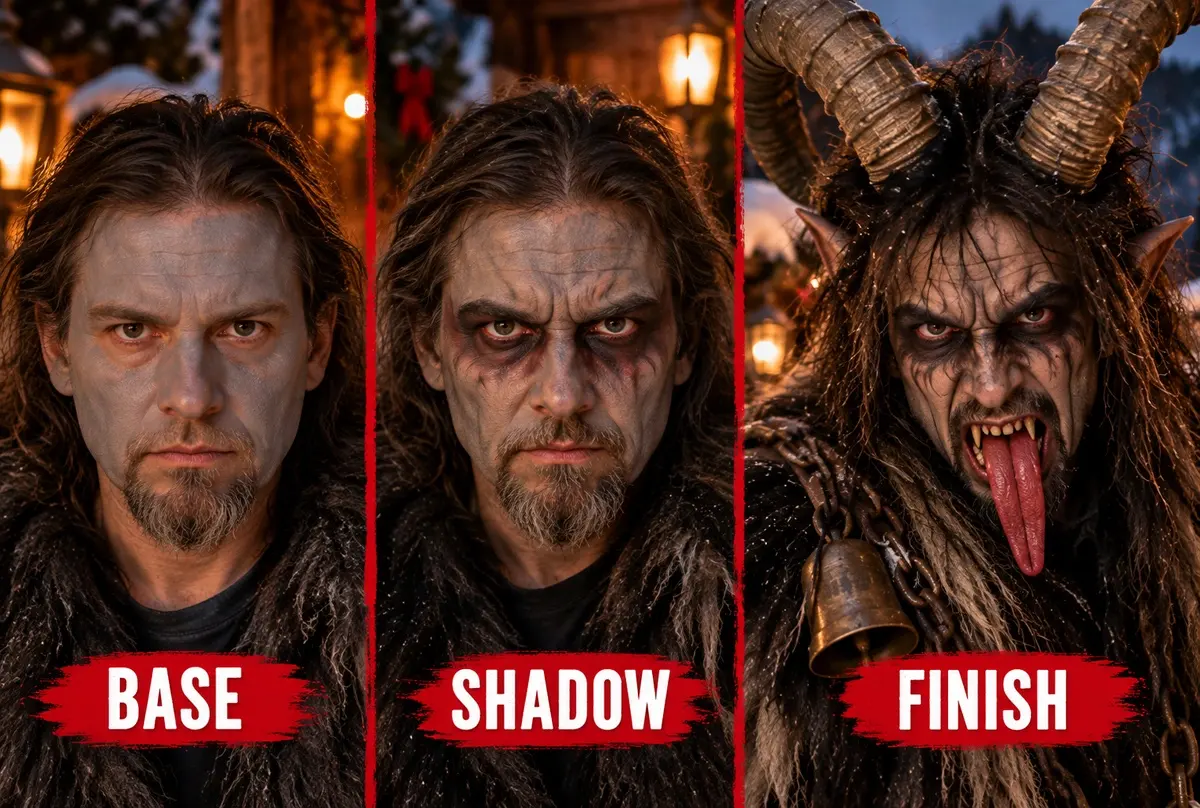
The face of a DIY Krampus Costume needs to look dark and beastly, with fangs and a long red tongue. You can create that face with makeup, a mask, or a mix of both. The makeup route looks the most professional and allows the most expression.
Start with a long, shaggy wig in black or dark brown. Tease it with a comb so it looks wild and tangled. Pull a few strands forward around the face. The wig hides the horn headband and blends your head into the fur coat.
For the face, apply a dark gray or brown cream base with a damp sponge. Cover the face, ears, and neck evenly. Set it lightly with translucent powder so the colors stay put.
Next, sculpt the face with deep shadows. Use black cream makeup under the cheekbones, around the temples, and along the sides of the nose. Blend the edges softly. This makes your face look gaunt and inhuman.
Darken the area around your eyes with black, then add red around the outer edges. Red rimmed eyes give Krampus a wild, sleepless glare. Keep makeup a safe distance from the waterline of your eyes.
Highlight the brow bone and the bridge of the nose with a little tan. This creates a heavier, more animal brow. Draw a few deep wrinkles across the forehead and between the eyes.
Add costume fangs to finish the mouth. Many fang kits use a fitting putty that molds to your own teeth. Darken your lips with deep brown or black cream. A touch of red at the corners of the mouth adds menace.
The long tongue is a classic Krampus feature. Costume shops sell latex tongues that fit inside the mouth. Choose one with a breathing gap and remove it when talking or eating. Never wear a tongue prop that blocks your airway.
Some readers will not want to wear heavy makeup or prosthetics. A latex Krampus mask is an easy workaround. Weather a cheap mask with the same dry brush technique you used on the horns. Glue faux fur around its edges so it blends with the wig and coat.
Readers with beards actually have an advantage. Comb a little dark cream or temporary hair color through the beard. Tease it to look wild and shaggy. A full beard blends naturally into the hairy Krampus look.
If you have no beard, glue a small patch of faux fur to the chin with spirit gum. Trim it into a goat-like tuft. Remove it gently with spirit gum remover at the end of the night.
Always patch test makeup and adhesives on your inner wrist a day ahead. Stop using any product that causes burning or itching.
🖐️ Step 5: Claws and Hooves
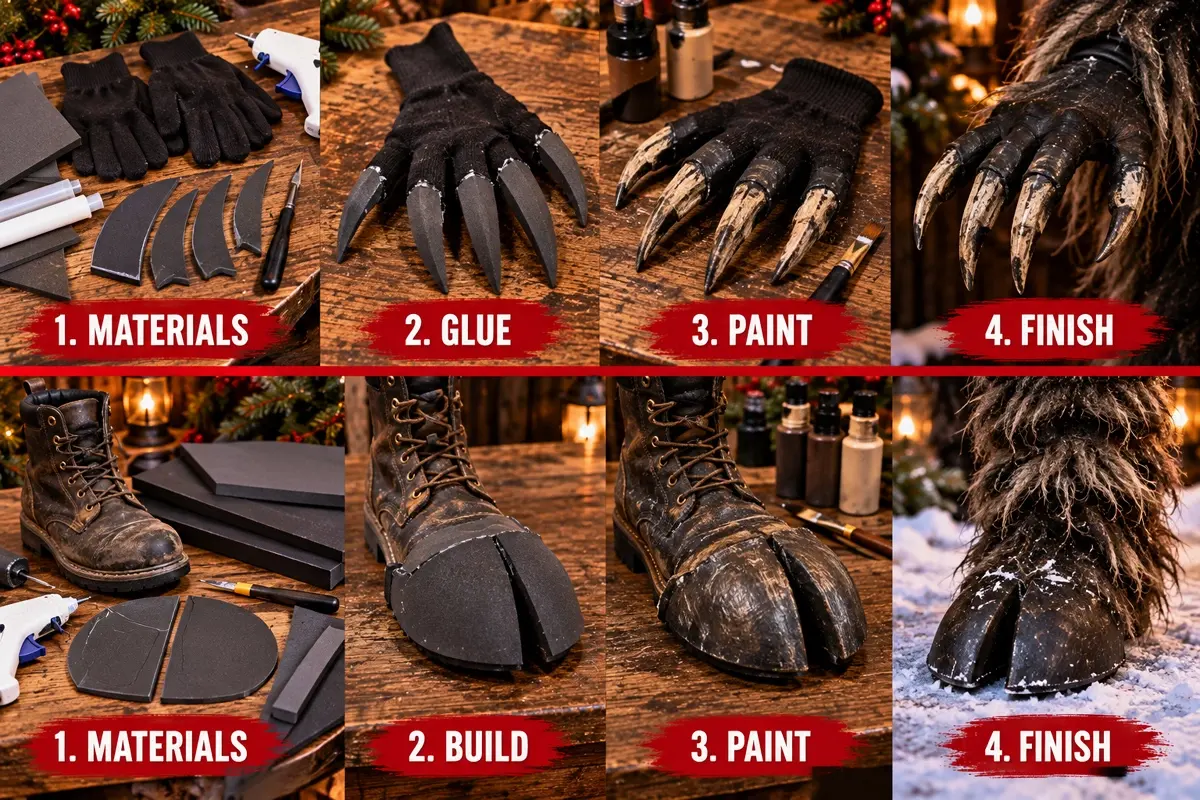
Bare human hands break the illusion of any DIY Krampus Costume. Start with a pair of thin black gloves. Stretchy knit or costume gloves give you the best grip and flexibility.
Cut ten claw shapes from black or dark gray craft foam. Make them long, curved, and pointed. Lightly paint the tips with bone colored paint, then add a brown wash for an aged look.
Hot glue one claw to each fingertip of the gloves. Put your hand inside a glove while gluing, but keep a thin barrier underneath. A plastic bag over your hand prevents hot glue burns. Let each claw cool before flexing your fingers.
Glue a few tufts of faux fur onto the back of each glove. Blend them into the fur sleeves of your coat. This hides the line where the glove ends.
Traditional Krampus has one human foot and one goat hoof. This odd detail is a fun nod for folklore fans. Start with dark boots, ideally an old pair you do not mind decorating.
On one boot, create a cloven hoof. Cut two rounded hoof shapes from thick craft foam. Glue them side by side onto the toe, leaving a narrow split between them. Paint them glossy black, then dry brush a little gray along the edges.
Let your fur leg wraps hang over the top of both boots. The fur hides laces and blends the legs into the costume. The single hoof peeks out at the bottom, creating a creepy, mismatched effect.
⛓️ Step 6: Chains and Bells
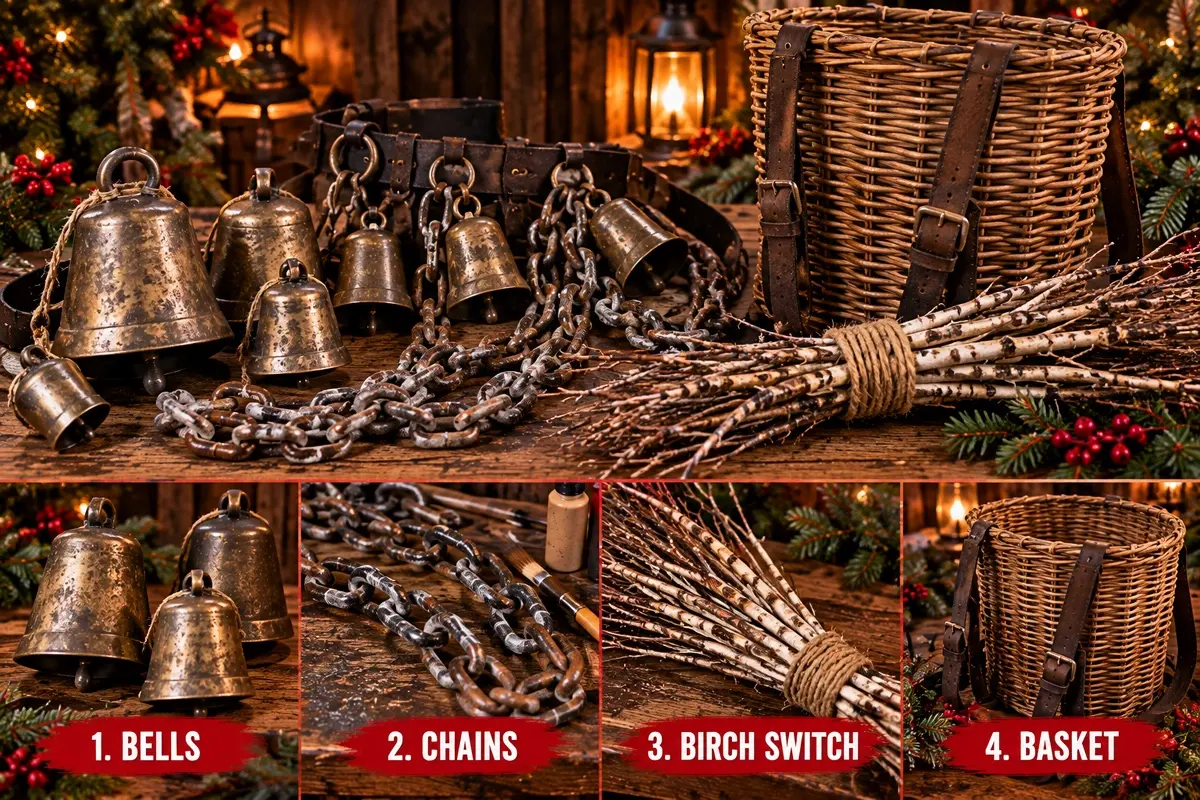
Chains give a DIY Krampus Costume its rattling, menacing sound. Real metal chain is heavy and can hurt people in crowds. Use lightweight plastic chain from a Halloween or craft store instead.
Plastic chain usually looks too shiny, so weather it first. Spray or paint it flat black and let it dry. Then dab rusty orange and brown paint onto random links with a sponge. Finish with a light dry brush of silver on the raised edges.
The result looks like old, rusted iron. Drape one length over a shoulder and across the chest. Wrap another loosely around the waist. Let a short end dangle from one hand for shaking at onlookers.
Add a padlock or two for extra character. Paint them the same rusty way as the chain. Clip them onto the chain where they can swing and clank.
Bells are just as important as chains. In Austria, Krampus bells are heavy and loud enough to warn people long before he arrives. Look for large cowbells or brass craft bells.
Fasten the bells to a thick rope or an old leather belt. Use zip ties or small carabiners so they stay secure. Wear the belt around your waist, over the fur coat. The bells should swing and clang with every step.
Age shiny bells with the same weathering method. A little black and brown paint rubbed into the crevices makes them look antique. Leave the inside clean so the bell still rings clearly.
🌿 Step 7: Birch Switch and Basket
The birch switch, called a rute, is the signature prop of any DIY Krampus Costume. Gather a bundle of thin, straight twigs about two feet long. Birch is traditional, but any thin, flexible branches will work.
Trim the twigs to roughly the same length at the bottom. Bundle them tightly and wrap the base with twine several times. Tie it off and add a dab of hot glue to secure the knot.
For a festive variation, spray paint a few twigs gold. In the Austrian region of Styria, decorated birch rods are traditionally presented to families. Tie a small red ribbon around the handle for a holiday touch.
Never strike anyone with the switch, even playfully. Shake it, wave it, and point it, but keep it to yourself. The menace should come from your performance, not from contact.
Next, make the basket Krampus carries on his back. Find a medium wicker basket at a thrift store. Weather it with a little dark brown paint brushed unevenly over the surface.
Create shoulder straps from two old belts or backpack straps. Thread them through the basket weave and secure them with zip ties. Test the fit before adding anything inside.
Fill the basket with a sack and a few lumps of coal. Painted black rocks or crumpled paper painted black work well. For a darkly funny touch, let a pair of stuffed doll legs poke out of the top.
🎭 Step 8: Movement and Character
Wearing a DIY Krampus Costume means playing a character who is wild, theatrical, and loud. Move with a hunched, prowling posture, as if stalking prey. Take heavy steps so your bells clang and your chains rattle.
Shake your chains and switch at the air, especially when someone looks at you. Tilt your head slowly and stare with wide, red rimmed eyes. Let out a low growl or a rumbling laugh now and then.
Ask people whether they have been naughty or nice this year. Pretend to check a list, then point at your basket. Playful threats get big laughs and great photos.
Be careful around small children. Some kids love Krampus, but others are truly frightened. Crouch down, soften your voice, or step away if a child looks scared.
Watch your surroundings at all times. Horns, wigs, and masks limit your vision. Traditional performers often walk with their hands stretched forward to sense obstacles. Bring a friend to guide you through crowds and doorways.
📸 Step 9: Capture the Moment
A DIY Krampus Costume looks best in dark, moody lighting. Shoot outdoors at dusk or at night under a single warm streetlight. Snow, bare trees, or an old wooden fence make perfect backdrops.
Light your face from below or the side with a flashlight or phone light. This casts dramatic shadows across your horns and brow. A red light behind you creates an eerie glow around the fur.
Try a close portrait of your face and horns with the switch raised. Then take a full body shot showing the chains, bells, basket, and hoof. A short video captures the sound of clanging bells, which photos cannot show.
A playful shot of Krampus dragging a laughing friend toward the basket makes a great final photo. Keep the pose gentle and fun.
🎄 Why Go DIY?
Store bought Krampus costumes are often expensive, and cheap ones look flat and plastic. Building a DIY Krampus Costume gives you sculpted horns, weathered fur, and rusty chains that look handcrafted. That handmade look matches the real Alpine tradition.
Most of the pieces come from thrift stores, craft aisles, and your own backyard. The horn sculpting and dry brushing skills you learn will carry over into future costumes. Best of all, your DIY Krampus Costume will be ready for every Krampusnacht to come.