🌽 DIY Jolly Green Giant Costume: How to Dress Like Advertising’s Gentle Giant

Picture an enormous, smiling figure towering over a valley of crops. Green from head to toe, wrapped in leaves, laughing a booming Ho Ho Ho. That is the Jolly Green Giant, one of advertising's most beloved gentle giants. A DIY Jolly Green Giant Costume brings his warm, larger than life presence to your next party. This guide covers everything you need for a full DIY Jolly Green Giant Costume, from clothing to technique.
This DIY Jolly Green Giant Costume guide walks readers through building a full outfit inspired by the longtime Green Giant advertising mascot. It covers clothing, leaf application technique, face and body paint, and movement tips, drawing on verified history of the character's 1928 debut and 1935 makeover by ad agency Leo Burnett. The guide is written for Halloween costume shoppers looking for an affordable, hands on advertising icon costume idea.
This character's story starts far stranger than his friendly modern image suggests. The Minnesota Valley Canning Company was founded in 1903 in Minnesota. In 1925 the company began selling an unusually large variety of peas. A giant mascot debuted in 1928 to match that oversized product. That original giant was nothing like the smiling figure we know today. He was hunched, pale, and based on a frightening Brothers Grimm fairy tale character. Early ads showed him as genuinely monstrous rather than friendly at all. It's a strange origin for what became one of advertising's warmest characters.
Everything changed in 1935 when advertising legend Leo Burnett took on the account. Burnett straightened the giant's posture and gave him a genuine smile. He swapped the character's rough bearskin for a woven leaf tunic instead. Burnett also added the word Jolly to the character's name that same year. The very first Jolly Green Giant ad ran on September 14, 1935. That single makeover transformed a scary mascot into a beloved advertising icon. The same ad agency also later created Tony the Tiger and the Pillsbury Doughboy.
The company was eventually renamed Green Giant in 1950, after its own mascot. Through the 1960s, the giant appeared in ads set among friendly farmers. His booming Ho Ho Ho became one of advertising's most recognizable sounds. In 1973 he gained a small sidekick, the Little Green Sprout. A massive fifty five foot statue of the giant was built in Blue Earth, Minnesota. It still stands today, greeting travelers along the interstate. The character has appeared in the Macy's Thanksgiving Day Parade since 2017. Nearly a century after his debut, he remains genuinely instantly recognizable to most Americans.
That nearly century long history is exactly why this costume carries real weight. He isn't just a green suit and some leaves thrown together randomly. He's one of the most enduring, genuinely gentle giants in advertising history. A DIY Jolly Green Giant Costume celebrates that warmth alongside some real hands on craft.
👕 Step 1: The Base Outfit
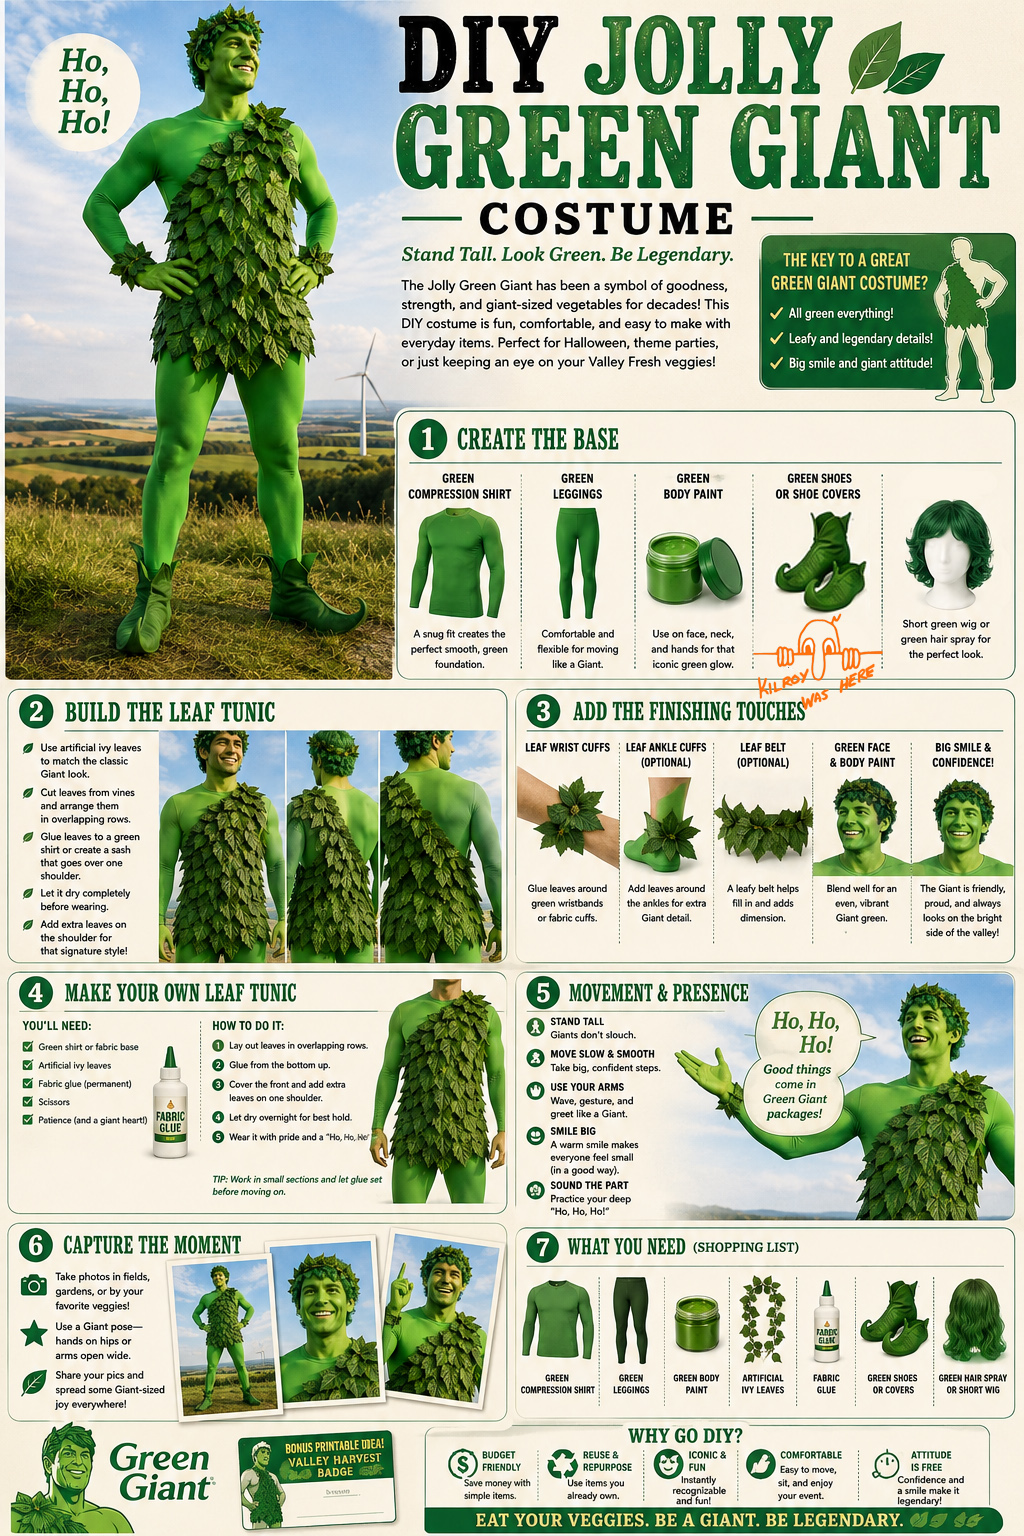
Start a DIY Jolly Green Giant Costume with a green compression shirt. Choose a bright, saturated green rather than anything muted or olive toned. A fitted compression style helps show off that classic, oversized giant physique. Green leggings complete the base below the waist in a matching bright shade.
Together these two pieces form the foundation everything else attaches to. Nothing about this base needs to look finished on its own. Its entire job is providing a smooth surface for the leaves that follow.
🍃 Step 2: Applying the Leaves
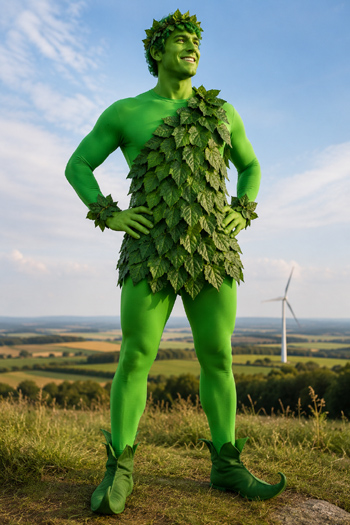
This step is really the heart of the entire DIY Jolly Green Giant Costume. Gather plenty of artificial leaves or leafy ivy garland before you begin. Buy more than you think you need, since coverage always takes more material than expected. Permanent fabric glue is the right adhesive for this entire project. Regular craft glue or hot glue can crack or peel once the fabric moves and stretches.
Start by trimming every leaf's stem down flat and short. A long stem creates bulk and makes leaves sit unevenly against the fabric. Flat, short stems glue down cleanly and lie much closer to the body. If you're working from a garland, snip individual leaf clusters free as you go. Keep a small pile of trimmed leaves ready nearby so the process moves smoothly.
Work from the bottom of the garment upward, one small section at a time. This bottom up order matters enormously for the finished look. Each new row of leaves should overlap the row below it, like shingles on a roof. That overlap hides every stem and glue line completely from view. Working top down instead leaves visible gaps and bare fabric showing through.
Apply glue directly to the stem end of each leaf, not the leaf's visible surface. Press it firmly against the fabric, angled slightly downward and outward. Hold each leaf in place for several seconds so the glue can grip properly. Work in small sections, no more than a few inches at a time. Fabric glue can begin setting fast, so small sections keep your placement accurate.
Vary the angle and direction of individual leaves slightly as you go. Perfectly uniform rows actually look less convincing than natural, slightly irregular placement. Real foliage never grows in perfectly straight, identical lines. A little variation sells the costume far more convincingly than rigid precision. Turning some leaves slightly sideways or tilted adds real, believable texture and depth.
Continue this overlapping, bottom up process across the shirt and leggings both. Pay special attention to shoulders, sleeve edges, and the waistband, since those spots show wear first. Double up the leaf layers in these high stress areas for extra durability. Let everything cure fully, ideally overnight, before wearing or moving around in the costume. Test a small stretch and bend the next morning before committing to a full night out.
Explore other Great Halloween Ideas Here
👞 Step 3: Shoes
Green elf style shoes are the closest authentic match for this character's original look. They can genuinely be a hard find at thrift stores, so don't get discouraged searching. A few solid alternatives work just as well if elf shoes don't turn up. A DIY Jolly Green Giant Costume doesn't hinge on that one piece alone.
Green slipper shoes are a comfortable, easy substitute with a soft, rounded profile. Green moccasins offer a similar effect with a slightly more rugged texture. Green shoe covers slipped over your own sneakers or boots are another simple option. Any of these three reads convincingly once leaves are added around the ankles. Dye a plain pair of canvas shoes green yourself if nothing suitable turns up secondhand.
Extend a few leaves down over the top of whatever shoes you choose. That small detail blends the footwear seamlessly into the rest of the costume.
🎨 Step 4: Face and Body Paint
Green face and body paint completes any exposed skin on this costume. Choose a bright, water based, skin safe paint designed for costume or theatrical use. Test a small patch on your inner arm a day ahead to check for irritation. This simple test saves real trouble if your skin reacts badly to a product.
Start with a clean, dry face and any other exposed skin, like your hands. Use a large, soft sponge to apply a thin, even base layer first. Thin layers blend better and dry faster than one thick, heavy coat. Build up coverage gradually with a second layer once the first has dried. Rushing this step usually leads to streaky, uneven color once it dries fully.
Blend carefully along your hairline, jaw, and neck so no visible edge remains. A slightly damp sponge helps soften and feather any harsh transition lines. Work in small circular motions rather than long, dragging strokes for the smoothest finish. Pay close attention to your hands, since they're just as visible as your face. Cover between the fingers and around the knuckles fully for even coverage. Don't forget the backs of your wrists, since sleeves often shift throughout the night.
Let the paint dry completely before touching your face or clothing. Set it with a light dusting of translucent powder if you have some available. That final step helps the paint resist smudging and rubbing off during the evening. Keep a small pack of face wipes handy for any touch ups later in the night.
👑 Step 5: Hair and Crown
A short green wig or green temporary hair dye completes the top of this look. Either option works well, so choose whichever fits your comfort and budget. A short, slightly tousled style suits this character better than anything sleek or styled.
A leaf crown finishes the whole costume with one final, unmistakable detail. Weave artificial leaves around a simple headband or wire base using the same fabric glue. Follow the same overlapping technique from Step 2 for a clean, natural finish.
🌾 Step 6: Movement and Presence
The Jolly Green Giant carries himself with warm, benevolent, larger than life energy. Stand tall, chest open, with a big, genuine smile throughout the evening. This character has never once looked threatening despite his enormous size.
Move slowly and deliberately, the way something truly massive naturally would. Big, unhurried gestures suit this character far better than quick, small movements. Speak warmly to everyone you meet, like a kind protector watching over his valley.
Deliver his signature laugh often and with real, booming confidence. Ho Ho Ho works as a greeting, a response, and a running joke all at once. A DIY Jolly Green Giant Costume feels most convincing when that warm laugh never lets up. Offer compliments generously, the way a gentle giant genuinely proud of his harvest would.
📸 Step 7: Capture the Moment
An outdoor garden or a green, leafy backdrop works beautifully for this costume's photography. Standing tall with arms slightly open, as though presenting the harvest, sells the reference instantly. A booming laugh mid shout, caught on camera, captures the character's energy perfectly.
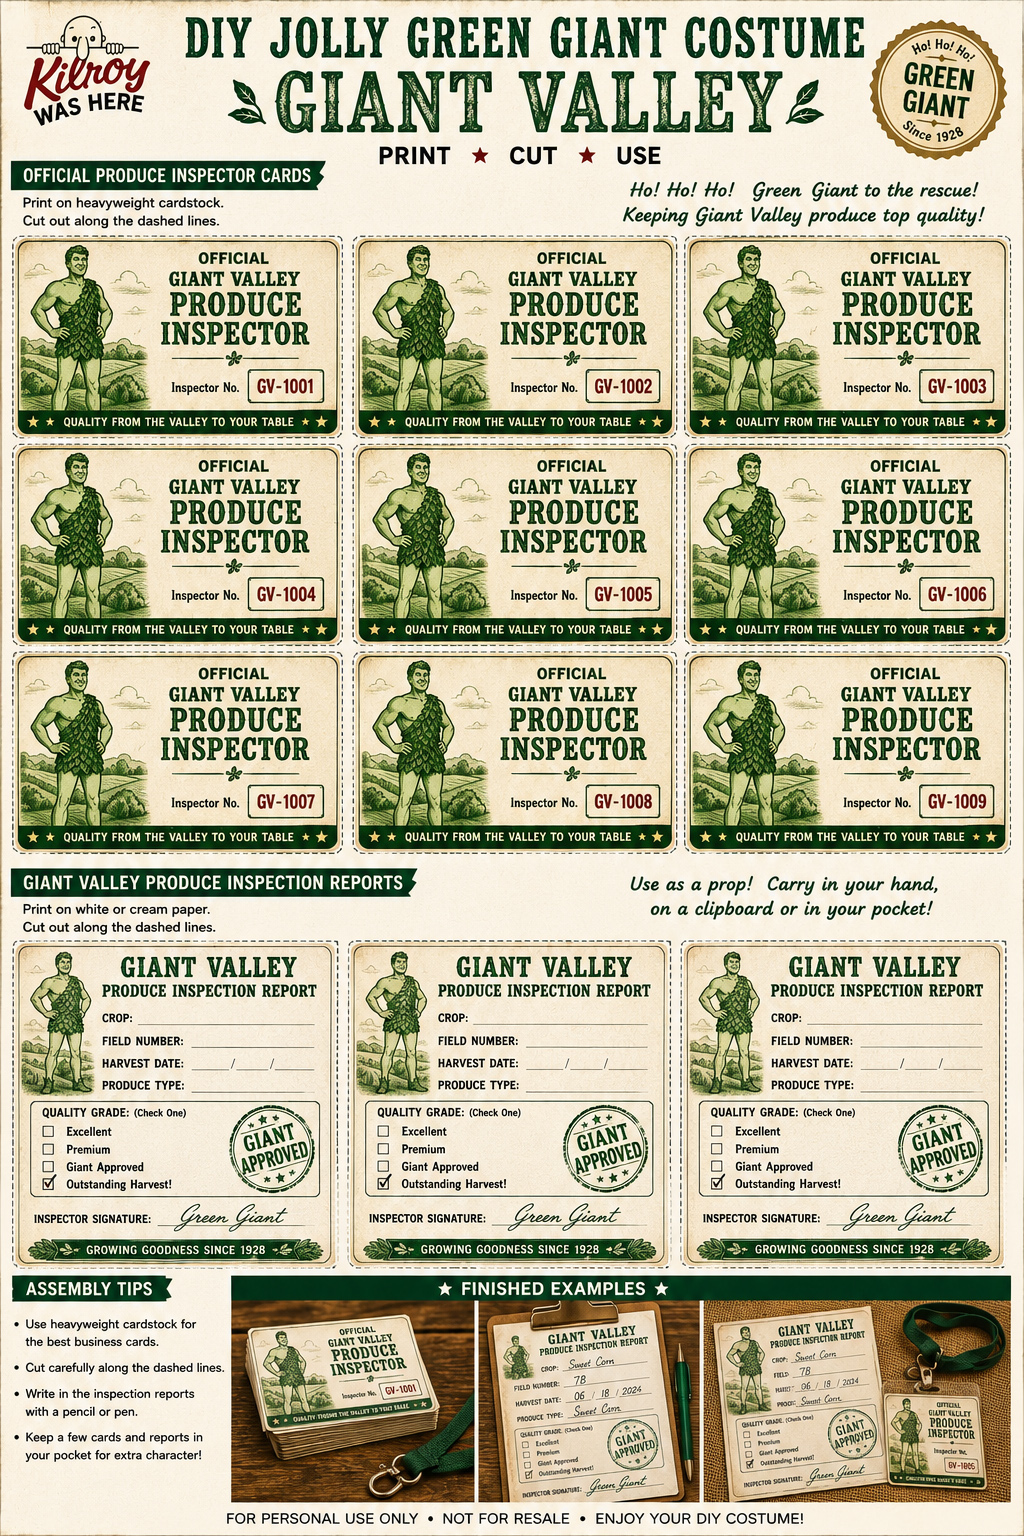
Natural daylight suits this costume's earthy, organic texture especially well. A group photo alongside our grocery aisle icons, Mr. Clean, Morton Salt Girl, Brawny Man, and Mr. Whipple, makes an unforgettable lineup. Different products, different eras, all recognizable icons standing together in one frame.
💡 Why Go DIY?
This costume is genuinely budget friendly, especially compared to a store bought giant costume. Compression wear, leaves, and fabric glue cost far less than a premade oversized suit. Most people can build this for a fraction of what a costume shop would charge.
It is also a wonderfully hands on, satisfying costume to actually build yourself. The leaf application alone is a genuine craft project with a real, visible payoff. A DIY Jolly Green Giant Costume rewards patience with a result that looks professionally made.
Comfort is another real strength once the base layers are finished. Compression fabric moves easily, and the leaves add surprisingly little extra weight. Nothing about this costume restricts movement once the glue has fully cured.
This costume also connects you to nearly a century of advertising history. Building a DIY Jolly Green Giant Costume honors one of the most enduring mascots ever created. Pair it with our grocery aisle icon costumes for an unforgettable group photo. Few costume lineups tell as much genuine advertising history in one single picture.
Ho Ho Ho, Green Giant.
🕸️ Related Costumes to Try
DIY Mr. Whipple Costume
DIY Brawny Man Costume
DIY Pep Boys Costume
DIY Mr. Clean Costume
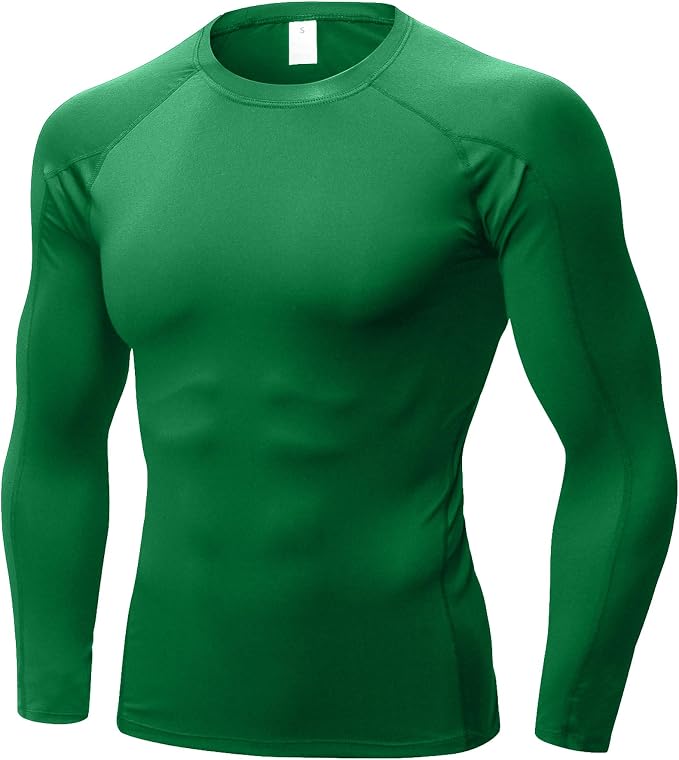
Men’s Long Sleeve Compression Shirt
Product Description:
A green compression shirt provides the perfect foundation for a DIY Jolly Green Giant Costume. Its close-fitting design creates a smooth base for attaching fabric leaves while keeping you comfortable throughout Halloween parties, cosplay events, parades, and costume contests.
Key Features:
• Stretch compression fabric for a close, athletic fit
• Moisture-wicking quick-dry material keeps you comfortable
• Four-needle flatlock seams help reduce skin irritation
• Lightweight base layer suitable for all-day wear
• Great for Halloween, cosplay, sports, and outdoor events
Why This Works:
A fitted green shirt allows artificial leaves to be attached neatly without bunching or sagging. Pair it with matching green compression pants, green face paint, pointed elf shoes, and a leafy crown to build a towering DIY Jolly Green Giant Costume that everyone will recognize from across the room.
Buy on Amazon
Further Reading & Resources
📺 See: Fake Ivy
🔍 More: Green Giant - Wikipedia