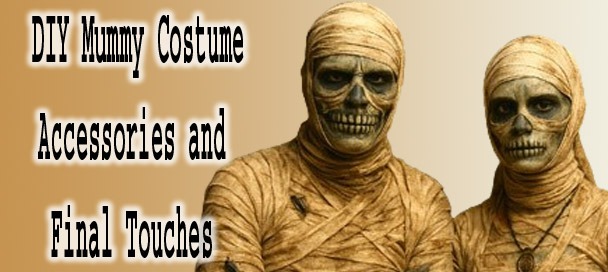
DIY Mummy Costume with tea-dyed bandages and undead makeup
The DIY Mummy Costume is one of October 31st most enduring classics. Wrapped in centuries of myth, mystery, and movie magic, this ancient horror icon brought to life buy Boris Karloff continues to haunt costume parties, trick-or-treat routes, and haunted attractions. With its roots in ancient Egypt and its place secured in vintage monster cinema, the mummy look is instantly recognizable and always eerie.
The “DIY Mummy Costume: Ancient Horror Wrapped in Style” article teaches how to build a layered, textured costume that merges undead horror and tomb-escape drama. It walks you through six steps from base layers and bandage wraps to aged distressing, skeletal makeup, hair styling, movement, and a tomblike photo shoot. The piece emphasizes storytelling through detail: peeling wraps, grime, loose ends, and atmospheric staging. It argues that a homemade mummy look allows you to choose how fresh or ancient the curse feels.
What makes the Mummy stand out is its tactile, textured appeal. Unlike store-bought suits that rely on one-piece gimmicks, a homemade version lets you layer every wrap, every rip, every shadowy detail. From tea-stained gauze to rotted bandages and sunken makeup, it’s a creative playground where you can go from freshly cursed to centuries-old crypt walker.
This costume isn’t just about looking spooky it’s about telling a story. Are you an escaped tomb dweller seeking revenge? A pharaoh’s lost love risen again? Or just an unlucky explorer who unwrapped the wrong scroll? Your DIY Mummy Costume can carry as much personality as you want to put into it, and the results will wrap everyone’s attention.
🧥 Step 1: Base Layers and Mummy Wraps
To begin your DIY Mummy Costume, start with a snug base layer that won’t interfere with your wrappings. A fitted white or beige long-sleeve shirt paired with matching leggings is ideal it keeps things secure underneath and gives your costume a clean foundation. Choose breathable materials, especially if you’ll be wearing this for long hours at a Halloween event or party. The base layer won’t be visible in the end, but it’s essential for both comfort and function.
Next comes the signature element: the wraps. Use gauze bandages, strips of muslin, or old cotton sheets that have been torn into uneven strips. For the aged, decayed effect, soak the fabric in tea or coffee for a few hours, then let it dry completely. This will give the material a yellowed, antique appearance that mimics burial wrappings from centuries ago. If you want to speed up the process, use fabric dye in shades of brown, tan, or gray for added depth.
Begin wrapping your body from the bottom up, starting at the ankles. Overlap the strips slightly and vary the direction for a more realistic look. Focus on layering more heavily around the arms, legs, and midsection to create that uneven, unraveling appearance. Avoid wrapping too tightly mobility is important and leave some strips loose or dangling for movement. Secure each strip with fabric glue, safety pins, or even a few stitches if you're handy with a needle and thread.
✂️ Step 2: Add Age and Texture your DIY Mummy Costume
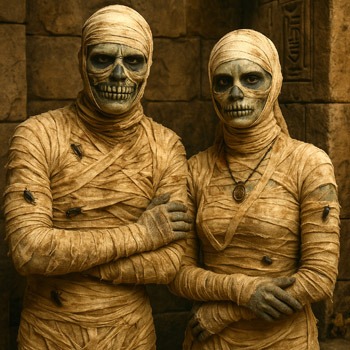
Male and female mummies with skeletal makeup, pendant, and crawling beetles in an ancient tomb setting.
Now that your DIY Mummy Costume wraps are in place, it’s time to transform them from clean cloth into something pulled from a long-forgotten tomb. Begin by fraying the edges of your fabric strips. Tear small holes and tug at loose threads to give the impression of decay and time-worn unraveling. This step adds dimension and authenticity, making your costume look ancient and naturally decomposed rather than freshly wrapped.
To take things further, use brown, gray, and green fabric paints to mimic dirt, mold, and rot. Lightly dab these colors across the bandages, concentrating on the lower edges, joints, and areas where dirt would naturally collect like knees, elbows, and hem lines. You can also apply watered-down black or dark gray paint in smudges to simulate soot or burial grime. This color layering adds depth and gives the costume a grim, freshly unearthed appearance.
For those wanting a little extra grotesque charm, consider adding small props like faux bugs, plastic beetles, or even bits of dry moss between your wraps. A few glued-on leaves or a light dusting of sand can evoke the feeling of having clawed your way out of a crumbling sarcophagus. The more texture you add, the more believable and eerie your DIY Mummy Costume will become.
💄 Step 3: Undead Face and Bandage for your DIY Mummy Costume
Mummy Halloween Makeup Tutorial
Mummy Make-Up
Start by giving your DIY Mummy Costume face a ghoulish base. Mix green and gray face paints to create a sickly, undead tone, and apply this blend across your entire face. Then, highlight your cheekbones and brow ridge with white to create depth and skeletal angles. Around the cheeks, temples, and forehead, lightly sweep chocolate-toned bronzer to give the impression of sunken decay and aged remains. Avoid a clean or polished look your goal is gritty, uneven, and haunting.
For a true monster touch, paint skeletal teeth onto your lips and cheeks. Use white to define exaggerated teeth shapes along your mouth, then outline with black to give them pop and depth. Blend just slightly where the lips meet to make the grin look cracked and worn. Use black sparingly around the eyes and nostrils to create shadow and mimic a partial skull effect, matching the makeup style seen in classic mummy transformation videos.
Finally, wrap parts of your face with gauze or torn bandage strips, leaving just one eye and your painted teeth visible. Let the cloth fall unevenly for a chaotic, ancient look nothing should be perfectly aligned. Add touches of fake blood, black smudges, or tea-stained grime if desired. This finishing touch ties your face into the rest of the DIY Mummy Costume and gives the illusion you’ve just escaped centuries of cursed slumber.
🎩 Step 4: Hair and Accessories for Your DIY Mummy Costume
Your hair plays a big role in completing the decayed, ancient feel of the DIY Mummy Costume. If you have long hair, pull it into a messy bun or braid and dust it with baby powder, ash-toned eyeshadow, or gray spray to make it look old and weathered. For shorter styles, simply tucking your hair under bandages works just as well just leave a few stray strands out for an unkempt, resurrected-from-the-tomb look. If you're going for something more theatrical, tease and tangle your hair, then add a streak of white or silver.
Next, add accessories to tell a deeper story. A weathered Egyptian headdress, cracked crown, or ancient-looking pendant can hint at your mummy’s past life perhaps you were once royalty, a priestess, or a cursed noble. A tattered scroll, faux scarab amulet, or broken ceremonial staff can be carried for dramatic effect. These props bring personality and historical flair to your mummy’s backstory, even if you’re just wandering a Halloween party.
Don't forget to incorporate your accessories into your wrappings. Let a necklace peek out between your gauze strips, or have a gold-painted ring tied into a loose bandage. Even a small, plastic tomb beetle glued to your shoulder adds flair. The more small, eerie details you add, the more your DIY Mummy Costume will stand out as something truly thought-out and totally creepy.
🧬 Fun Fact
Ancient Egyptian mummies were often buried with curses carved into their tombs to ward off thieves fueling countless horror legends.
🧠 Step 5: Embrace the Undead Walk with Your DIY Mummy Costume
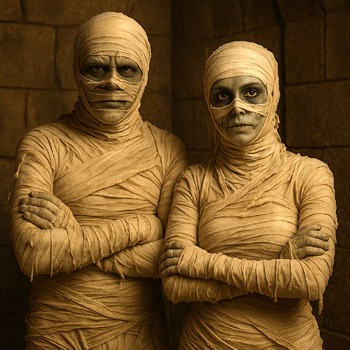
Male and female mummies with skeletal makeup, in an ancient tomb setting.
Now that your look is complete, it’s time to bring your mummy to life or unlife through movement and presence. A DIY Mummy Costume isn’t just about visual details it’s about how you carry the ancient curse. Walk slowly, dragging one foot as if stiffened by centuries of entombment. Keep your arms slightly raised or let them swing with disjointed, jerky motions. The key is to move like your body hasn’t functioned properly in a thousand years, as if every step is breaking the seal of the tomb just a little more.
Facial expression matters, too. Keep a distant, hollow stare or look around with sudden, darting glances like a creature rediscovering the world. Let your mouth hang slightly open or move it as if silently chanting forgotten curses. If your costume includes skeletal teeth, emphasize them with a subtle snarl or dry smile when someone gets too close. The less human you seem in motion, the more unnerving the overall effect.
For a finishing touch, consider vocal elements. Soft groans, raspy exhales, or breathy whispers of ancient warnings can send chills down spines. Try phrases like “Set me free…” or “They should never have opened the tomb…” in a scratchy, barely-there tone. Stay in character as much as you can especially in dim settings like haunted houses or Halloween events because your haunting presence will leave just as strong an impression as your incredible DIY Mummy Costume.
📸 Step 6: Eerie Tomb-Shoot
Your DIY Mummy Costume deserves more than a quick snapshot it needs a photo shoot that captures the full undead drama. Choose a location with stone walls, sand-colored textures, or broken structures to mimic an ancient tomb. Even a backyard with low lighting and a few props like fake torches, skulls, or a stone bench can create the right ambiance. The goal is to make your mummy look like it just emerged from a long-buried crypt.
Lighting is key. Use warm amber or orange filters to mimic torchlight, or try flickering candles and lanterns to add movement and shadow. Shadows should be deep, dramatic, and eerie position your light source from below or from one side for maximum horror effect. Try a few shots with high-contrast black and white settings too. These edits bring out the rough texture in your wraps and the sunken details of your makeup, creating a timeless horror vibe.
Experiment with poses: sit slumped against a wall as if drained of energy, or stagger toward the camera with a vacant stare. Have your bandages unravel slightly in motion shots, or raise your arms slowly as if performing a ritual. If possible, take a few action photos while turning, reaching, or dragging a foot capturing motion blur for that ghostly effect. Your mummy isn’t just a costume it’s a full character brought to life, one frame at a time.
🏆 Why Go DIY?
The DIY Mummy Costume offers a level of detail and creativity that no store-bought version can match. By building it yourself, you control every layer from the color of the wraps to the level of grime and decay. Whether you’re aiming for a fresh-from-the-tomb horror or an ancient, crumbling corpse, you can tailor the look to match your exact vision. Plus, it’s budget-friendly and lets you recycle materials like old sheets or fabric scraps.
More than just appearance, a homemade mummy costume allows you to build a character. You’re not just dressing up you’re telling a story with every wrap, stain, and accessory. Maybe your mummy was a cursed royal, a lost lover, or a tomb guardian risen from the sands of time. Adding symbolic props or makeup details makes your costume personal and memorable, standing out from generic Halloween fare.
Best of all, going DIY makes the experience part of the fun. From staining your bandages to applying rotting makeup, you get to enjoy the transformation process just as much as the final reveal. The DIY Mummy Costume is your chance to dig deep into horror history, unleash your creativity, and emerge from the shadows with something truly unforgettable.
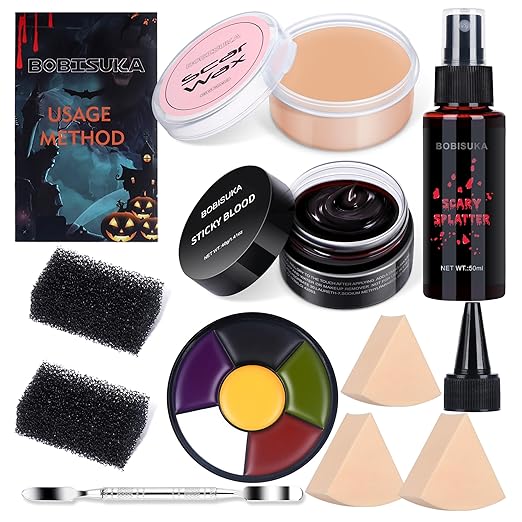
🩹 Effects SFX Halloween Makeup Kit – Perfect for Your DIY Mummy Costume
Complete makeup kit with bruise palette, scar wax, fake blood, and tools ideal for crafting your DIY Mummy Costume.
Complete Halloween Makeup Set: Includes 6-color bruise palette, scar wax with spatula, fake blood cream, splatter spray, stipple sponges, and more everything you need to simulate surgical trauma.
High Quality & Versatile: Scar wax is flexible for reshaping facial features. Bruise palette layers easily to create realistic effects for wounds, swelling, or deep discoloration.
Beginner Friendly: Easy to apply and clean off. Great texture for fake blood tears, splatter FX, and exaggerated cosmetic mishaps that complete the look.
Imaginative & Safe: Non-toxic, vegan, and cruelty-free. Ideal for adults and kids alike during Halloween, cosplay, haunted houses, or themed photo shoots.
ML Lamp is the owner of Kilroy Was Here. After his 20 years of working in Las Vegas in the entertainment promotions field, Mr. Lamp retired in 2002 from his job to pursue his passion for collectibles. Now as a guest speaker and author he’s living the dream, and sharing his warmth with You.