🥶 DIY Frostbite Makeup: Create a Chilling Frozen-Skin Effect
Some Halloween looks rely on blood and gore. Others scare people with something quieter, like skin that looks dangerously, painfully cold. DIY Frostbite Makeup creates that effect with ordinary cosmetics, a sponge, and a little patience. It suits stranded mountain climbers, winter ghosts, frozen zombies, and lost polar explorers.
DIY Frostbite Makeup is a special effects technique that mimics cold-injured skin using a pale cosmetic base, stippled red and purple patches, and sparing blue-purple shading. Real frostbite most often affects the fingers, toes, ears, cheeks, chin, and nose tip, so convincing makeup concentrates color on those exposed edges. The effect should always be created with skin-safe cosmetics, never real ice or dry ice.
Frostbite remains a classic special effects makeup exercise. Professional makeup schools still use it to teach color theory, stippling, and texture. The good news is that you do not need a professional kit to get great results. This guide walks you through eight core steps, plus setting, wardrobe, safety, and removal.
The secret is simple. Convincing frozen skin comes from irregular color and careful placement. It does not come from painting your whole face blue. Once you understand where real frostbite appears and how it looks, the makeup almost plans itself.
❄️ What Is Frostbite?
Frostbite is a real cold injury that happens when skin and the tissue beneath it freeze. It is a serious medical condition, so this makeup is meant only as a respectful illusion. Understanding the basics simply helps your makeup look believable.
Medical sources describe frostbite in three general stages, and DIY Frostbite Makeup can mimic each one. The earliest stage is called frostnip. It causes cold, tingling, numb skin that can look red, purple, or lighter than usual. Frostnip does not cause permanent damage.
The second stage is superficial frostbite. The skin can look patchy, with purple or blue areas that resemble bruising. Fluid-filled blisters may appear about a day after the skin warms up again. This stage needs medical care.
The third stage is deep frostbite, which reaches all layers of the skin and the tissue below. Large blisters can form, and the skin may eventually darken and harden. This is a medical emergency, and your makeup only needs to hint at it from a distance.
According to the Mayo Clinic, frostbite most often affects the fingers, toes, ears, cheeks, chin, and tip of the nose. These are the areas farthest from the body’s core and most exposed to wind. That list is your roadmap for placing color. Affected skin can show patches of red, white, blue, gray, purple, or brown, depending on severity and natural skin tone.
🧊 What Makes Frostbite Makeup Convincing?
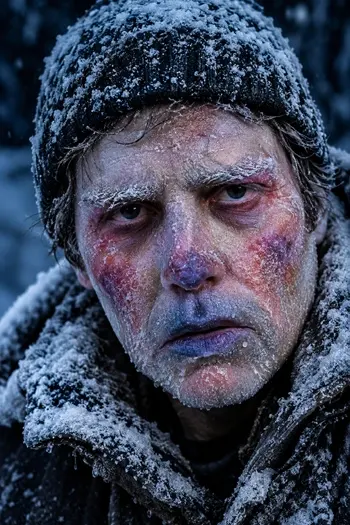
The illusion depends on irregular color, cold-looking skin, and careful placement. A face painted evenly blue looks like a cartoon or a party character. Real cold damage is blotchy, uneven, and concentrated on exposed edges.
Think of DIY Frostbite Makeup as a map of where the cold attacked first. The nose tip, ear rims, cheekbones, and chin take the worst damage. The forehead and center of the face usually stay paler and less colorful. That contrast is what tricks the eye.
Texture matters just as much as color. Smooth, even paint reads as makeup. Broken, stippled color reads as skin. Every step below uses dabbing and layering rather than smooth brush strokes.
Finally, restraint sells the effect. Most beginners add too much blue. A small amount of deep color looks far colder than a fully blue face. Surround it with pale skin and angry red patches.
🧰 Supplies You Will Need
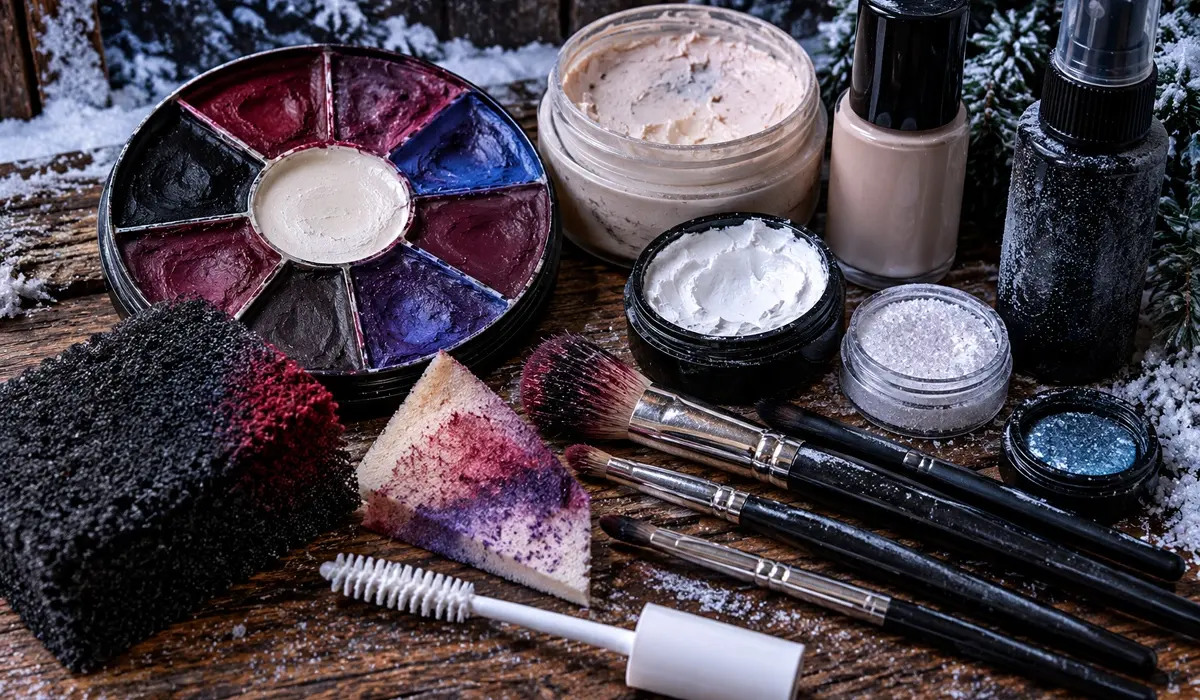
For DIY Frostbite Makeup, start with a cream color wheel that includes white, red, burgundy, and purple. Add blue as well. Bruise wheels sold for special effects work are ideal, since they contain most of these shades. An alcohol-activated palette is another option for longer wear, though it requires more practice.
You will also need a foundation or cream base one or two shades lighter than your skin. A white cream or white face paint helps you lighten that base further. Choose products labeled for use on skin, never craft paint or markers.
Stipple sponges are the most important tool for DIY Frostbite Makeup. These coarse, open-cell sponges leave a broken, speckled pattern instead of smooth coverage. A torn piece of ordinary makeup sponge can work in a pinch. Pick at the surface to make it rougher before you begin.
Gather a few small, inexpensive brushes for detail work around the nose and lips. A damp beauty sponge helps blend harsh edges. Translucent setting powder and a makeup setting spray will lock everything in place.
For finishing touches, look for a clear gloss or glycerin-based product for a wet, thawing look. A cosmetic-grade white or iridescent shimmer creates the look of frost. Only use glitter labeled safe for the face, since craft glitter can scratch the eyes. White mascara and white cream are useful for frosted brows and lashes.
🎚️ Choose Your Severity Level
Before you start, decide how severe you want your DIY Frostbite Makeup to look. A mild version suggests frostnip, with pale skin and rosy, irritated patches. It is quick, subtle, and great for a winter hiker or snow ghost.
A moderate version adds purple and blue bruise-like areas on the nose, ears, and cheeks. This is the level most people picture when they hear the word frostbite. It works well for stranded climbers and lost explorers.
An advanced version adds simple blisters and darkened fingertips. It is the most dramatic option and takes the most time. Save it for older audiences and adult parties. The eight steps below build the moderate level, and the advanced extras come later.
🧴 Step 1: Start With Clean Skin
Prepare a small test area first and work only with skin-safe cosmetic products. Every DIY Frostbite Makeup session should begin this way. Apply a dab of each product to the inside of your wrist or behind your ear. Wait twenty four hours if possible to check for redness or itching.
On the day you apply the look, wash your face and hands with a gentle cleanser. Pat the skin dry with a clean towel. Apply a light, fast-absorbing moisturizer and let it sink in for several minutes.
If you have oily skin, follow with a thin layer of makeup primer. Primer helps cream colors grip the skin and last longer. Pull long hair back with a headband or clips so it stays out of the wet makeup.
Set out all your products before you begin. Line up your colors from lightest to darkest so you can grab them quickly. Good lighting matters too, so work near a window or a bright, neutral light.
🤍 Step 2: Drain the Warmth From the Skin
Use pale cosmetic tones to create the cold foundation while allowing some natural skin variation to remain. Apply a foundation one or two shades lighter than your skin across the face. Use a damp sponge and press it on rather than wiping.
Mix a tiny amount of white cream into your foundation if you need to go paler. Add the white slowly, since it is easy to overdo. DIY Frostbite Makeup needs a drained, bloodless look, not a white clown base.
Do not aim for perfect, even coverage. Let a few natural freckles or tone shifts show through. Real cold skin still looks like skin, just with the warmth pulled out of it.
If you have a deeper skin tone, avoid simply covering your face in white. Real frostbite on brown and Black skin can look grayish, ashy, or darker in patches. Instead, mix a small amount of gray, taupe, or cool-toned beige into a foundation near your own shade. Pat it on to mute the warmth and create a dull, ashy cast. Your purples and burgundies will show beautifully over this base.
Finish this step by lightly dusting translucent powder over the base. This keeps the cream colors from sliding when you add the next layers. Use a large, fluffy brush and a very light hand.
🌹 Step 3: Build Red and Purple Areas
Stipple irregular reddish and purple tones around areas such as the nose, cheekbones, and exposed edges. Start with red, since irritated skin usually surrounds the coldest areas. Dip a stipple sponge lightly in red cream and blot most of it off on the back of your hand.
Press the sponge gently onto the upper cheekbones, the sides of the nose, and the chin. Rotate the sponge between presses so the pattern never repeats. Keep the shapes uneven and patchy, almost like windburn.
Next, add burgundy or plum on top of the red, but cover a smaller area. Concentrate it at the very center of each red patch. The color should fade outward from purple to red to pale skin.
Avoid perfect circles or symmetrical shapes on both sides of the face. Wind usually hits one side harder than the other. Making one cheek slightly worse adds a surprising amount of realism to your DIY Frostbite Makeup.
💜 Step 4: Add the Deep Cold Tones
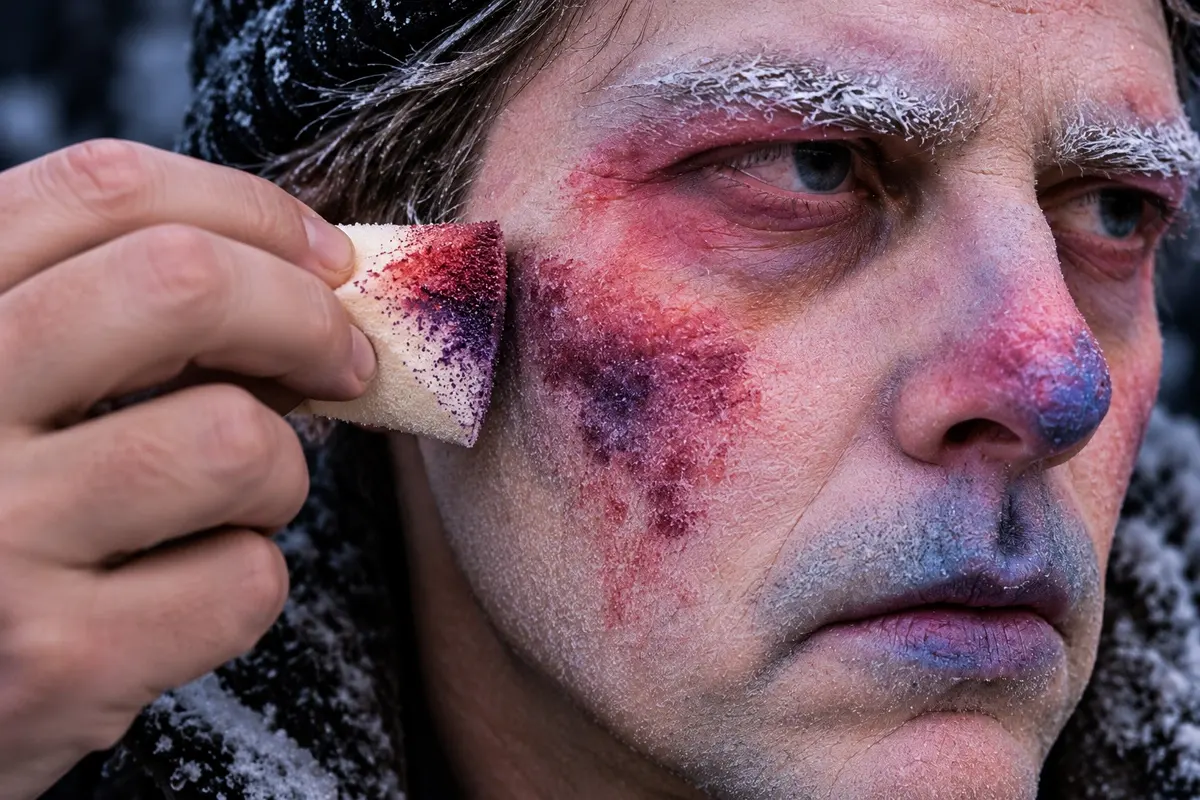
Introduce blue-purple shading sparingly in selected areas rather than covering the entire face. Blue is the easiest color to overuse in DIY Frostbite Makeup. Mix a little blue into purple to create a cold, bruised violet. Pure bright blue tends to look fake, so always mute it.
Apply this deep tone only at the coldest points. The nose tip, ear rims, and the edges of the cheekbones are the best places. Use the corner of your stipple sponge for small, controlled marks.
Blend the edges with a clean, slightly damp sponge so the blue melts into the purple. You should still see the red layer around it. The finished color zone should move from pale to red to purple to blue.
A tiny touch of gray mixed with blue creates a dead, frozen look in the very center of a patch. Use it on only one or two spots. That small accent makes the surrounding colors look even colder.
✨ Step 5: Create Frozen Texture
Use stippling and uneven cosmetic texture to break up smooth skin and make the effect less like ordinary face paint. Lightly stipple a little of your pale base back over the colored areas. This breaks up the color and makes it look like it sits under the skin.
Go back in with a tiny bit of red on a clean sponge. Add a few scattered dots across the cheeks and nose to suggest broken capillaries. Keep these marks small and random.
For a dry, chapped look, dab a small amount of translucent powder onto the reddest areas. Do not blend it completely. It adds a rough, wind-burned finish that contrasts nicely with glossy areas later.
To suggest frost, press a cosmetic-grade white or iridescent shimmer onto the high points of the cheeks and nose. Tap it on with a fingertip rather than sweeping it. A little goes a very long way.
For a thawing, wet look, add a thin layer of clear gloss to a few small spots. The shine makes skin look damp and raw. Use it sparingly and keep it away from areas you plan to powder.
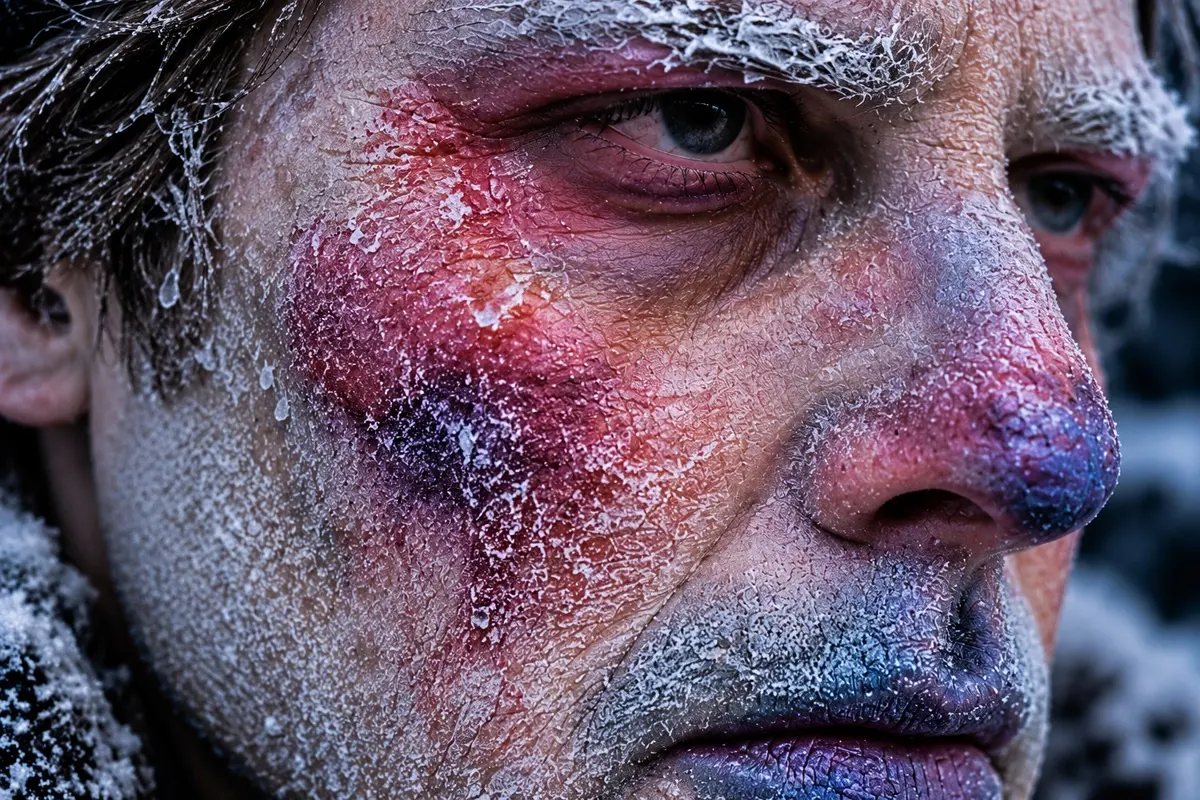
👃 Step 6: Work on the Lips, Nose, Ears, and Chin
These areas help sell the cold effect quickly, so keep the colors irregular and carefully blended. Start with the lips. Cover them with a little of your pale base to remove their natural color.
Dab a muted purple or blue-gray onto the lips with a fingertip. Concentrate the color near the outer corners and along the edges. Leave the center slightly lighter for depth. A touch of powder on top creates a dry, cracked texture.
The nose is the star of any DIY Frostbite Makeup look. Build the deepest color right at the tip and around the nostril edges. Let it fade upward toward the bridge. A hint of red just inside the nostrils suggests a raw, cold, running nose.
Ears are easy to forget, but they are one of the first places real frostbite appears. Stipple red along the outer rim of each ear. Add purple and a little blue to the top curve and the earlobe. The ear rims should look almost as damaged as the nose.
Finish with the chin. Add a patchy red and purple area right on the point of the chin. Keep it smaller than the cheek patches. This completes the pattern of cold attacking every exposed edge.
🖐️ Step 7: Carry the Effect Beyond the Face
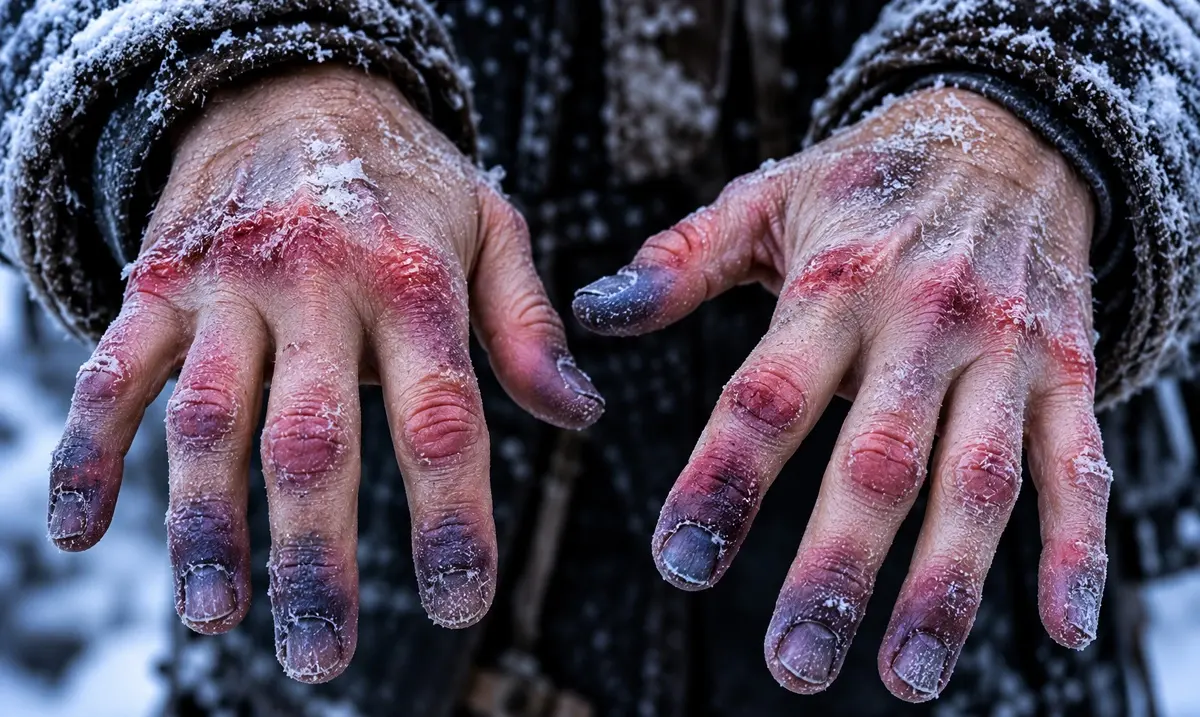
Repeat appropriate color and texture on exposed hands or other visible skin so the illusion does not abruptly stop. Bare hands are the most common giveaway in DIY Frostbite Makeup. Apply your pale base across the backs of the hands and wrists.
Fingertips deserve the most attention, since real frostbite strikes them early. Stipple red over each knuckle and the last joint of each finger. Then add purple and blue right at the fingertips, fading back toward the hand.
Make each finger slightly different. A few fingertips can look much worse than the others. Add a little gray to the very tips of one or two fingers for a deeper, frozen look.
Check your neck as well. A clear line where makeup stops at the jaw breaks the illusion instantly. Fade the pale base down the neck and onto the collarbones if they will be visible.
If you will wear sandals or go barefoot for a photo, treat the toes the same way as the fingers. Otherwise, closed winter boots let you skip the feet entirely.
🔭 Step 8: Check the Effect From a Distance
Use the 20-foot principle. The face should read as dangerously cold before viewers notice the individual makeup colors. Step back from the mirror or have a friend take a photo from across the room.
If the face just looks purple, you probably used too much color. Stipple more pale base back over the edges to break it up. If the face looks healthy, push the red and purple a little deeper on the nose and cheeks.
Check the photo in both warm and cool light if you can. Party lighting is often warm and yellow, which can wash out cool tones. A slightly stronger purple may be needed for an orange-lit room.
🧑🦳 Frosted Hair, Brows, and Facial Hair
DIY Frostbite Makeup looks even more convincing when the hair looks frozen too. Brush white mascara or a little white cream through the eyebrows. Focus on the tips of the hairs rather than coating the brows solid.
Use white mascara on the tips of your lashes for a frosty, icy look. Apply one light coat and avoid clumping. Never use paint, glue, or craft glitter anywhere near the eyes.
For the hair on your head, use a white or silver temporary color spray. Mist it lightly onto the ends and around the hairline, as if frost formed where breath and wind met. A light dusting looks more natural than full coverage.
Beards and mustaches offer a fantastic opportunity. Real climbers often grow frost around the mouth from frozen breath. Comb white cream or temporary white hair color through the mustache and the beard near the lips.
If you do not have facial hair, you can still suggest frozen breath. Dab a little cosmetic shimmer and white cream around the corners of the mouth. Add a few white specks along the upper lip to look like tiny ice crystals.
If you have very short or no hair, a knit hat solves the problem completely. Frost a few strands of a cheap wig or the edge of a hat brim instead. The eye will still read the overall look as frozen.
🩹 Optional Advanced Frostbite: Blisters and Darkened Tips
For an advanced look, add a few simple blisters. Many special effects kits include clear gelatin or a blister gel. Warm the product as directed and dab a small drop onto a fingertip or the nose.
Let the drop cool into a rounded bump before touching it. Lightly stipple a little red around the base of the blister. The clear bump over colored skin creates a convincing effect from a distance.
No gelatin? A thin layer of clear lip gloss dotted onto the skin can suggest small blisters. It will not hold its shape as well, but it photographs nicely.
For darkened fingertips, layer deep purple, gray, and a touch of dark brown on just one or two fingertips. Keep the darkest color very small and well blended. Real deep frostbite is a serious injury, so keep the effect suggestive rather than graphic. This version of DIY Frostbite Makeup is best for adult events.
🔒 Set It for a Long Night
Cream makeup can smudge, crease, and transfer, especially in a warm room. Press translucent powder gently over the finished makeup with a powder puff. Avoid powdering any glossy areas you want to stay shiny.
Mist the face with a makeup setting spray from about eight to ten inches away. Let it dry completely before touching your face. A second light mist adds even more staying power.
Carry a small DIY Frostbite Makeup touch-up kit for the evening. Pack the red and purple shades, a clean sponge, and a little powder. A quick stipple on the nose and fingertips can revive the look after a few hours.
Avoid rubbing your nose or face with tissues. Blot gently instead. Hands wear off fastest, so check them every hour or two.
🧥 Wardrobe and Accessories
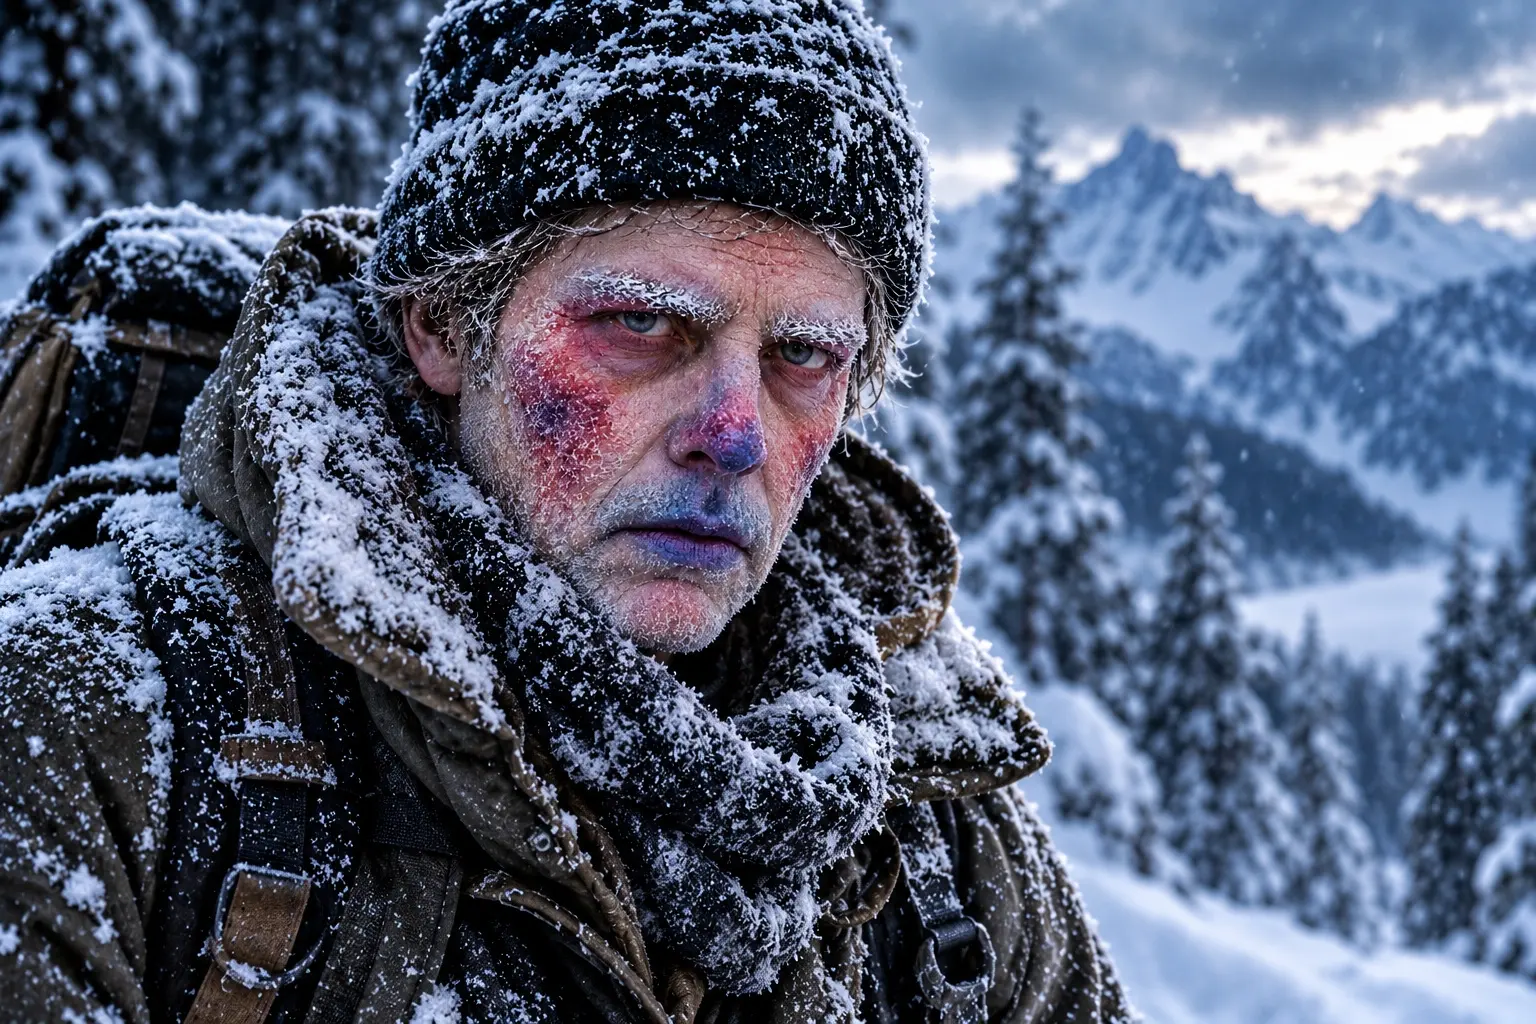
The right costume turns DIY Frostbite Makeup into a full character. A puffy winter coat, a heavy parka, or a worn wool sweater instantly suggests a bitter cold setting. Layered thermal shirts and snow pants add to the look.
Add a knit hat and a long scarf. Dust them with fake snow or a light mist of white temporary hair spray to look frosted. A small amount on the shoulders and sleeves helps too.
Mountaineering props make the story clear. A coiled rope, a toy ice axe, ski goggles pushed up on the forehead, or a backpack all work. A pair of fingerless gloves keeps your frostbitten fingertips visible.
For a supernatural twist, pair the makeup with tattered white clothing and gray-blue lips. That creates a frozen ghost or a winter spirit. For a zombie version, add torn clothing and a few frosty patches of fake snow.
🥶 Movement and Presence
The makeup works best when your body looks cold too. Keep your shoulders raised and slightly hunched, as if bracing against wind. Hug your arms close to your body.
Move slowly and stiffly, like your joints are half frozen. Rub your hands together or blow into them now and then. These small gestures remind people of the cold even before they see your face.
Let your speech sound a little shaky, with an occasional shiver or chattering pause. Keep it subtle and fun. A frozen stare into the distance makes a great photo pose.
📸 Capture the Moment
Cool, blue-tinted lighting makes DIY Frostbite Makeup look its best on camera. Set your phone or camera to a cool white balance, or add a blue filter afterward. Warm light can make the purple look muddy.
Shoot outdoors on an overcast day for soft, natural light. A snowy backdrop is perfect if you have one. If not, a plain white or pale gray wall creates a cold, empty feeling.
Toss a handful of fake snow in front of the camera for an instant winter scene. Have a friend drop it from above while you hold still. Take several shots, since falling snow looks different every time.
Get close-up photos of your hands, nose, and ears. Those details show off your stippling and color work. Then take a wider shot to show the whole cold, exhausted character.
⚠️ Safety: Keep the Cold Fake
Never use actual ice, dry ice, extreme cold, or irritating substances on the skin to create the effect. Real cold can cause real frostbite, and dry ice can burn skin on contact. The whole point of this makeup is to fake the danger safely.
Use cosmetic products intended for skin, and patch-test unfamiliar products a day ahead. Keep all products away from the eyes, except white mascara made for lashes. Stop immediately and remove the makeup if you feel burning, stinging, or itching.
Do not use craft paint, markers, or household glue on your skin. Avoid sharing sponges or brushes with others. Wash your tools with soap and water after every use.
If you plan to be outside in real cold weather, dress warmly under your costume. Your skin should only look frozen. Make sure it stays warm and protected underneath the illusion.
🧼 Gentle Removal
Never scrub DIY Frostbite Makeup off with a rough washcloth. Start with an oil-based cleanser, cleansing balm, or makeup remover. Massage it gently over the face and hands to break down the cream colors.
Wipe the loosened makeup away with a soft cloth or cotton pads. Repeat until the cloth comes away mostly clean. Then wash with a gentle facial cleanser and lukewarm water.
If you used alcohol-activated makeup, use a remover made for that product. Ordinary soap often will not work. Never pick at gelatin blisters, and soften them with warm water before peeling them gently away.
Finish with a soothing moisturizer. Some pigments, especially purple and blue, can leave a faint stain on dry skin. It usually fades after another wash or two.
🎓 Why Learn Frostbite FX?
Frostbite makeup teaches stippling, irregular coloration, blending, and texture techniques that carry over into other practical makeup work. The same skills create bruises, burns, sickness, and zombie skin. Once you master DIY Frostbite Makeup, those other looks feel much easier.
It is also inexpensive. A single bruise wheel, a stipple sponge, and a few drugstore basics cover nearly everything. That makes it a great first project for anyone curious about special effects makeup.
🏔️ Conclusion
A believable frozen effect comes from controlled layers and variation, not from turning someone’s entire face blue. Start pale, build red and purple at the edges, and use deep blue sparingly. Add texture, frost, and a cold, stiff presence to finish the story. With practice, DIY Frostbite Makeup can make any winter character look truly, chillingly frozen.